
Wi-Fi Enabled IoT Device with Arduino Nano RP2040 Connect and Power Boost Converter
View and Edit Project In Cirkit Designer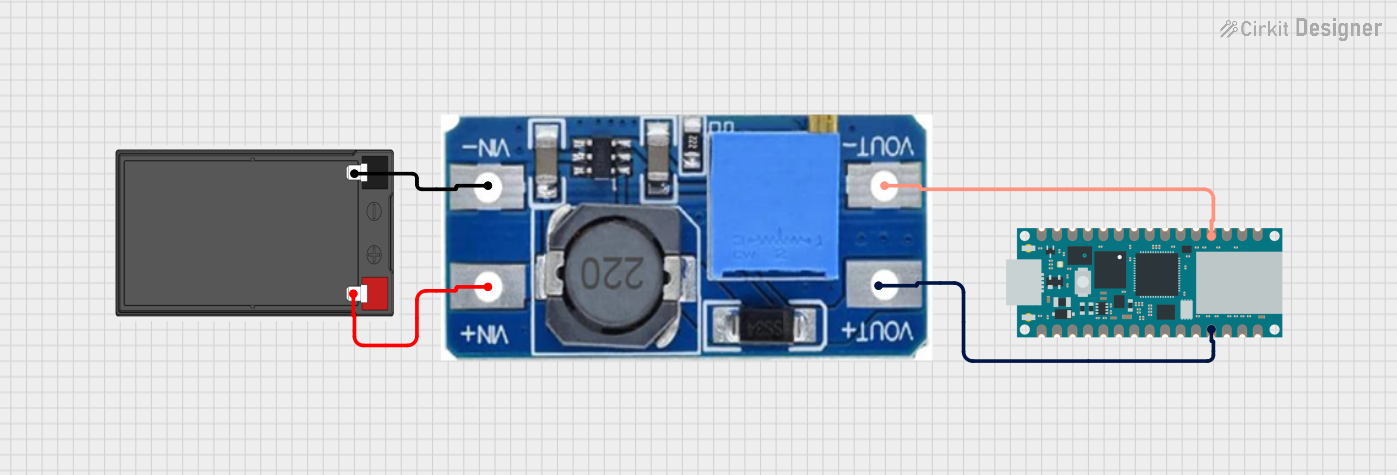
Circuit Documentation
Summary of the Circuit
This circuit is designed to utilize an Arduino Nano RP2040 Connect as the central microcontroller, powered by a battery through a Step Up Boost Power Converter. The power converter adjusts the voltage from the battery to a suitable level for the Arduino. The Arduino Nano RP2040 Connect is programmed to scan data using its built-in components, such as sensors and communication modules, and transmit this data to the Arduino Cloud.
Component List
Arduino Nano RP2040 Connect
- Description: A microcontroller board based on the RP2040 microcontroller, featuring built-in WiFi and Bluetooth connectivity, along with a variety of digital and analog pins.
- Purpose: Acts as the central processing unit of the circuit, handling data acquisition, processing, and communication with the Arduino Cloud.
Battery
- Description: A power source for the circuit.
- Purpose: Provides the necessary power to the circuit when not connected to an external power supply.
Step Up Boost Power Converter, Adjustable Voltage Regulator
- Description: A module that steps up the voltage from the battery to a higher, regulated output voltage.
- Purpose: Converts the battery's voltage to a level that is suitable for powering the Arduino Nano RP2040 Connect.
Wiring Details
Arduino Nano RP2040 Connect
- +5V: Connected to the VOUT+ of the Step Up Boost Power Converter.
- GND: Connected to the VOUT- of the Step Up Boost Power Converter.
Battery
- +: Connected to the VIN+ of the Step Up Boost Power Converter.
- -: Connected to the VIN- of the Step Up Boost Power Converter.
Step Up Boost Power Converter, Adjustable Voltage Regulator
- VIN+: Connected to the positive terminal of the battery.
- VIN-: Connected to the negative terminal of the battery.
- VOUT+: Connected to the +5V pin of the Arduino Nano RP2040 Connect.
- VOUT-: Connected to the GND pin of the Arduino Nano RP2040 Connect.
Documented Code
/*
 * Arduino Nano RP2040 Connect Project
 * This sketch scans data using built-in components and transmits it to the
 * Arduino Cloud. The built-in components include sensors and communication
 * modules available on the Arduino Nano RP2040 Connect.
 */

#include <Arduino_ConnectionHandler.h>
#include <ArduinoIoTCloud.h>
#include <WiFiConnectionManager.h>

const char SSID[]     = "yourSSID"; // network SSID
const char PASS[]     = "yourPASSWORD"; // network password

void setup() {
  // Initialize serial communication
  Serial.begin(9600);
  while (!Serial);

  // Initialize WiFi connection
  WiFiConnectionManager connectionManager(SSID, PASS);
  ArduinoCloud.begin(ArduinoIoTPreferredConnection);

  // Wait for connection to Arduino Cloud
  while (ArduinoCloud.status() != ARDUINO_CLOUD_CONNECTED) {
    Serial.print('.');
    delay(500);
  }
  Serial.println("Connected to Arduino Cloud");

  // Initialize built-in components
  // Add initialization code for sensors and other components here
}

void loop() {
  // Update Arduino Cloud
  ArduinoCloud.update();

  // Scan data from built-in components
  // code to read data from sensors and other components here

  // Transmit data to Arduino Cloud
  // code to send data to the cloud here

  delay(1000); // Adjust delay as needed
}
This code is designed to run on the Arduino Nano RP2040 Connect. It initializes the board's serial communication, connects to a WiFi network, and then connects to the Arduino Cloud. The setup() function is responsible for initializing the board and its components, while the loop() function is responsible for regularly updating the Arduino Cloud with data scanned from the built-in components. The actual sensor reading and data transmission code need to be added where indicated by the comments.