
Arduino UNO and 74HC14-Based Button-Controlled LED Circuit with Battery Power
View and Edit Project In Cirkit Designer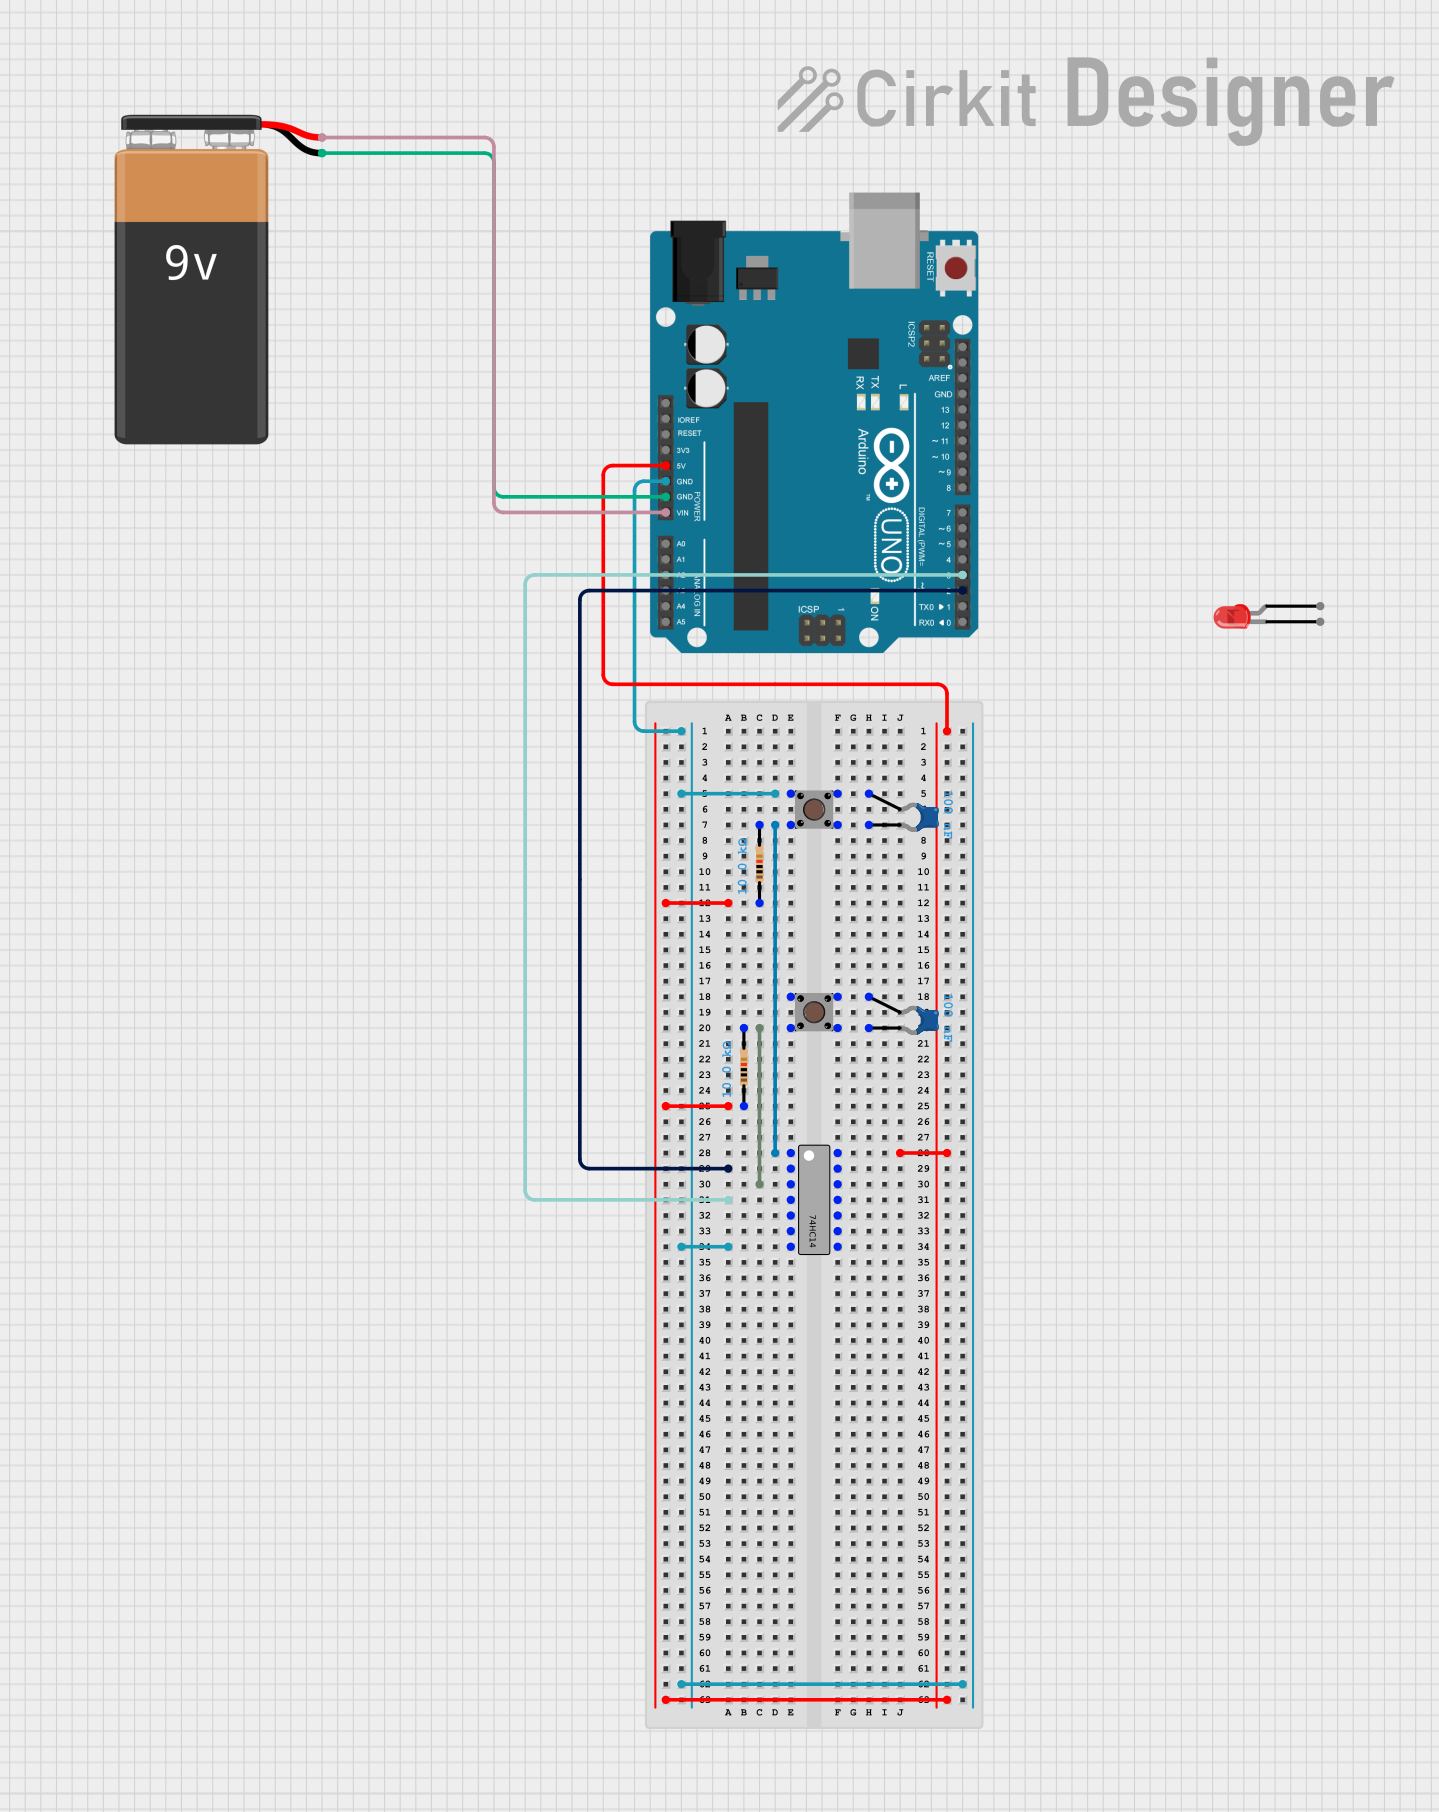
Circuit Documentation
Summary
This circuit involves an Arduino UNO microcontroller, a 74HC14 Schmitt Trigger, pushbuttons, resistors, capacitors, an LED, and a 9V battery. The Arduino UNO is powered by the 9V battery and controls the circuit, which includes debouncing pushbuttons and driving an LED.
Component List
74HC14
- Description: Schmitt Trigger
- Pins: A1, Y1, A2, Y2, A3, Y3, GND, VCC, A6, Y6, A5, Y5, A4, Y4
Arduino UNO
- Description: Microcontroller
- Pins: UNUSED, IOREF, Reset, 3.3V, 5V, GND, Vin, A0, A1, A2, A3, A4, A5, SCL, SDA, AREF, D13, D12, D11, D10, D9, D8, D7, D6, D5, D4, D3, D2, D1, D0
LED: Two Pin (red)
- Description: Red LED
- Pins: cathode, anode
Pushbutton
- Description: Pushbutton
- Pins: Pin 3 (out), Pin 4 (out), Pin 1 (in), Pin 2 (in)
Resistor
- Description: Resistor
- Pins: pin1, pin2
- Properties: Resistance: 10k Ohms
Ceramic Capacitor
- Description: Capacitor
- Pins: pin0, pin1
- Properties: Capacitance: 0.1 µF
9V Battery
- Description: Battery
- Pins: -, +
Wiring Details
74HC14
- VCC: Connected to Arduino UNO 5V and Resistor pin1
- GND: Connected to Arduino UNO GND and Pushbutton Pin 2 (in)
- Y2: Connected to Arduino UNO D3
- Y1: Connected to Arduino UNO D2
- A1: Connected to Pushbutton Pin 4 (out) and Resistor pin2
- A2: Connected to Pushbutton Pin 1 (in) and Resistor pin2
Arduino UNO
- 5V: Connected to 74HC14 VCC and Resistor pin1
- GND: Connected to 74HC14 GND, Pushbutton Pin 2 (in), and 9V Battery -
- Vin: Connected to 9V Battery +
- D3: Connected to 74HC14 Y2
- D2: Connected to 74HC14 Y1
LED: Two Pin (red)
- cathode: Not connected
- anode: Not connected
Pushbutton
- Pin 2 (in): Connected to Arduino UNO GND and 74HC14 GND
- Pin 4 (out): Connected to 74HC14 A1 and Resistor pin2
- Pin 1 (in): Connected to Resistor pin2 and 74HC14 A2
- Pin 3 (out): Connected to Ceramic Capacitor pin1
Pushbutton
- Pin 2 (in): Connected to Ceramic Capacitor pin1
- Pin 4 (out): Connected to Ceramic Capacitor pin0
- Pin 1 (in): Connected to Ceramic Capacitor pin0
- Pin 3 (out): Not connected
Resistor
- pin1: Connected to Arduino UNO 5V and 74HC14 VCC
- pin2: Connected to Pushbutton Pin 4 (out) and 74HC14 A1
Resistor
- pin1: Connected to Arduino UNO 5V and 74HC14 VCC
- pin2: Connected to Pushbutton Pin 1 (in) and 74HC14 A2
Ceramic Capacitor
- pin0: Connected to Pushbutton Pin 1 (in) and Pushbutton Pin 4 (out)
- pin1: Connected to Pushbutton Pin 3 (out) and Pushbutton Pin 2 (in)
Ceramic Capacitor
- pin0: Connected to Pushbutton Pin 1 (in) and Pushbutton Pin 4 (out)
- pin1: Connected to Pushbutton Pin 2 (in) and Pushbutton Pin 3 (out)
9V Battery
- -: Connected to Arduino UNO GND
- +: Connected to Arduino UNO Vin
Code Documentation
Arduino UNO Code
void setup() {
  // put your setup code here, to run once:
  Serial.begin(9600);
  Serial.println("Setup");
}

void loop() {
  // put your main code here, to run repeatedly:
}
This code initializes the serial communication at a baud rate of 9600 in the setup() function and prints "Setup" to the serial monitor. The loop() function is currently empty and can be filled with the main logic to be executed repeatedly.