
Arduino UNO-Based Multi-Button Input System with Limit Switch
View and Edit Project In Cirkit Designer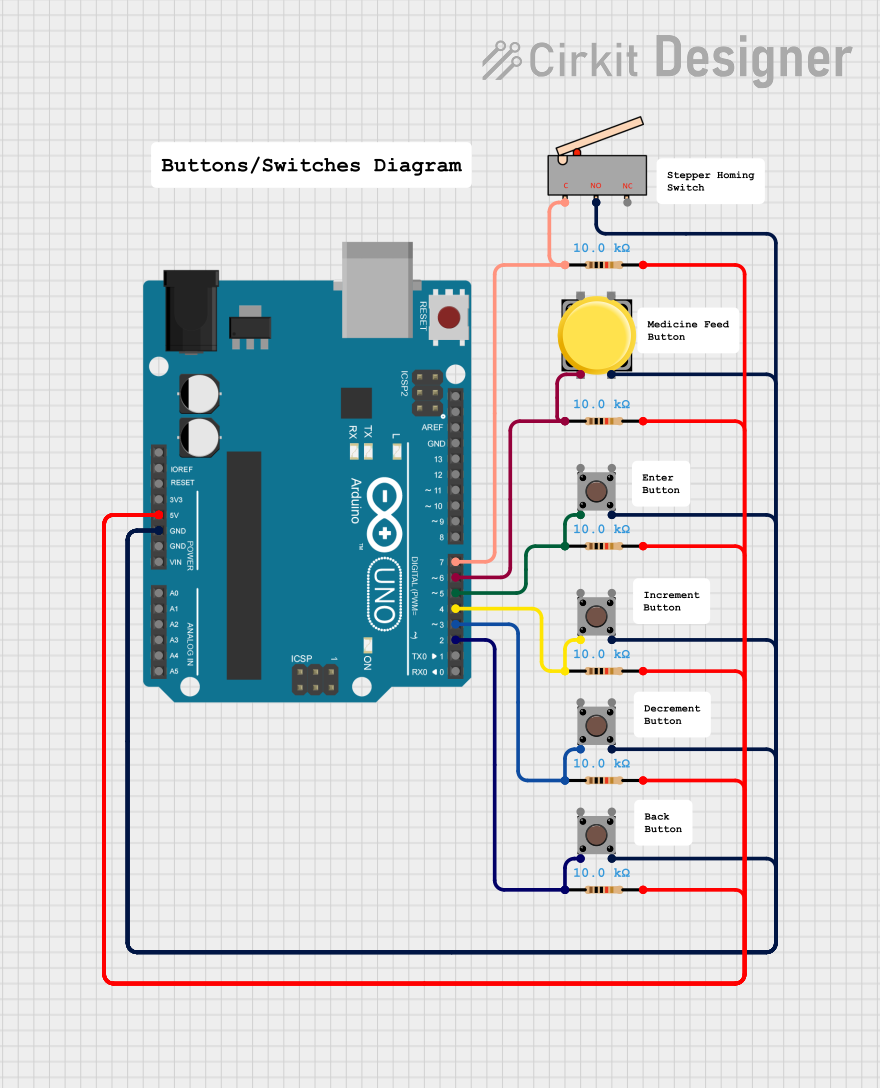
Circuit Documentation
Summary
This circuit involves an Arduino UNO microcontroller interfacing with multiple pushbuttons, limit switches, and resistors. The circuit is designed to read inputs from the pushbuttons and limit switches, which are connected to various digital pins on the Arduino. The resistors are used as pull-down resistors to ensure proper logic levels at the input pins.
Component List
Pushbutton
- Pins: Pin 2, Pin 1, Pin 3, Pin 4
Pushbutton
- Pins: Pin 3 (out), Pin 4 (out), Pin 1 (in), Pin 2 (in)
Limit switch
- Pins: C, NO, NC
Arduino UNO
- Pins: UNUSED, IOREF, Reset, 3.3V, 5V, GND, Vin, A0, A1, A2, A3, A4, A5, SCL, SDA, AREF, D13, D12, D11, D10, D9, D8, D7, D6, D5, D4, D3, D2, D1, D0
Resistor
- Pins: pin1, pin2
- Properties: Resistance = 10000 Ohms
Comment
- No pins
Wiring Details
Pushbutton
- Pin 2 connected to Arduino UNO D6 and Resistor pin1
- Pin 4 connected to Arduino UNO GND
Pushbutton
- Pin 2 (in) connected to Arduino UNO D2 and Resistor pin1
- Pin 4 (out) connected to Arduino UNO GND
Pushbutton
- Pin 2 (in) connected to Arduino UNO D3 and Resistor pin1
- Pin 4 (out) connected to Arduino UNO GND
Pushbutton
- Pin 2 (in) connected to Arduino UNO D4 and Resistor pin1
- Pin 4 (out) connected to Arduino UNO GND
Pushbutton
- Pin 2 (in) connected to Arduino UNO D5 and Resistor pin1
- Pin 4 (out) connected to Arduino UNO GND
Pushbutton
- Pin 2 (in) connected to Arduino UNO D6 and Resistor pin1
- Pin 4 (out) connected to Arduino UNO GND
Limit switch
- C connected to Arduino UNO D7 and Resistor pin1
- NO connected to Arduino UNO GND
Resistor
- pin1 connected to Arduino UNO D2 and Pushbutton Pin 2 (in)
- pin2 connected to Arduino UNO 5V
Resistor
- pin1 connected to Arduino UNO D3 and Pushbutton Pin 2 (in)
- pin2 connected to Arduino UNO 5V
Resistor
- pin1 connected to Arduino UNO D4 and Pushbutton Pin 2 (in)
- pin2 connected to Arduino UNO 5V
Resistor
- pin1 connected to Arduino UNO D5 and Pushbutton Pin 2 (in)
- pin2 connected to Arduino UNO 5V
Resistor
- pin1 connected to Arduino UNO D6 and Pushbutton Pin 2 (in)
- pin2 connected to Arduino UNO 5V
Resistor
- pin1 connected to Arduino UNO D7 and Limit switch C
- pin2 connected to Arduino UNO 5V
Documented Code
Arduino UNO Code
void setup() {
  // put your setup code here, to run once:

}

void loop() {
  // put your main code here, to run repeatedly:

}
This code initializes the Arduino UNO but does not contain any specific logic for handling the inputs from the pushbuttons or limit switches. You can add your custom logic in the setup() and loop() functions to handle the inputs and perform desired actions.