
Arduino Nano and ESP32-Based Smart Irrigation System with Soil Moisture and DHT11 Sensors
View and Edit Project In Cirkit Designer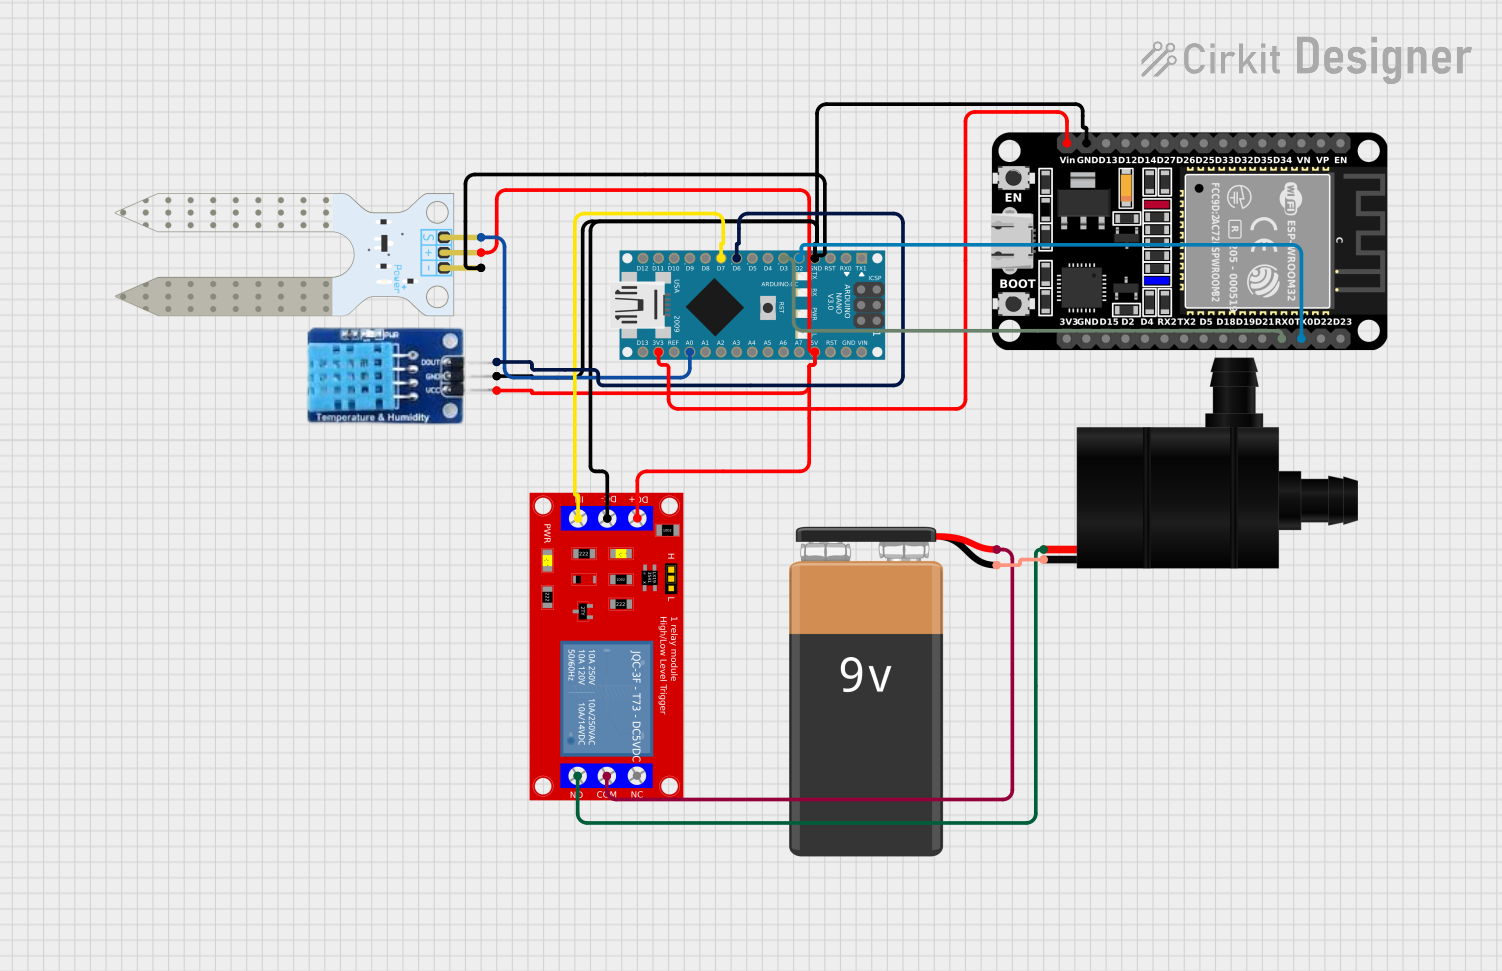
Circuit Documentation
Summary
This circuit is designed to monitor soil moisture levels and control a water pump to automatically water plants. It uses an Arduino Nano to read data from a soil moisture sensor and a DHT11 temperature and humidity sensor. Based on the soil moisture level, the Arduino controls a relay module to turn the water pump on or off. An ESP32 is also included for potential wireless communication or additional processing.
Component List
Arduino Nano
- Description: A small, complete, and breadboard-friendly board based on the ATmega328P.
- Pins: D1/TX, D0/RX, RESET, GND, D2, D3, D4, D5, D6, D7, D8, D9, D10, D11/MOSI, D12/MISO, VIN, 5V, A7, A6, A5, A4, A3, A2, A1, A0, AREF, 3V3, D13/SCK
Soil Moisture Sensor
- Description: Measures the volumetric content of water in soil.
- Pins: VCC, GND, SIG
1 Channel 5V Relay Module
- Description: Allows the Arduino to control high voltage devices like a water pump.
- Pins: VCC+, VCC- (GND), IN, N.O., COM, N.C.
Water Pump
- Description: A small pump used to water plants.
- Pins: VCC, GND
DHT11
- Description: A sensor for measuring temperature and humidity.
- Pins: DATA, GND, VCC
9V Battery
- Description: Provides power to the water pump.
- Pins: -, +
ESP32 (30 pin)
- Description: A low-cost, low-power system on a chip with Wi-Fi and Bluetooth capabilities.
- Pins: EN, VP, VN, D34, D35, D32, D33, D25, D26, D27, D14, D12, D13, GND, Vin, D23, D22, TX0, RX0, D21, D19, D18, D5, TX2, RX2, D4, D2, D15, 3V3
Wiring Details
Arduino Nano
- GND: Connected to GND of DHT11, ESP32, Relay Module, and Soil Moisture Sensor.
- D2: Connected to TX0 of ESP32.
- D3: Connected to RX0 of ESP32.
- D6: Connected to DATA of DHT11.
- D7: Connected to IN of Relay Module.
- 5V: Connected to VCC of DHT11, Relay Module, and Soil Moisture Sensor.
- A0: Connected to SIG of Soil Moisture Sensor.
- 3V3: Connected to Vin of ESP32.
Soil Moisture Sensor
- VCC: Connected to 5V of Arduino Nano.
- GND: Connected to GND of Arduino Nano.
- SIG: Connected to A0 of Arduino Nano.
1 Channel 5V Relay Module
- VCC+: Connected to 5V of Arduino Nano.
- VCC- (GND): Connected to GND of Arduino Nano.
- IN: Connected to D7 of Arduino Nano.
- N.O.: Connected to VCC of Water Pump.
- COM: Connected to + of 9V Battery.
Water Pump
- VCC: Connected to N.O. of Relay Module.
- GND: Connected to - of 9V Battery.
DHT11
- DATA: Connected to D6 of Arduino Nano.
- GND: Connected to GND of Arduino Nano.
- VCC: Connected to 5V of Arduino Nano.
9V Battery
- +: Connected to COM of Relay Module.
- -: Connected to GND of Water Pump.
ESP32 (30 pin)
- GND: Connected to GND of Arduino Nano.
- TX0: Connected to D2 of Arduino Nano.
- RX0: Connected to D3 of Arduino Nano.
- Vin: Connected to 3V3 of Arduino Nano.
Code Documentation
#include <DHT.h>

#define DHTPIN 6           // DHT11 data pin connected to pin D6
#define DHTTYPE DHT11      // DHT11 sensor
#define RELAY_PIN 7        // Relay control pin
#define MOISTURE_SENSOR A0 // Soil moisture sensor analog pin

DHT dht(DHTPIN, DHTTYPE);

void setup() {
  pinMode(RELAY_PIN, OUTPUT);
  pinMode(MOISTURE_SENSOR, INPUT);

  Serial.begin(9600);
  dht.begin();
}

void loop() {
  int moistureLevel = analogRead(MOISTURE_SENSOR);  // Read soil moisture level
  float humidity = dht.readHumidity();              // Read humidity
  float temperature = dht.readTemperature();        // Read temperature

  int threshold = 500;  // Moisture threshold

  // Print sensor data to Serial Monitor
  Serial.print("Soil Moisture Level: ");
  Serial.println(moistureLevel);
  Serial.print("Humidity: ");
  Serial.print(humidity);
  Serial.println("%");
  Serial.print("Temperature: ");
  Serial.print(temperature);
  Serial.println("°C");

  // Check if soil is dry, activate water pump
  if (moistureLevel < threshold) {
    digitalWrite(RELAY_PIN, HIGH);  // Turn on water pump
    Serial.println("Watering the plants...");
  } else {
    digitalWrite(RELAY_PIN, LOW);   // Turn off water pump
    Serial.println("Soil moisture is sufficient.");
  }

  delay(2000);  // Wait before taking next reading
}
This code initializes the DHT11 sensor and sets up the pins for the relay and soil moisture sensor. In the loop, it reads the soil moisture level, humidity, and temperature, and prints these values to the Serial Monitor. If the soil moisture level is below a certain threshold, it activates the relay to turn on the water pump. Otherwise, it turns off the water pump. The loop repeats every 2 seconds.