
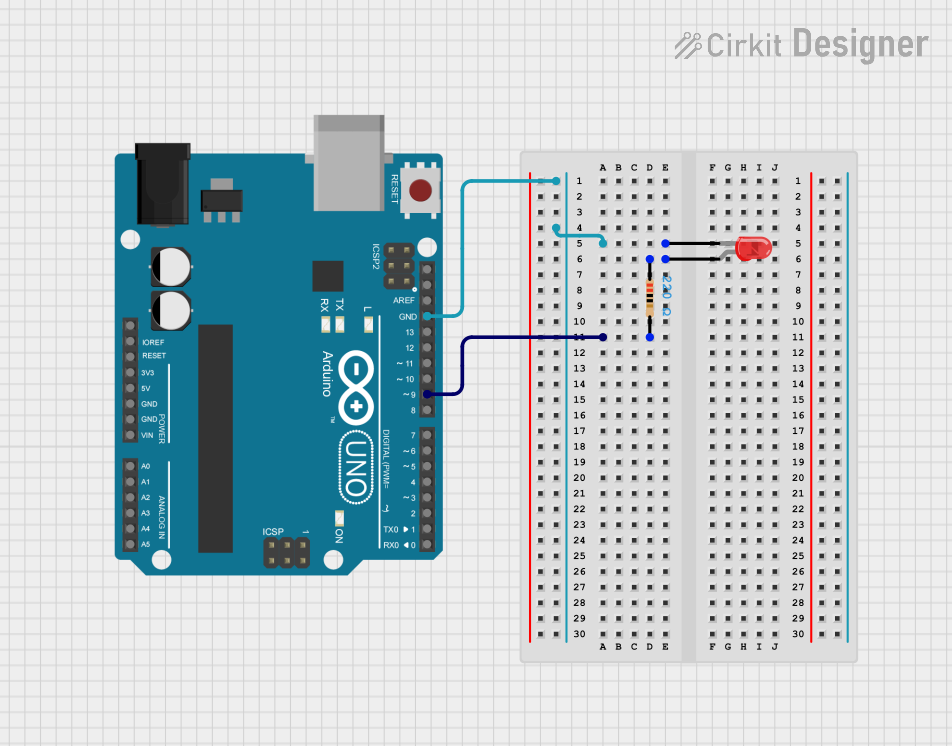
Circuit Documentation
Summary
This circuit consists of an Arduino UNO microcontroller, a red LED, and a 220 Ohm resistor. The Arduino UNO controls the LED based on serial input commands. When the command "on" is received, the LED lights up; otherwise, it remains off.
Component List
Arduino UNO
- Description: A microcontroller board based on the ATmega328P.
- Pins: UNUSED, IOREF, Reset, 3.3V, 5V, GND, Vin, A0, A1, A2, A3, A4, A5, SCL, SDA, AREF, D13, D12, D11, D10, D9, D8, D7, D6, D5, D4, D3, D2, D1, D0
LED: Two Pin (red)
- Description: A red light-emitting diode.
- Pins: cathode, anode
Resistor
- Description: A resistor with a resistance of 220 Ohms.
- Pins: pin1, pin2
- Properties:
- Resistance: 220 Ohms
Wiring Details
Arduino UNO
- GND: Connected to the cathode of the LED.
- D9: Connected to pin2 of the resistor.
LED: Two Pin (red)
- cathode: Connected to GND of the Arduino UNO.
- anode: Connected to pin1 of the resistor.
Resistor
- pin1: Connected to the anode of the LED.
- pin2: Connected to D9 of the Arduino UNO.
Code Documentation
Arduino UNO Code
void setup(){
  pinMode(9, OUTPUT);
  Serial.begin(9600);
}

void loop()
{
  if (Serial.available()>0){
    String data = Serial.readStringUntil('\n');
    Serial.println(data);
    if (data=="on"){
        digitalWrite(9,HIGH);
    }
    else{
      digitalWrite(9,LOW);
    }
  }
}
Explanation:
- setup(): Initializes pin 9 as an output and starts serial communication at 9600 baud.
- loop(): Continuously checks for serial input. If data is available, it reads the input string until a newline character. If the input string is "on", it sets pin 9 to HIGH, turning on the LED. Otherwise, it sets pin 9 to LOW, turning off the LED.