
Raspberry Pi Controlled LED Indicator with Pushbutton Interface
View and Edit Project In Cirkit Designer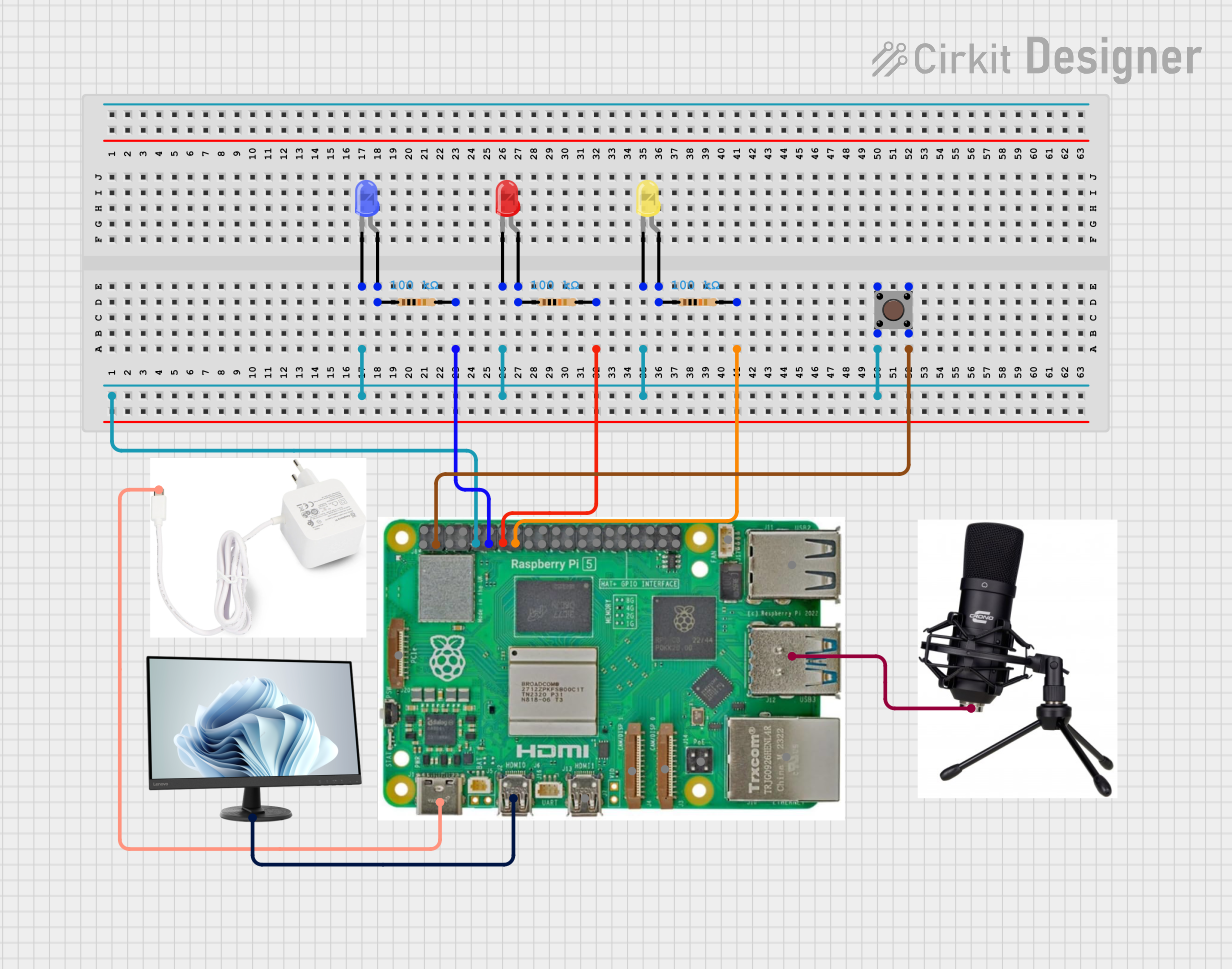
Circuit Documentation
Summary
This document provides a detailed overview of a circuit that includes various components such as resistors, LEDs, a pushbutton, a Raspberry Pi 5, a microphone, a power supply, and a monitor. The circuit is designed to interface with a Raspberry Pi 5, which controls the LEDs and receives input from a pushbutton. The Raspberry Pi is powered by a power supply and outputs video to a monitor. Additionally, a microphone is connected to the Raspberry Pi for audio input.
Component List
Resistor (100k Ohms)
- Pins: pin1, pin2
- Description: Standard resistor with a resistance of 100k Ohms.
Pushbutton
- Pins: Pin 1 (in), Pin 2 (in), Pin 3 (out), Pin 4 (out)
- Description: A pushbutton switch with four pins.
LED: Two Pin (red)
- Pins: cathode, anode
- Description: A red LED with two pins.
LED: Two Pin (blue)
- Pins: cathode, anode
- Description: A blue LED with two pins.
LED: Two Pin (yellow)
- Pins: cathode, anode
- Description: A yellow LED with two pins.
Raspberry Pi 5
- Pins: Type-C, Micro HDMI 1, Micro HDMI 2, Camera 1, Camera 2, PoE, Fan, PCIe, USB 3.0, USB 2.0, Ethernet, 5V, GND, 3.3v, GPIO 14, GPIO 15, GPIO 18, GPIO 23, GPIO 24, GPIO 25, GPIO 8, GPIO 7, GPIO 1, GPIO 12, GPIO 16, GPIO 20, GPIO 21, GPIO 2, GPIO 3, GPIO 4, GPIO 17, GPIO 27, GPIO 22, GPIO 10, GPIO 9, GPIO 11, GPIO 0, GPIO 5, GPIO 6, GPIO 13, GPIO 19, GPIO 26
- Description: A single-board computer with multiple GPIO pins and various interfaces.
Microphone
- Pins: usb
- Description: A USB microphone.
Power Supply
- Pins: usb c
- Description: A power supply with a USB-C connector.
Monitor
- Pins: hdmi
- Description: A monitor with an HDMI input.
Wiring Details
Resistor (100k Ohms)
Resistor 1
- pin1: Connected to the anode of the blue LED.
- pin2: Connected to GPIO 17 of the Raspberry Pi 5.
Resistor 2
- pin1: Connected to the anode of the yellow LED.
- pin2: Connected to GPIO 22 of the Raspberry Pi 5.
Resistor 3
- pin1: Connected to the anode of the red LED.
- pin2: Connected to GPIO 27 of the Raspberry Pi 5.
Pushbutton
- Pin 1 (in): Connected to the common cathode of the LEDs and GND of the Raspberry Pi 5.
- Pin 2 (in): Connected to the common cathode of the LEDs and GND of the Raspberry Pi 5.
- Pin 3 (out): Connected to GPIO 2 of the Raspberry Pi 5.
- Pin 4 (out): Connected to GPIO 2 of the Raspberry Pi 5.
LED: Two Pin (red)
- cathode: Connected to the common cathode of the LEDs and GND of the Raspberry Pi 5.
- anode: Connected to pin1 of Resistor 3.
LED: Two Pin (blue)
- cathode: Connected to the common cathode of the LEDs and GND of the Raspberry Pi 5.
- anode: Connected to pin1 of Resistor 1.
LED: Two Pin (yellow)
- cathode: Connected to the common cathode of the LEDs and GND of the Raspberry Pi 5.
- anode: Connected to pin1 of Resistor 2.
Raspberry Pi 5
- GND: Connected to the common cathode of the LEDs and Pin 1 (in) and Pin 2 (in) of the pushbutton.
- GPIO 17: Connected to pin2 of Resistor 1.
- GPIO 22: Connected to pin2 of Resistor 2.
- GPIO 27: Connected to pin2 of Resistor 3.
- GPIO 2: Connected to Pin 3 (out) and Pin 4 (out) of the pushbutton.
- Type-C: Connected to the USB-C connector of the power supply.
- Micro HDMI 1: Connected to the HDMI input of the monitor.
- USB 3.0: Connected to the USB connector of the microphone.
Microphone
- usb: Connected to USB 3.0 of the Raspberry Pi 5.
Power Supply
- usb c: Connected to the Type-C connector of the Raspberry Pi 5.
Monitor
- hdmi: Connected to Micro HDMI 1 of the Raspberry Pi 5.
Code
No code is provided for this circuit.