
Arduino UNO-Based Fire Detection and Response System with Flame Sensors and Motor Control
View and Edit Project In Cirkit Designer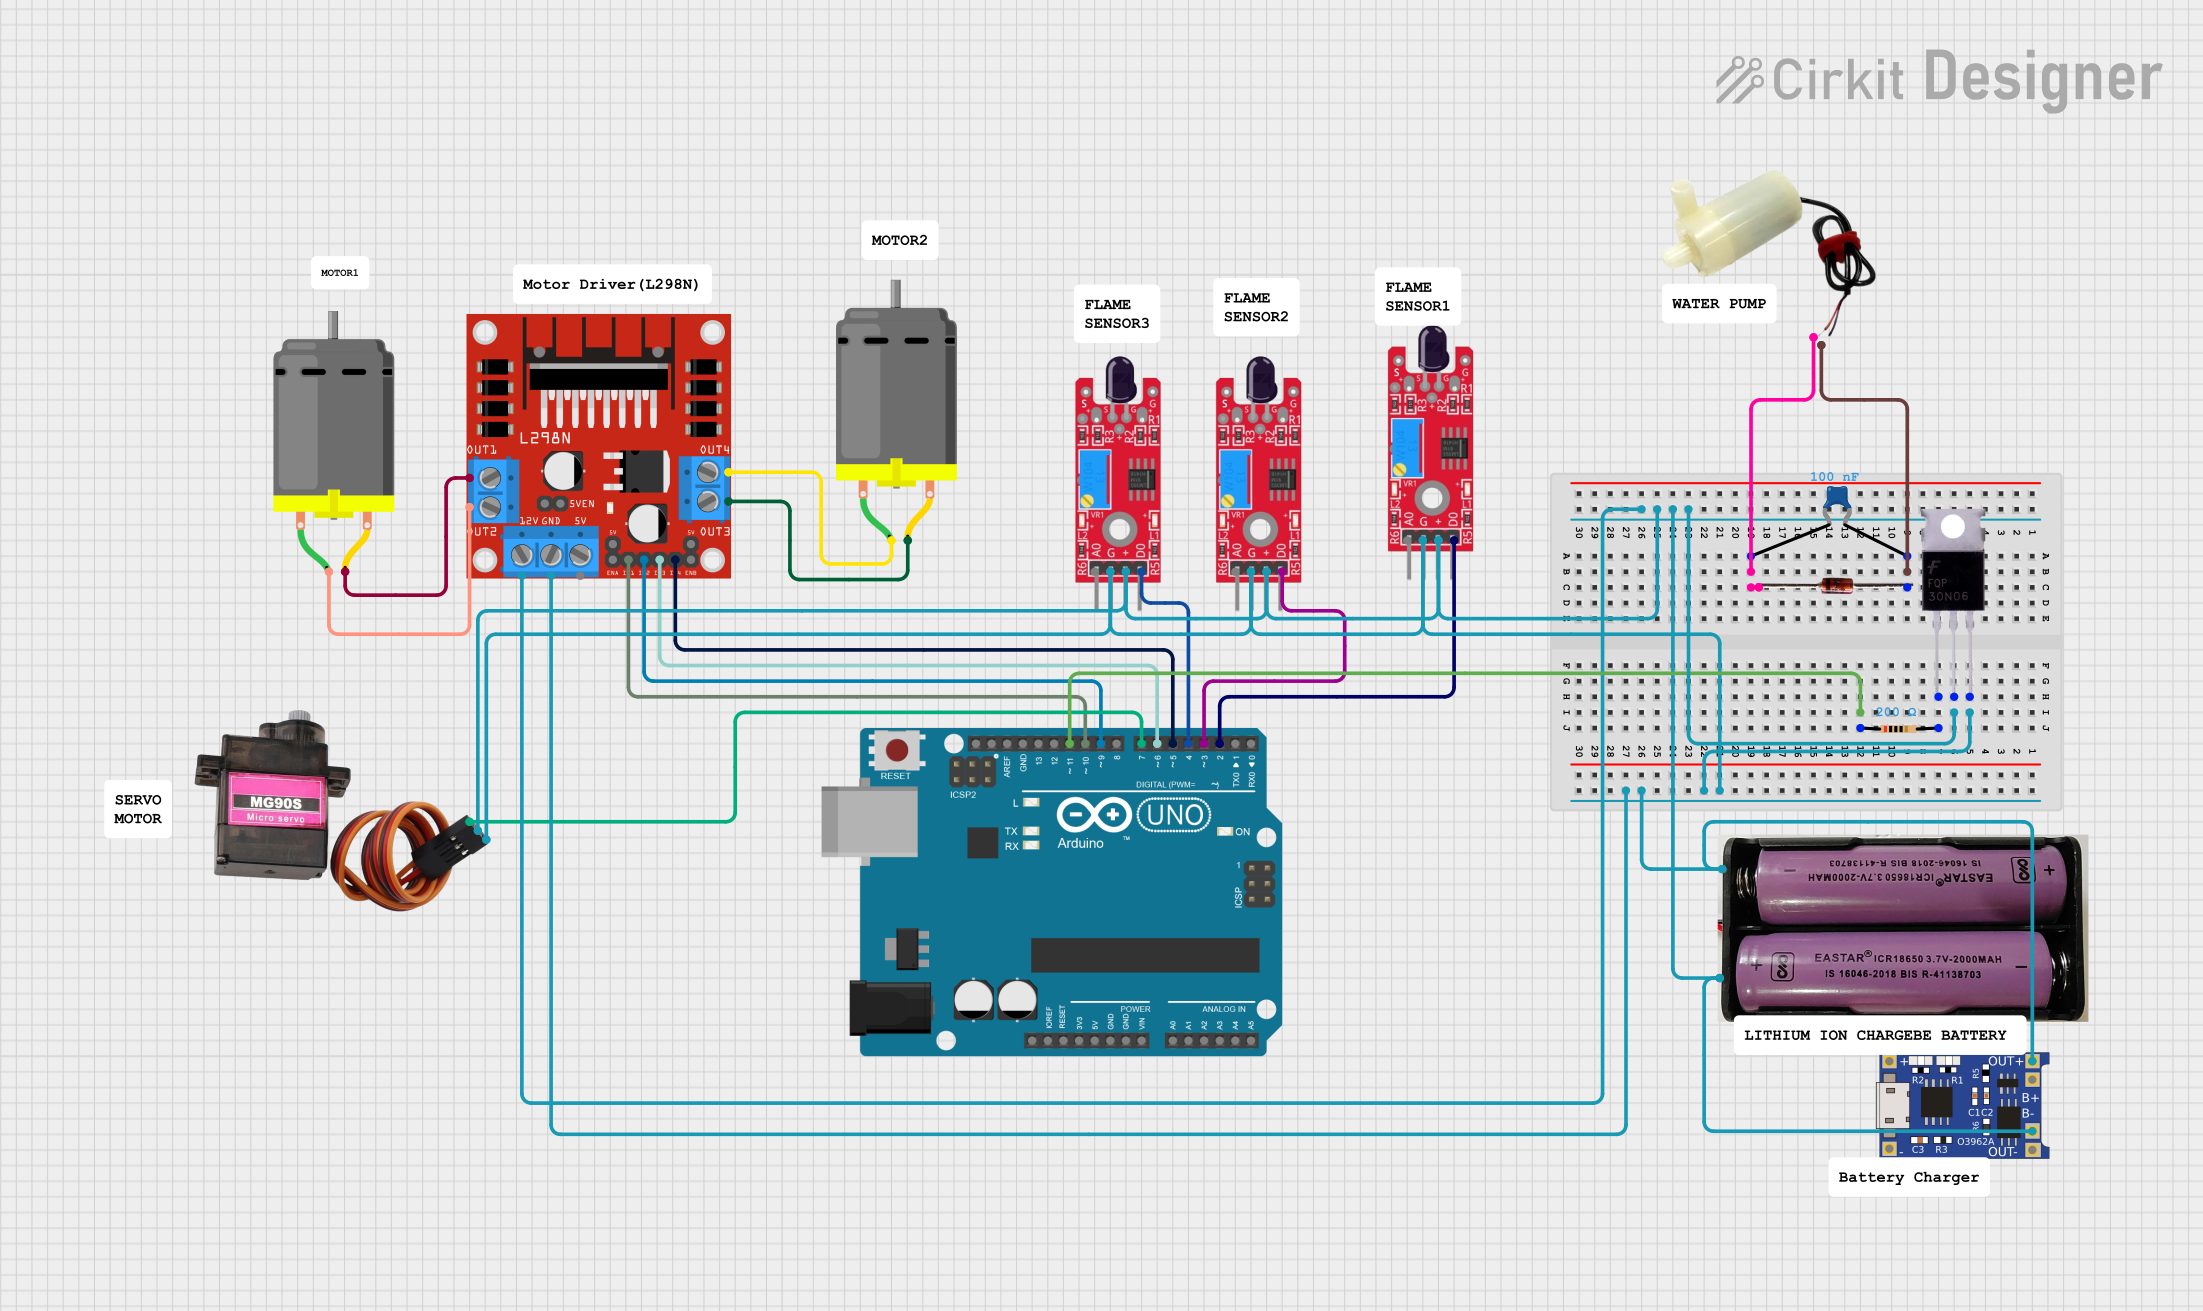
Circuit Documentation
Summary
This circuit involves an Arduino UNO microcontroller interfacing with multiple sensors, motors, and other components. The primary components include flame sensors, a DC motor driver, DC motors, a servo motor, a water pump, a MOSFET, a TP4056 battery charger, a Zener diode, a ceramic capacitor, and a resistor. The circuit is designed to detect flames and control motors and a water pump accordingly.
Component List
Arduino UNO
- Description: Microcontroller board based on the ATmega328P.
- Pins: UNUSED, IOREF, Reset, 3.3V, 5V, GND, Vin, A0, A1, A2, A3, A4, A5, SCL, SDA, AREF, D13, D12, D11, D10, D9, D8, D7, D6, D5, D4, D3, D2, D1, D0
KY-026 Flame Sensor
- Description: Flame sensor module.
- Pins: AO, GND, VCC, DO
DC Motor
- Description: Standard DC motor.
- Pins: pin 1, pin 2
TP4056
- Description: Lithium battery charger module.
- Pins: OUT-, B-, B+, OUT+, IN-, IN+
MG90S
- Description: Micro servo motor.
- Pins: SIG, VCC, GND
5V Mini Water Pump
- Description: Small water pump.
- Pins: positive pin, negative pin
7.4V Battery
- Description: 7.4V battery.
- Pins: +, -
Mosfet
- Description: Metal-Oxide-Semiconductor Field-Effect Transistor.
- Pins: Gate, Drain, Source
L298N DC Motor Driver
- Description: Dual H-Bridge motor driver.
- Pins: OUT1, OUT2, 12V, GND, 5V, OUT3, OUT4, 5V-ENA-JMP-I, 5V-ENA-JMP-O, +5V-J1, +5V-J2, ENA, IN1, IN2, IN3, IN4, ENB
Resistor
- Description: 200 Ohms resistor.
- Pins: pin1, pin2
12V Zener Diode
- Description: Zener diode with 12V breakdown voltage.
- Pins: Anode, Cathode
Ceramic Capacitor
- Description: 0.1µF ceramic capacitor.
- Pins: pin0, pin1
Wiring Details
Arduino UNO
- D11 connected to Resistor pin1
- D10 connected to L298N DC Motor Driver IN1
- D9 connected to L298N DC Motor Driver IN2
- D7 connected to MG90S SIG
- D6 connected to L298N DC Motor Driver IN3
- D5 connected to L298N DC Motor Driver IN4
- D4 connected to KY-026 Flame Sensor DO
- D3 connected to KY-026 Flame Sensor DO
- D2 connected to KY-026 Flame Sensor DO
KY-026 Flame Sensor
- GND connected to Mosfet Source
- GND connected to TP4056 OUT+
- GND connected to 7.4V Battery -
- GND connected to L298N DC Motor Driver GND
- VCC connected to Mosfet Drain
- VCC connected to TP4056 B-
- VCC connected to 7.4V Battery +
- VCC connected to L298N DC Motor Driver 12V
- DO connected to Arduino UNO D4
- DO connected to Arduino UNO D3
- DO connected to Arduino UNO D2
DC Motor
- pin 1 connected to L298N DC Motor Driver OUT2
- pin 2 connected to L298N DC Motor Driver OUT1
- pin 1 connected to L298N DC Motor Driver OUT4
- pin 2 connected to L298N DC Motor Driver OUT3
TP4056
- OUT+ connected to Mosfet Source
- B- connected to Mosfet Drain
MG90S
- GND connected to Mosfet Source
- VCC connected to Mosfet Drain
- SIG connected to Arduino UNO D7
5V Mini Water Pump
- negative pin connected to 12V Zener Diode Anode
- positive pin connected to Ceramic Capacitor pin0
7.4V Battery
- - connected to Mosfet Source
- + connected to Mosfet Drain
Mosfet
- Source connected to KY-026 Flame Sensor GND
- Source connected to TP4056 OUT+
- Source connected to 7.4V Battery -
- Source connected to L298N DC Motor Driver GND
- Drain connected to TP4056 B-
- Drain connected to 7.4V Battery +
- Gate connected to Resistor pin2
L298N DC Motor Driver
- GND connected to Mosfet Source
- 12V connected to Mosfet Drain
- IN1 connected to Arduino UNO D10
- IN2 connected to Arduino UNO D9
- IN3 connected to Arduino UNO D6
- IN4 connected to Arduino UNO D5
- OUT1 connected to DC Motor pin 2
- OUT2 connected to DC Motor pin 1
- OUT3 connected to DC Motor pin 2
- OUT4 connected to DC Motor pin 1
Resistor
- pin1 connected to Arduino UNO D11
- pin2 connected to Mosfet Gate
12V Zener Diode
- Anode connected to 5V Mini Water Pump negative pin
- Cathode connected to Ceramic Capacitor pin0
Ceramic Capacitor
- pin0 connected to 5V Mini Water Pump positive pin
- pin1 connected to 12V Zener Diode Anode
Code Documentation
Arduino UNO Code
void setup() {
  // put your setup code here, to run once:

}

void loop() {
  // put your main code here, to run repeatedly:

}
This code is a basic template for the Arduino UNO. The setup() function is used to initialize any settings or configurations, and the loop() function contains the main code that runs repeatedly. Currently, both functions are empty and need to be filled with the appropriate logic for the circuit's operation.