
Arduino Uno Smart Medicine Reminder with LCD Display and RTC
View and Edit Project In Cirkit Designer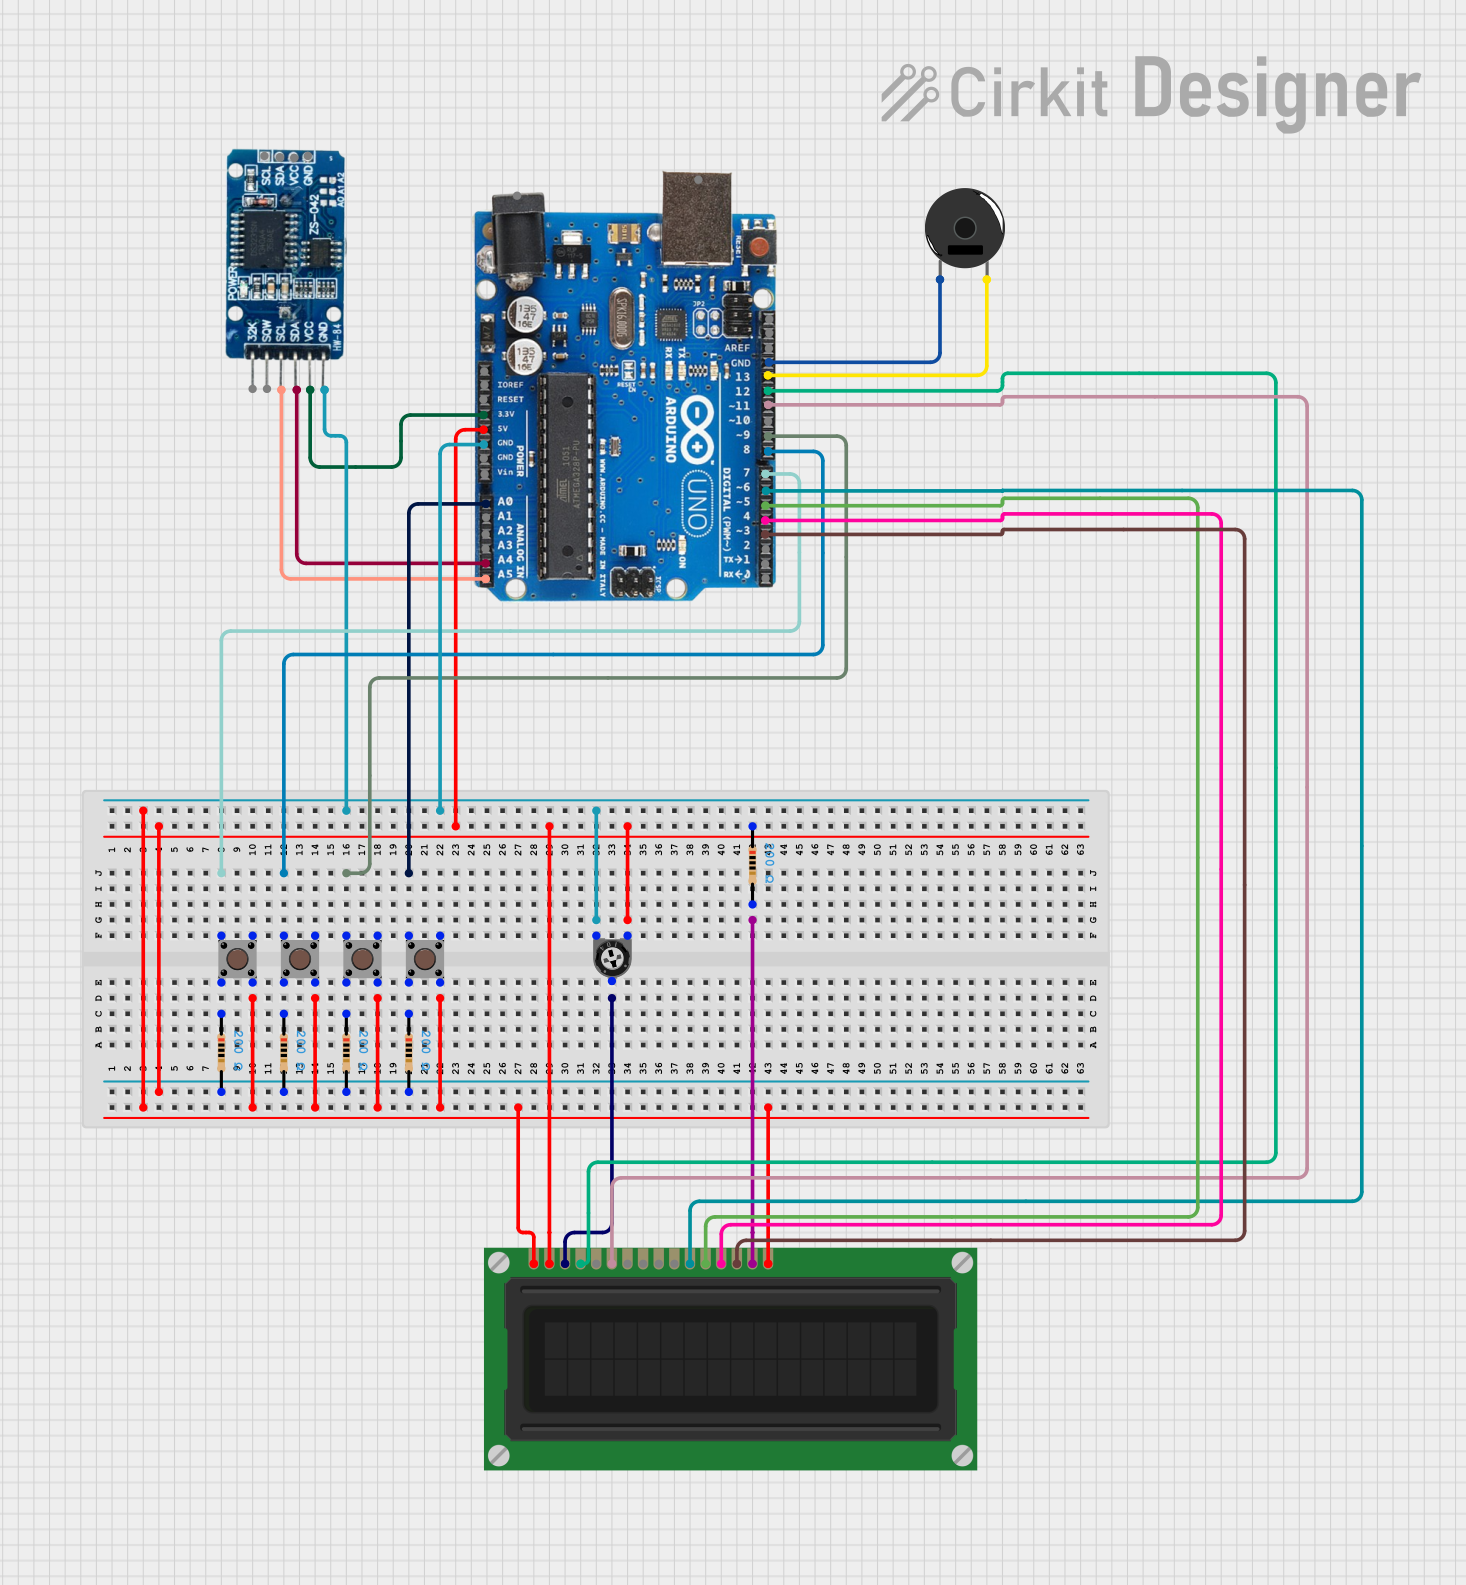
Smart Medicine Reminder Circuit Documentation
Summary
The Smart Medicine Reminder circuit is designed to help users remember to take their medicine at scheduled times. The circuit includes an Arduino Uno R3 microcontroller, an LCD display, an RTC module, push buttons, a piezo buzzer, resistors, and a trimmer potentiometer. The user can set the time, number of dosages, and the next medicine time using the push buttons. The LCD displays the current time and settings, while the buzzer alerts the user when it's time to take their medicine.
Component List
Pushbutton
- Description: A simple pushbutton used for user input.
- Pins: Pin 1 (in), Pin 2 (in), Pin 3 (out), Pin 4 (out)
RTC DS3231
- Description: Real-Time Clock module for keeping track of time.
- Pins: 32K, SQW, SCL, SDA, VCC, GND
Arduino Uno R3
- Description: Microcontroller board based on the ATmega328P.
- Pins: D0/RX, D1/Tx, D2, D3, D4, D5, D6, D7, D8, D9, D10, D11, D12, D13, A0, A1, A2, A3, A4/SDA, A5/SCL, GND, 5V, 3.3V, Vin, RESET, IOREF, USB Jack, Power Jack
Trimmer Potentiometer
- Description: Adjustable resistor used to control the contrast of the LCD.
- Pins: leg1, wiper, leg2
- Properties: Resistance: 10k Ohms
Piezo Buzzer
- Description: Buzzer used to alert the user.
- Pins: pin 1, pin 2
Resistor
- Description: Resistor used for current limiting.
- Pins: pin1, pin2
- Properties: Resistance: 200 Ohms
LCD Display (16 pin)
- Description: 16x2 character LCD display.
- Pins: VSS, VDD, VO, RS, R_W, E, DB0, DB1, DB2, DB3, DB4, DB5, DB6, DB7, A, K
Wiring Details
Pushbutton 1
- Pin 1 (in): Connected to Arduino Uno R3 pin D7
- Pin 2 (in): Connected to Resistor pin1
- Pin 4 (out): Connected to GND
Pushbutton 2
- Pin 1 (in): Connected to Arduino Uno R3 pin D8
- Pin 2 (in): Connected to Resistor pin1
- Pin 4 (out): Connected to GND
Pushbutton 3
- Pin 1 (in): Connected to Arduino Uno R3 pin D9
- Pin 2 (in): Connected to Resistor pin1
- Pin 4 (out): Connected to GND
Pushbutton 4
- Pin 1 (in): Connected to Arduino Uno R3 pin A0
- Pin 2 (in): Connected to Resistor pin1
- Pin 4 (out): Connected to GND
RTC DS3231
- SCL: Connected to Arduino Uno R3 pin A5/SCL
- SDA: Connected to Arduino Uno R3 pin A4/SDA
- VCC: Connected to Arduino Uno R3 pin 3.3V
- GND: Connected to GND
Trimmer Potentiometer
- leg1: Connected to Resistor pin1
- wiper: Connected to LCD Display pin VO
- leg2: Connected to GND
Piezo Buzzer
- pin 1: Connected to GND
- pin 2: Connected to Arduino Uno R3 pin D13
Resistor 1
- pin1: Connected to Pushbutton 1 pin 2 (in)
- pin2: Connected to GND
Resistor 2
- pin1: Connected to Pushbutton 2 pin 2 (in)
- pin2: Connected to GND
Resistor 3
- pin1: Connected to Pushbutton 3 pin 2 (in)
- pin2: Connected to GND
Resistor 4
- pin1: Connected to Pushbutton 4 pin 2 (in)
- pin2: Connected to GND
Resistor 5
- pin1: Connected to Trimmer Potentiometer leg1
- pin2: Connected to LCD Display pin A
LCD Display (16 pin)
- VSS: Connected to GND
- VDD: Connected to Arduino Uno R3 pin 5V
- VO: Connected to Trimmer Potentiometer wiper
- RS: Connected to Arduino Uno R3 pin D12
- E: Connected to Arduino Uno R3 pin D11
- DB4: Connected to Arduino Uno R3 pin 6
- DB5: Connected to Arduino Uno R3 pin D5
- DB6: Connected to Arduino Uno R3 pin D4
- DB7: Connected to Arduino Uno R3 pin D3
- A: Connected to Resistor pin2
- K: Connected to GND
Documented Code
#include <LiquidCrystal.h>
#include <RTClib.h>
#include <Wire.h>

/*
 * Smart Medicine Reminder
 * This Arduino sketch controls an LCD display, RTC, push buttons, and a buzzer
 * to remind users to take their medicine at scheduled times. The user can set
 * the time, number of dosages, and the next medicine time using the push buttons.
 */

// LCD pins
const int rs = 12, en = 11, d4 = 6, d5 = 5, d6 = 4, d7 = 3;
LiquidCrystal lcd(rs, en, d4, d5, d6, d7);

// RTC
RTC_DS3231 rtc;

// Buzzer pin
const int buzzerPin = 13;

// Push buttons
const int button1Pin = A0;
const int button2Pin = 7;
const int button3Pin = 8;
const int button4Pin = 9;

// Variables to store settings
int setHour = 0;
int setMinute = 0;
int setDosages = 0;
DateTime nextMedicineTime;

void setup() {
  // Initialize LCD
  lcd.begin(16, 2);
  lcd.print("Medicine Reminder");
  delay(2000);
  lcd.clear();

  // Initialize RTC
  if (!rtc.begin()) {
    lcd.print("Couldn't find RTC");
    while (1);
  }
  if (rtc.lostPower()) {
    lcd.print("RTC lost power");
    rtc.adjust(DateTime(F(__DATE__), F(__TIME__)));
  }

  // Initialize buzzer
  pinMode(buzzerPin, OUTPUT);

  // Initialize push buttons
  pinMode(button1Pin, INPUT_PULLUP);
  pinMode(button2Pin, INPUT_PULLUP);
  pinMode(button3Pin, INPUT_PULLUP);
  pinMode(button4Pin, INPUT_PULLUP);
}

void loop() {
  DateTime now = rtc.now();

  // Display current time
  lcd.setCursor(0, 0);
  lcd.print(now.hour(), DEC);
  lcd.print(':');
  lcd.print(now.minute(), DEC);
  lcd.print(':');
  lcd.print(now.second(), DEC);

  // Check push buttons for setting time and dosage
  if (digitalRead(button1Pin) == LOW) {
    delay(50); // Debounce delay
    if (digitalRead(button1Pin) == LOW) {
      // Code to set hour
      lcd.setCursor(0, 1);
      lcd.print("Set Hour: ");
      setHour = (setHour + 1) % 24; // Increment hour
      lcd.print(setHour);
      delay(1000); // Wait for 1 second to avoid multiple increments
    }
  }
  if (digitalRead(button2Pin) == LOW) {
    delay(50); // Debounce delay
    if (digitalRead(button2Pin) == LOW) {
      // Code to set minute
      lcd.setCursor(0, 1);
      lcd.print("Set Minute: ");
      setMinute = (setMinute + 1) % 60; // Increment minute
      lcd.print(setMinute);
      delay(1000); // Wait for 1 second to avoid multiple increments
    }
  }
  if (digitalRead(button3Pin) == LOW) {
    delay(50); // Debounce delay
    if (digitalRead(button3Pin) == LOW) {
      // Code to set number of dosages
      lcd.setCursor(0, 1);
      lcd.print("Set Dosages: ");
      setDosages = (setDosages + 1) %