
Arduino UNO Bluetooth-Controlled Robotic Arm with Multiple Servos
View and Edit Project In Cirkit Designer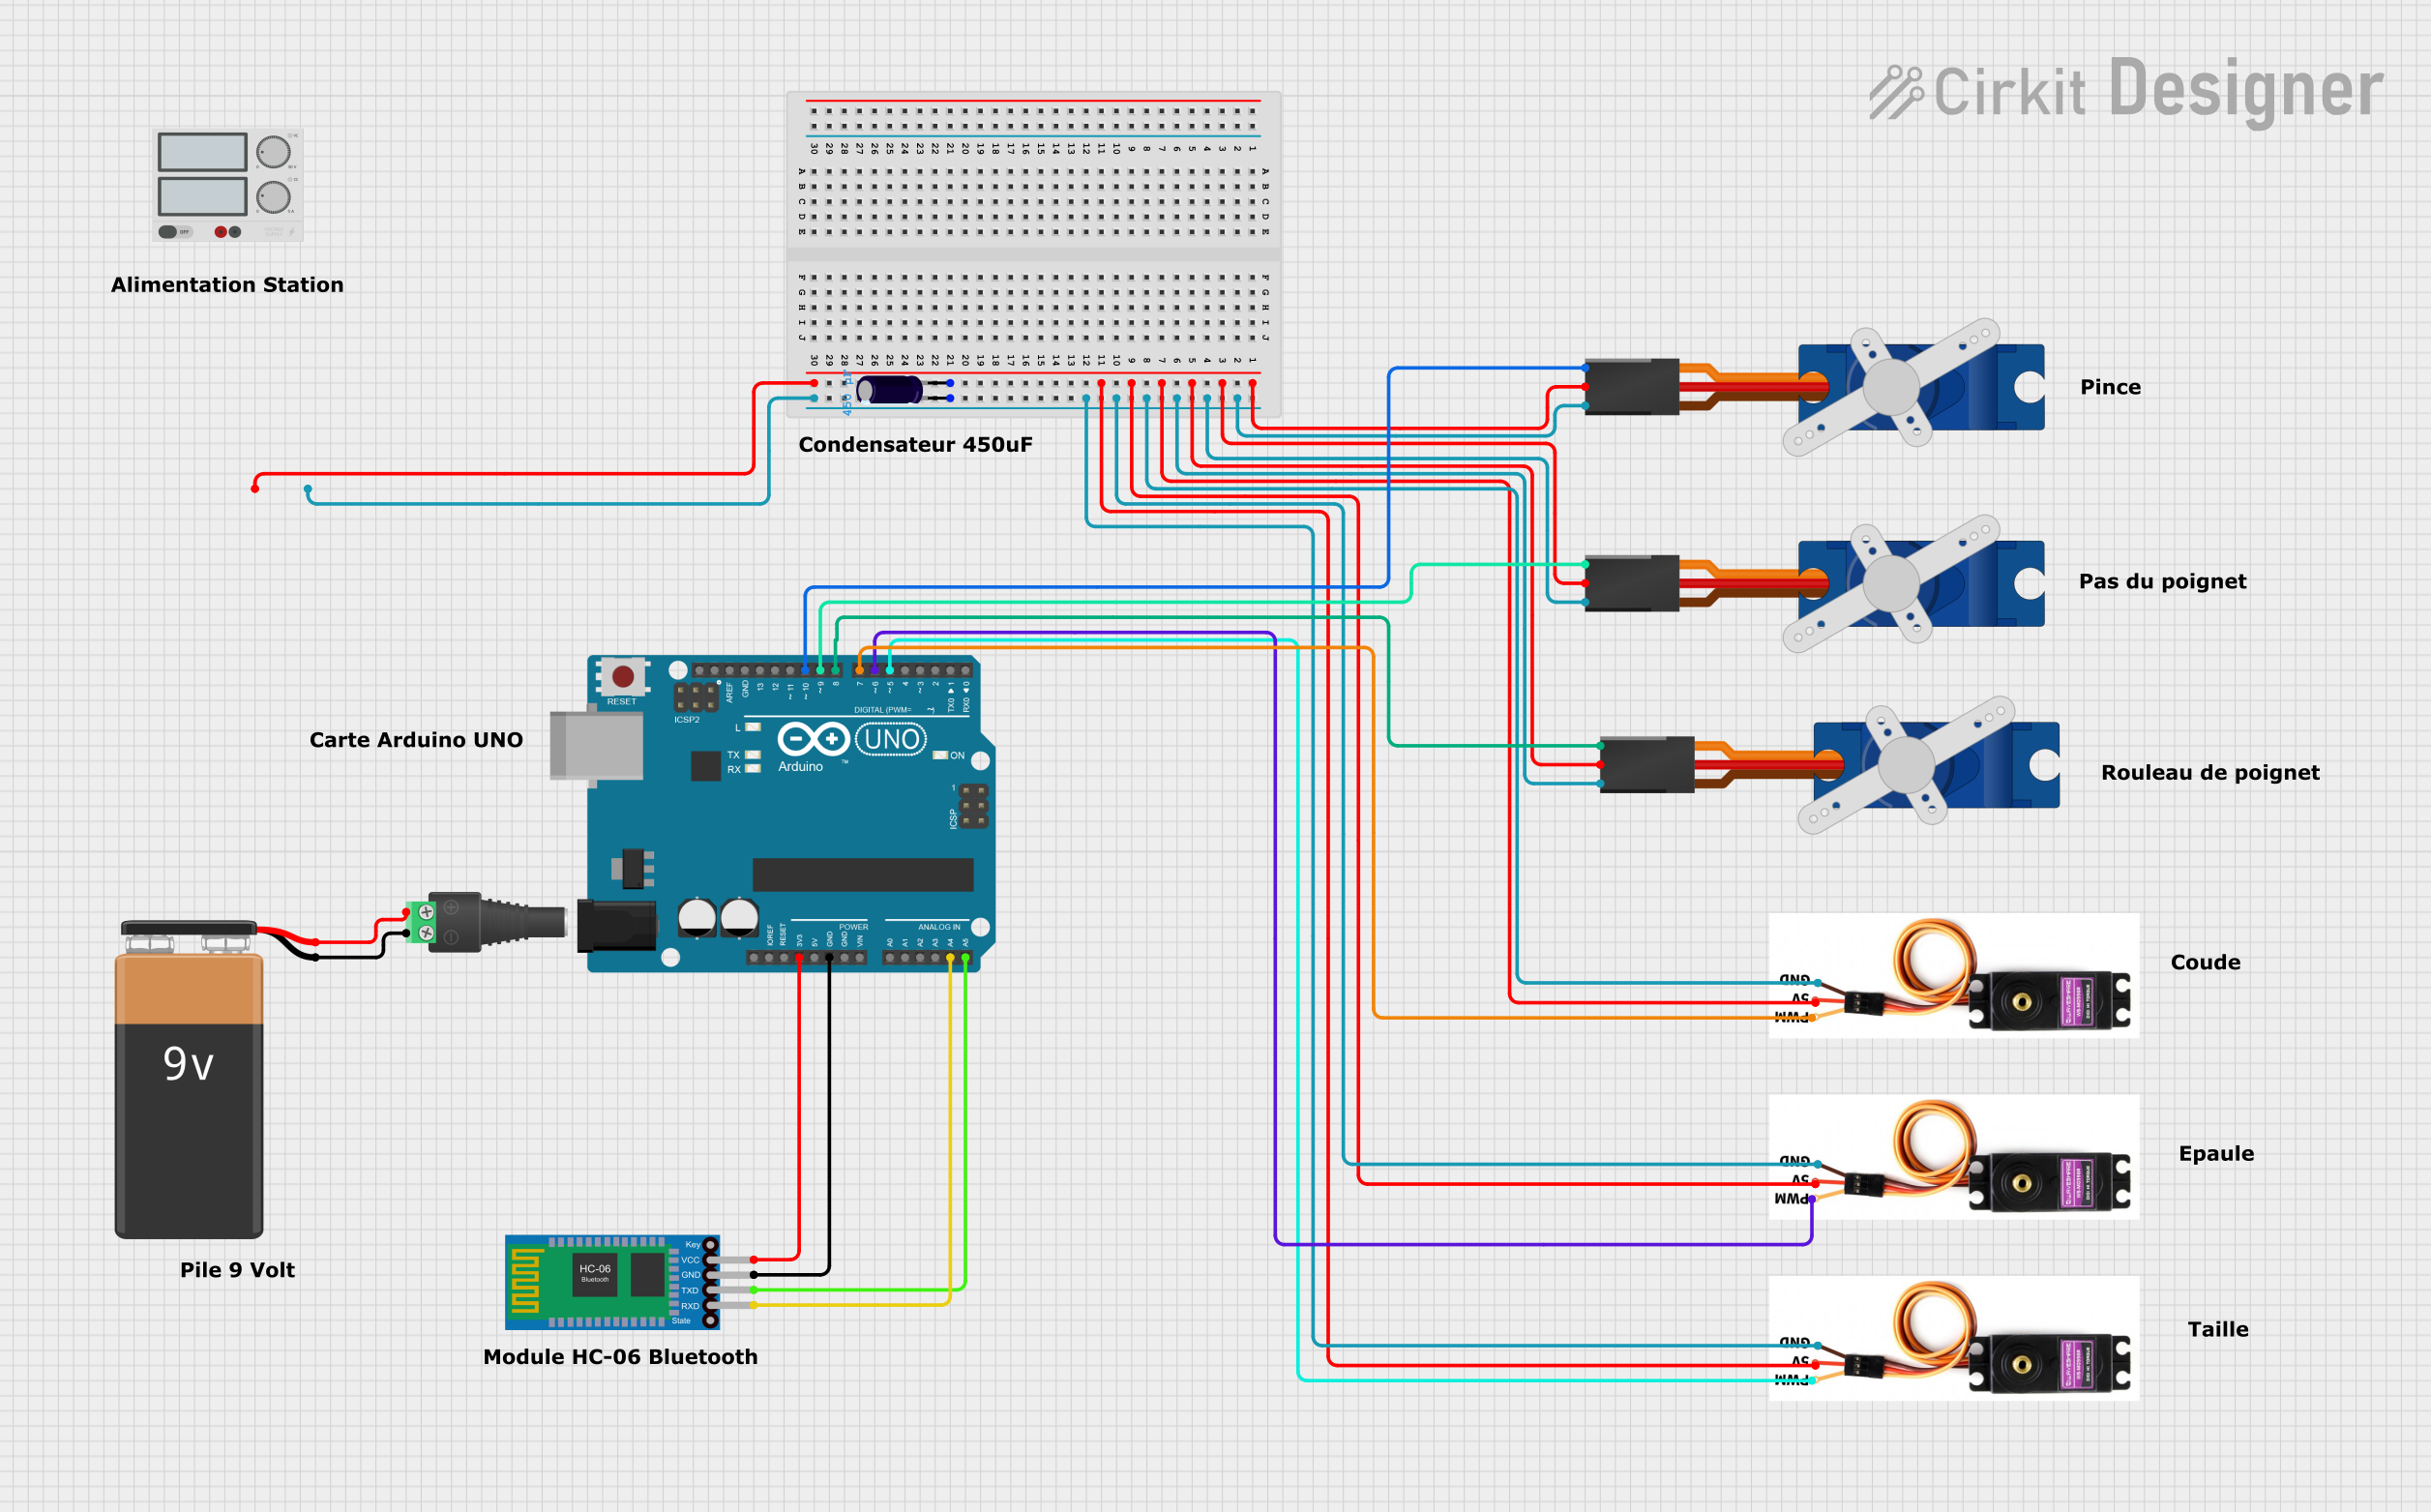
Circuit Documentation
Summary
This circuit is designed to control a robotic arm using an Arduino UNO microcontroller. The robotic arm is equipped with multiple servos, which are controlled via Bluetooth using the HC-06 module. The power supply for the servos is provided by a 9V battery and a power supply unit. The circuit also includes an electrolytic capacitor for voltage stabilization.
Component List
Arduino UNO
- Description: Microcontroller board based on the ATmega328P.
- Pins: UNUSED, IOREF, Reset, 3.3V, 5V, GND, Vin, A0, A1, A2, A3, A4, A5, SCL, SDA, AREF, D13, D12, D11, D10, D9, D8, D7, D6, D5, D4, D3, D2, D1, D0
9V Battery
- Description: Provides power to the circuit.
- Pins: -, +
Electrolytic Capacitor
- Description: Used for voltage stabilization.
- Pins: -, +
- Properties:
- Capacitance: 0.00045 Farads
Tower Pro SG90 Servo
- Description: Small servo motor used for precise control.
- Pins: Signal, +5V, GND
Servo Motor MG996R
- Description: High torque servo motor.
- Pins: PMW, VCC 5V, GND
2.1mm Barrel Jack with Terminal Block
- Description: Used to connect the 9V battery to the circuit.
- Pins: POS, NEG
Power Supply
- Description: Provides power to the servos.
- Pins: +, -
Bluetooth HC-06
- Description: Bluetooth module for wireless communication.
- Pins: VCC, GND, TXD, RXD
Wiring Details
Arduino UNO
- 3.3V: Connected to VCC of Bluetooth HC-06
- GND: Connected to GND of Bluetooth HC-06
- A4: Connected to RXD of Bluetooth HC-06
- A5: Connected to TXD of Bluetooth HC-06
- D10: Connected to Signal of Tower Pro SG90 Servo
- D9: Connected to Signal of Tower Pro SG90 Servo
- D8: Connected to Signal of Tower Pro SG90 Servo
- D7: Connected to PMW of Servo Motor MG996R
- D6: Connected to PMW of Servo Motor MG996R
- D5: Connected to PMW of Servo Motor MG996R
9V Battery
- -: Connected to NEG of 2.1mm Barrel Jack with Terminal Block
- +: Connected to POS of 2.1mm Barrel Jack with Terminal Block
Electrolytic Capacitor
- +: Connected to +5V of Tower Pro SG90 Servo, VCC 5V of Servo Motor MG996R, and + of Power Supply
- -: Connected to GND of Tower Pro SG90 Servo, GND of Servo Motor MG996R, and - of Power Supply
Tower Pro SG90 Servo
- Signal: Connected to D10, D9, and D8 of Arduino UNO
- +5V: Connected to + of Electrolytic Capacitor and + of Power Supply
- GND: Connected to - of Electrolytic Capacitor and - of Power Supply
Servo Motor MG996R
- PMW: Connected to D7, D6, and D5 of Arduino UNO
- VCC 5V: Connected to + of Electrolytic Capacitor and + of Power Supply
- GND: Connected to - of Electrolytic Capacitor and - of Power Supply
2.1mm Barrel Jack with Terminal Block
- POS: Connected to + of 9V Battery
- NEG: Connected to - of 9V Battery
Power Supply
- +: Connected to +5V of Tower Pro SG90 Servo, VCC 5V of Servo Motor MG996R, and + of Electrolytic Capacitor
- -: Connected to GND of Tower Pro SG90 Servo, GND of Servo Motor MG996R, and - of Electrolytic Capacitor
Bluetooth HC-06
- VCC: Connected to 3.3V of Arduino UNO
- GND: Connected to GND of Arduino UNO
- TXD: Connected to A5 of Arduino UNO
- RXD: Connected to A4 of Arduino UNO
Code Documentation
/*
   DIY Arduino Robot Arm Smartphone Control
   by Dejan, www.HowToMechatronics.com
*/

#include <SoftwareSerial.h>
#include <Servo.h>

Servo servo01;
Servo servo02;
Servo servo03;
Servo servo04;
Servo servo05;
Servo servo06;

SoftwareSerial Bluetooth(3, 4); // Arduino(RX, TX) - HC-05 Bluetooth (TX, RX)

int servo1Pos, servo2Pos, servo3Pos, servo4Pos, servo5Pos, servo6Pos; // current position
int servo1PPos, servo2PPos, servo3PPos, servo4PPos, servo5PPos, servo6PPos; // previous position
int servo01SP[50], servo02SP[50], servo03SP[50], servo04SP[50], servo05SP[50], servo06SP[50]; // for storing positions/steps
int speedDelay = 20;
int index = 0;
String dataIn = "";

void setup() {
  servo01.attach(5);
  servo02.attach(6);
  servo03.attach(7);
  servo04.attach(8);
  servo05.attach(9);
  servo06.attach(10);
  Bluetooth.begin(38400); // Default baud rate of the Bluetooth module
  Bluetooth.setTimeout(1);
  delay(20);
  // Robot arm initial position
  servo1PPos = 90;
  servo01.write(servo1PPos);
  servo2PPos = 150;
  servo02.write(servo2PPos);
  servo3PPos = 35;
  servo03.write(servo3PPos);
  servo4PPos = 140;
  servo04.write(servo4PPos);
  servo5PPos = 85;
  servo05.write(servo5PPos);
  servo6PPos = 80;
  servo06.write(servo6PPos);
}

void loop() {
  // Check for incoming data
  if (Bluetooth.available() > 0) {
    dataIn = Bluetooth.readString();  // Read the data as string

    // If "Waist" slider has changed value - Move Servo 1 to position
    if (dataIn.startsWith("s1")) {
      String dataInS = dataIn.substring(2, dataIn.length()); // Extract only the number. E.g. from "s1120" to "120"
      servo1Pos = dataInS.toInt();  // Convert the string into integer
      // We use for loops so we can control the speed of the servo
      // If previous position is bigger then current position
      if (servo1PPos > servo1Pos) {
        for ( int j = servo1PPos; j >= servo1Pos; j--) {   // Run servo down
          servo01.write(j);
          delay(20);    // defines the speed at which the servo rotates
        }
      }
      // If previous position is smaller then current position
      if (servo1PPos < servo1Pos) {
        for ( int j = servo1PPos; j <= servo1Pos; j++) {   // Run servo up
          servo01.write(j);
          delay(20);
        }
      }
      servo1PPos = servo1Pos;   // set current position as previous position
    }

    // Move Servo 2
    if (dataIn.startsWith("s2")) {
      String dataInS = dataIn.substring(2, dataIn.length());
      servo2Pos = dataInS.toInt();

      if (servo2PPos > servo2Pos) {
        for ( int j = servo2PPos; j >= servo2Pos; j--) {
          servo02.write(j);
          delay(50);
        }
      }
      if (servo2PPos < servo2Pos) {
        for ( int j = servo2PPos; j <= servo2Pos; j++) {
          servo02.write(j);
          delay(50);
        }
      }
      servo2PPos = servo2Pos;
    }
    // Move Servo 3
    if (dataIn.startsWith("s3")) {
      String dataInS = dataIn.substring(2, dataIn.length());
      servo3Pos = dataInS.toInt();
      if (servo3PPos > servo3Pos) {
        for ( int j = servo3PPos; j >= servo3Pos; j--) {
          servo03.write(j);
          delay(30);
        }
      }
      if (servo3PPos < servo3Pos) {
        for ( int j = servo3PPos; j <= servo3Pos; j++) {
          servo