
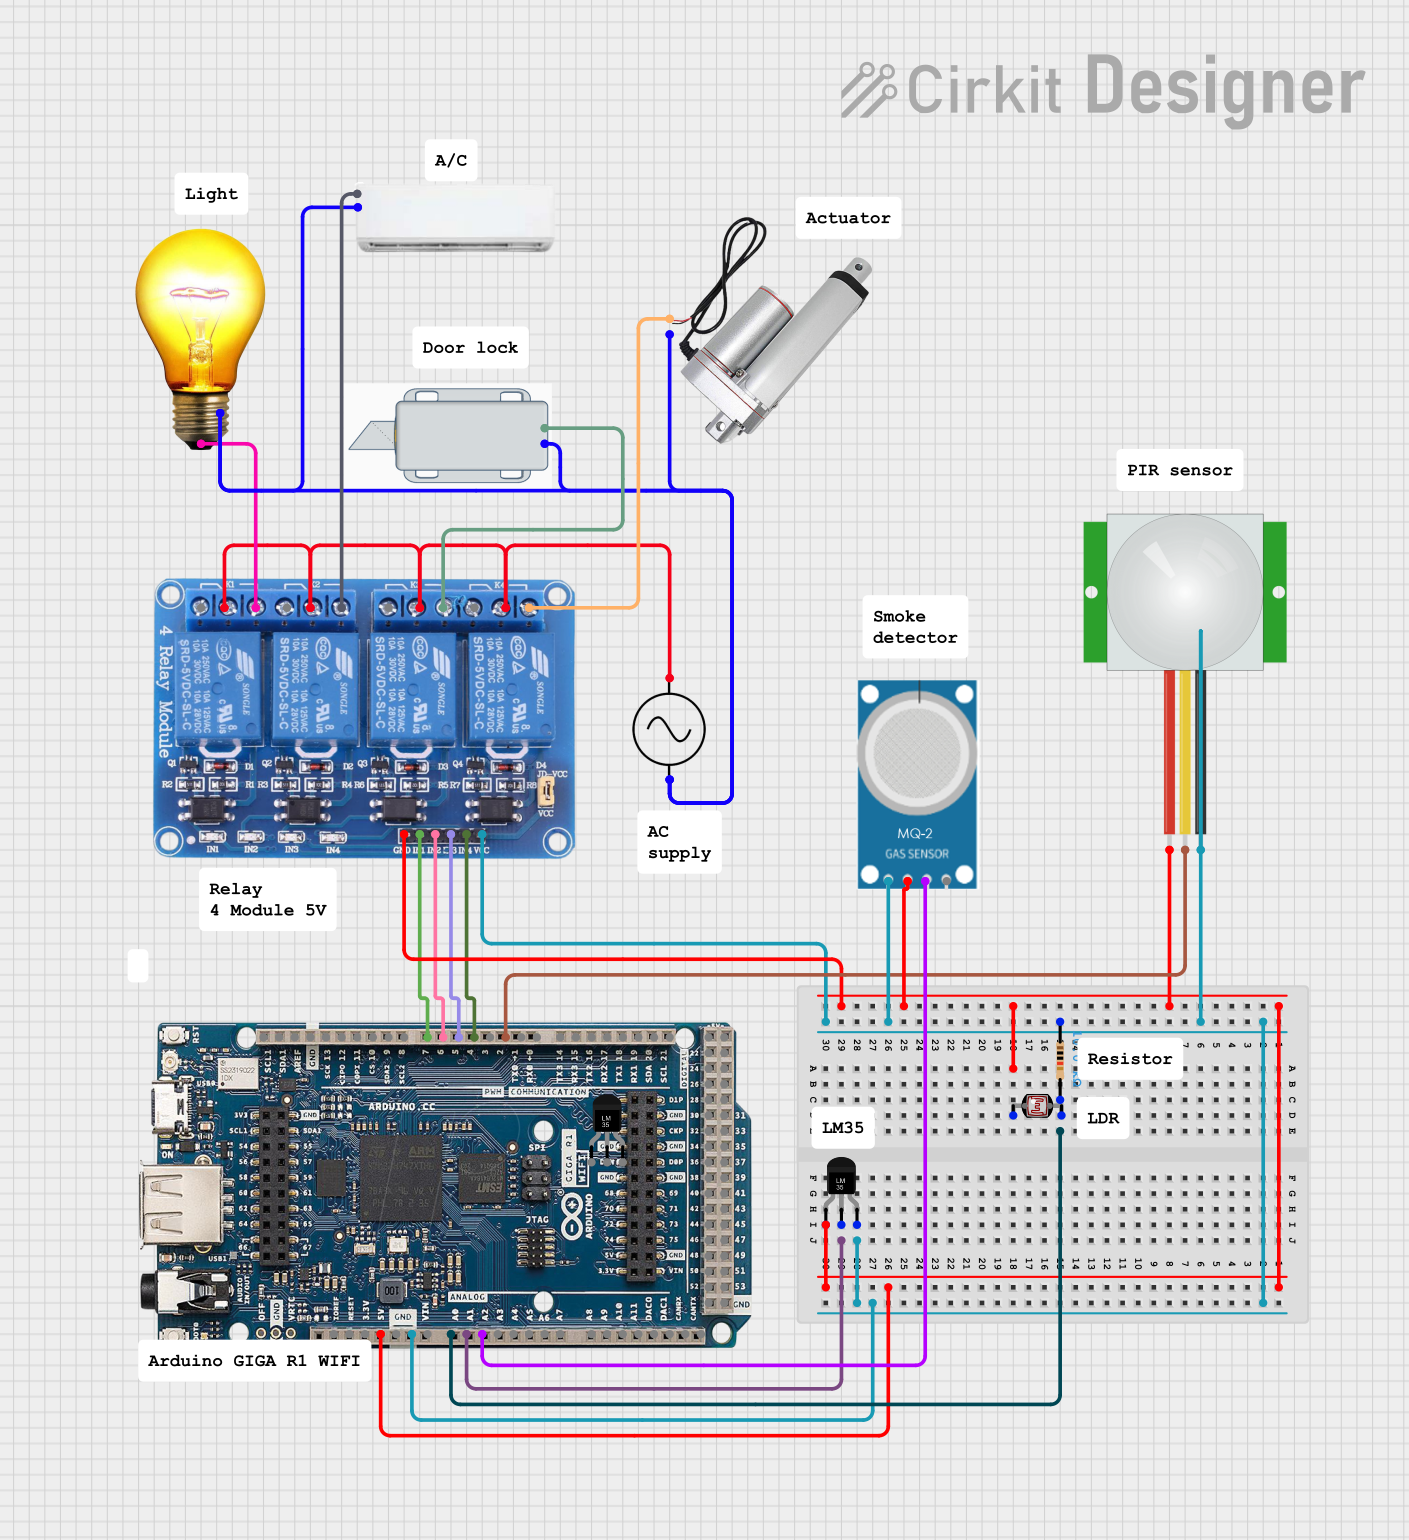
Circuit Documentation
Summary
This circuit involves an Arduino GIGA R1 WIFI microcontroller interfacing with various sensors and actuators, including a 4-channel relay, temperature sensors, a PIR sensor, a gas sensor (MQ-2), a photocell (LDR), an AC bulb, an air conditioner, a solenoid lock, and a linear actuator. The Arduino reads sensor data and controls the actuators through the relay module.
Component List
Arduino GIGA R1 WIFI
- Description: A microcontroller board based on the ATmega2560.
- Pins: SLC1, SDA1, AREF, GND, SCK13, CIPO12, COPI11, CS10, SDA2 9, SCL2 8, 7, 6, 5, 4, 3, 2, TX0 1, RX0 0, TX3 14, RX3 15, TX2 16, RX2 17, TX1 18, RX1 19, SDA 20, SCL 21, 5V, 22, 23, 24, 25, 26, 27, 28, 29, 30, 31, 32, 33, 34, 35, 36, 37, 38, 39, 40, 41, 42, 43, 44, 45, 46, 47, 48, 49, 50, 51, 52, 53, A8, A9, A10, A11, DAC0, DAC1, CANRX, CANTX, IOREF, RESET, 3.3V, VIN, A0, A1, A2, A3, A4, A5, A6, A7
Relay 4 Channel 5v
- Description: A relay module that allows the Arduino to control high voltage devices.
- Pins: GND, IN1, IN2, IN3, IN4, VCC, COM1, COM2, COM3, COM4, NO1, NO2, NO3, NO4, NC1, NC2, NC3, NC4
Temperature Sensor (LM35)
- Description: An analog temperature sensor.
- Pins: +Vs, Vout, GND
Ac Supply
- Description: AC power supply.
- Pins: +ve, -ve
MQ-2
- Description: Gas sensor for detecting smoke and combustible gases.
- Pins: GND, VCC, ANALOG, Digital
12V Solenoid Lock
- Description: Electromechanical lock.
- Pins: -, +
AC Bulb
- Description: Standard AC light bulb.
- Pins: P, N
PIR sensor
- Description: Passive Infrared sensor for motion detection.
- Pins: VDD, SIG, GND
Photocell (LDR)
- Description: Light-dependent resistor.
- Pins: pin 0, pin 1
Resistor
- Description: 10k Ohm resistor.
- Pins: pin1, pin2
- Properties: Resistance: 10000 Ohms
Linear actuator
- Description: Electromechanical actuator.
- Pins: +, -
Wiring Details
Arduino GIGA R1 WIFI
- A0: Connected to Photocell (LDR) pin 1 and Resistor pin2
- 5V: Connected to Photocell (LDR) pin 0, PIR sensor VDD, MQ-2 VCC, Relay 4 Channel 5v GND, Temperature Sensor (LM35) +Vs
- GND: Connected to Temperature Sensor (LM35) GND, Resistor pin1, PIR sensor GND, MQ-2 GND, Relay 4 Channel 5v VCC
- A1: Connected to Temperature Sensor (LM35) Vout
- 7: Connected to Relay 4 Channel 5v IN1
- 6: Connected to Relay 4 Channel 5v IN2
- 5: Connected to Relay 4 Channel 5v IN3
- 4: Connected to Relay 4 Channel 5v IN4
- 2: Connected to PIR sensor SIG
- A2: Connected to MQ-2 ANALOG
Relay 4 Channel 5v
- GND: Connected to Arduino GIGA R1 WIFI 5V
- VCC: Connected to Arduino GIGA R1 WIFI GND
- IN1: Connected to Arduino GIGA R1 WIFI 7
- IN2: Connected to Arduino GIGA R1 WIFI 6
- IN3: Connected to Arduino GIGA R1 WIFI 5
- IN4: Connected to Arduino GIGA R1 WIFI 4
- COM1, COM2, COM3, COM4: Connected to Ac Supply +ve
- NO1: Connected to AC Bulb P
- NO2: Connected to AIRCONDITIONER +
- NO3: Connected to 12V Solenoid Lock +
- NO4: Connected to Linear actuator +
Temperature Sensor (LM35)
- +Vs: Connected to Arduino GIGA R1 WIFI 5V
- Vout: Connected to Arduino GIGA R1 WIFI A1
- GND: Connected to Arduino GIGA R1 WIFI GND
Ac Supply
- +ve: Connected to Relay 4 Channel 5v COM1, COM2, COM3, COM4
- -ve: Connected to AIRCONDITIONER -, 12V Solenoid Lock -, AC Bulb N, Linear actuator -
MQ-2
- VCC: Connected to Arduino GIGA R1 WIFI 5V
- GND: Connected to Arduino GIGA R1 WIFI GND
- ANALOG: Connected to Arduino GIGA R1 WIFI A2
12V Solenoid Lock
- +: Connected to Relay 4 Channel 5v NO3
- -: Connected to Ac Supply -ve
AC Bulb
- P: Connected to Relay 4 Channel 5v NO1
- N: Connected to Ac Supply -ve
PIR sensor
- VDD: Connected to Arduino GIGA R1 WIFI 5V
- SIG: Connected to Arduino GIGA R1 WIFI 2
- GND: Connected to Arduino GIGA R1 WIFI GND
Photocell (LDR)
- pin 0: Connected to Arduino GIGA R1 WIFI 5V
- pin 1: Connected to Arduino GIGA R1 WIFI A0 and Resistor pin2
Resistor
- pin1: Connected to Arduino GIGA R1 WIFI GND
- pin2: Connected to Arduino GIGA R1 WIFI A0 and Photocell (LDR) pin 1
Linear actuator
- +: Connected to Relay 4 Channel 5v NO4
- -: Connected to Ac Supply -ve
Code Documentation
Arduino GIGA R1 WIFI Code
void setup() {
  // put your setup code here, to run once:

}

void loop() {
  // put your main code here, to run repeatedly:

}
This code is a basic template for the Arduino GIGA R1 WIFI. The setup() function is where you initialize your settings, and the loop() function is where you place the code that you want to run continuously.