
Arduino UNO-Based Door Lock System with Keypad and LCD Display
View and Edit Project In Cirkit Designer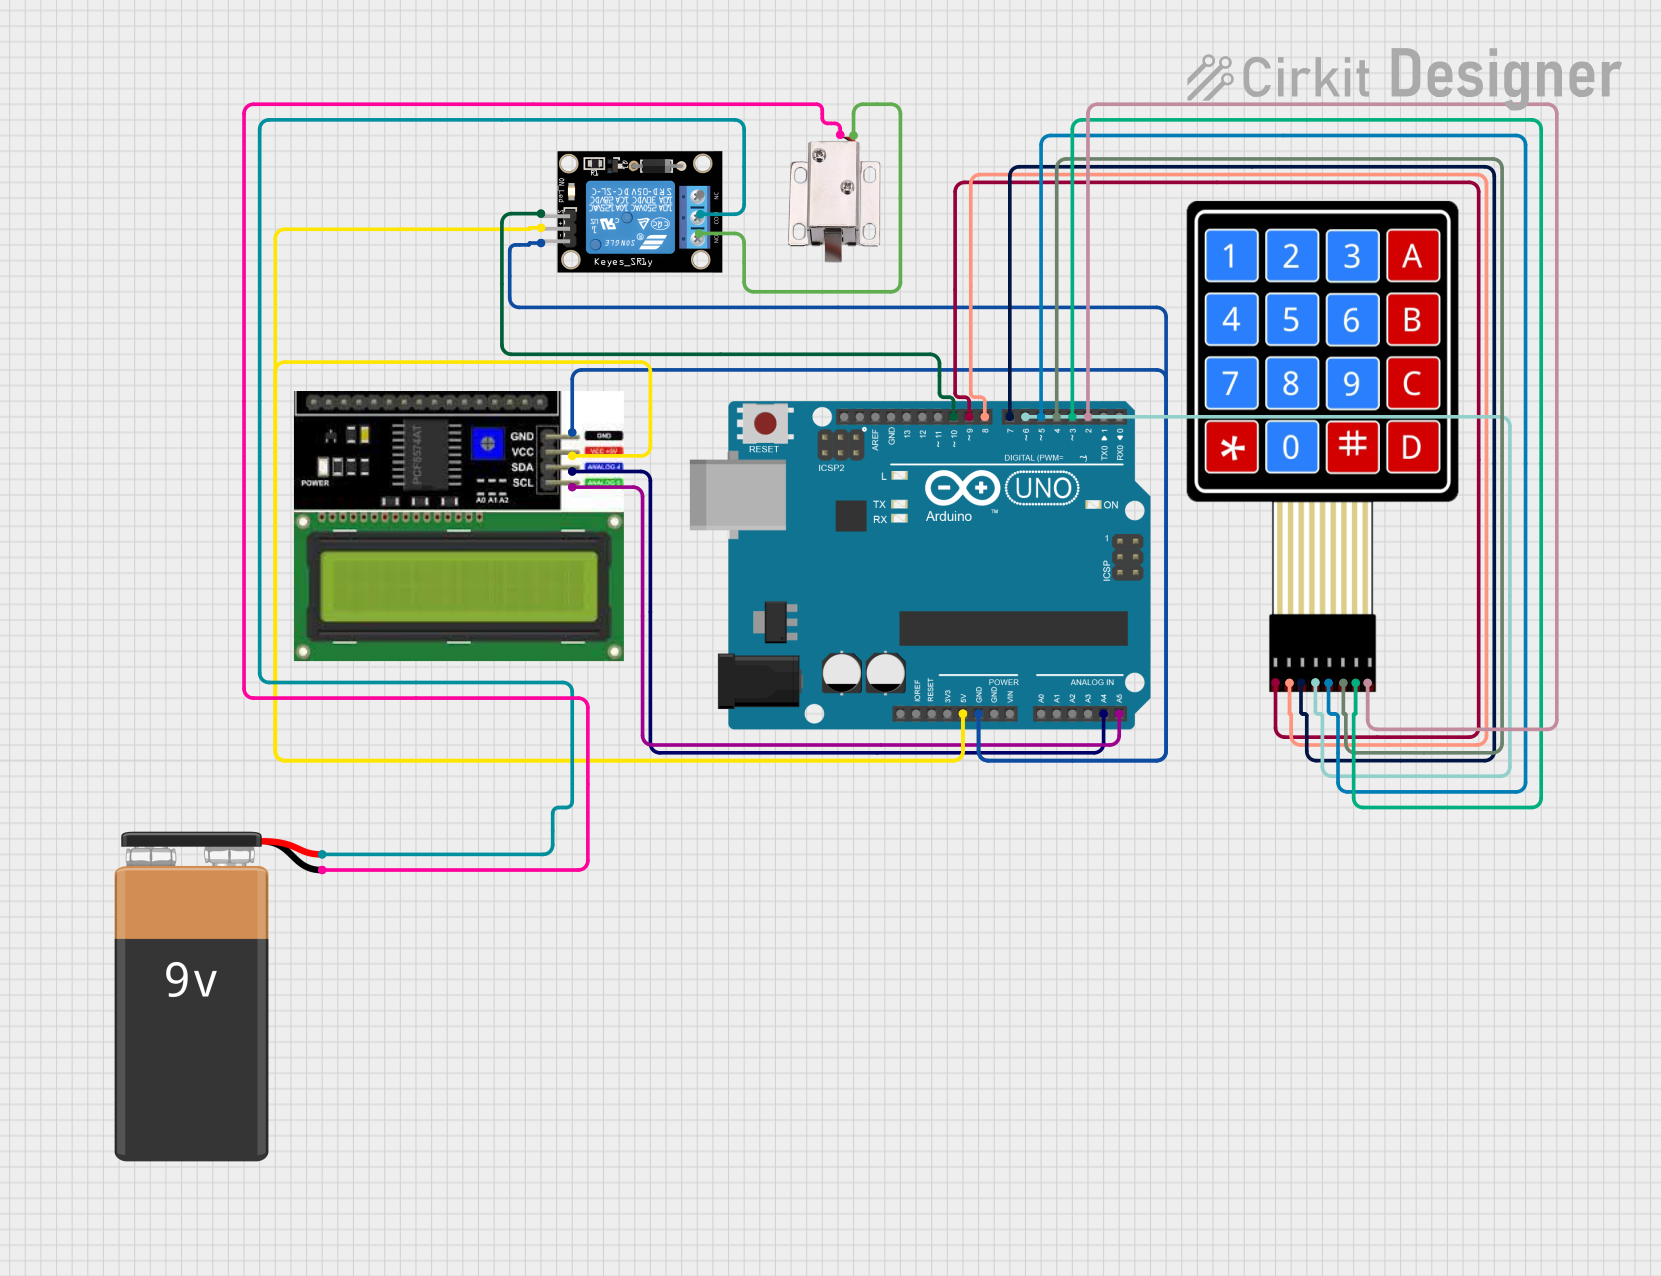
Circuit Documentation
Summary
This circuit is a door lock system that uses a 4x4 membrane matrix keypad, an LCD I2C display, and a relay module to control a 12V solenoid lock. The system is controlled by an Arduino UNO microcontroller. The user inputs a password via the keypad, which is displayed on the LCD. If the entered password matches the predefined password, the relay is activated, unlocking the solenoid lock.
Component List
Arduino UNO
- Description: A microcontroller board based on the ATmega328P.
- Pins: UNUSED, IOREF, Reset, 3.3V, 5V, GND, Vin, A0, A1, A2, A3, A4, A5, SCL, SDA, AREF, D13, D12, D11, D10, D9, D8, D7, D6, D5, D4, D3, D2, D1, D0
LCD I2C Display
- Description: A 16x2 character LCD display with I2C interface.
- Pins: GND, VCC, SDA, SCL
Relay Module 1 Channel
- Description: A single-channel relay module used to control high voltage devices.
- Pins: S, 5V, GND, NC, COM, NO
4X4 Membrane Matrix Keypad
- Description: A 4x4 matrix keypad used for user input.
- Pins: R1, R2, R3, R4, C1, C2, C3, C4
12V Solenoid Lock
- Description: An electronic lock that operates on 12V.
- Pins: VCC, GND
9V Battery
- Description: A 9V battery used to power the solenoid lock.
- Pins: -, +
Wiring Details
Arduino UNO
- 5V: Connected to 5V pin of Relay Module and VCC pin of LCD I2C Display.
- GND: Connected to GND pin of Relay Module and GND pin of LCD I2C Display.
- A4: Connected to SDA pin of LCD I2C Display.
- A5: Connected to SCL pin of LCD I2C Display.
- D10: Connected to S pin of Relay Module.
- D9: Connected to R1 pin of 4X4 Membrane Matrix Keypad.
- D8: Connected to R2 pin of 4X4 Membrane Matrix Keypad.
- D7: Connected to R3 pin of 4X4 Membrane Matrix Keypad.
- D6: Connected to R4 pin of 4X4 Membrane Matrix Keypad.
- D5: Connected to C1 pin of 4X4 Membrane Matrix Keypad.
- D4: Connected to C2 pin of 4X4 Membrane Matrix Keypad.
- D3: Connected to C3 pin of 4X4 Membrane Matrix Keypad.
- D2: Connected to C4 pin of 4X4 Membrane Matrix Keypad.
LCD I2C Display
- GND: Connected to GND pin of Arduino UNO.
- VCC: Connected to 5V pin of Arduino UNO.
- SDA: Connected to A4 pin of Arduino UNO.
- SCL: Connected to A5 pin of Arduino UNO.
Relay Module 1 Channel
- 5V: Connected to 5V pin of Arduino UNO.
- GND: Connected to GND pin of Arduino UNO.
- S: Connected to D10 pin of Arduino UNO.
- COM: Connected to + pin of 9V Battery.
- NO: Connected to VCC pin of 12V Solenoid Lock.
4X4 Membrane Matrix Keypad
- R1: Connected to D9 pin of Arduino UNO.
- R2: Connected to D8 pin of Arduino UNO.
- R3: Connected to D7 pin of Arduino UNO.
- R4: Connected to D6 pin of Arduino UNO.
- C1: Connected to D5 pin of Arduino UNO.
- C2: Connected to D4 pin of Arduino UNO.
- C3: Connected to D3 pin of Arduino UNO.
- C4: Connected to D2 pin of Arduino UNO.
12V Solenoid Lock
- VCC: Connected to NO pin of Relay Module.
- GND: Connected to - pin of 9V Battery.
9V Battery
- +: Connected to COM pin of Relay Module.
- -: Connected to GND pin of 12V Solenoid Lock.
Code Documentation
/*
 * Door Lock System using 4x4 Keypad, LCD, and Relay
 * This code reads input from a 4x4 keypad, displays it on an LCD using I2C,
 * and checks if the entered code matches a predefined password to
 * unlock the door by activating a relay. Feedback is provided on incorrect
 * entry, and blocking delays are prevented.
 * Password: 1234
 */

#include <Keypad.h>
#include <Wire.h>
#include <LiquidCrystal_I2C.h>

const byte ROWS = 4; // Four rows
const byte COLS = 4; // Four columns
char keys[ROWS][COLS] = {
  {'1','2','3','A'},
  {'4','5','6','B'},
  {'7','8','9','C'},
  {'*','0','#','D'}
};
byte rowPins[ROWS] = {9, 8, 7, 6}; // Connect to the row pinouts of the keypad
byte colPins[COLS] = {5, 4, 3, 2}; // Connect to the column pinouts of the keypad

Keypad keypad = Keypad(makeKeymap(keys), rowPins, colPins, ROWS, COLS);

LiquidCrystal_I2C lcd(0x27, 16, 2); // Set the LCD address to 0x27 for a 16 chars and 2 line display

const int relayPin = 10; // Pin connected to the relay
String password = "1234";
String input = "";
unsigned long lastInteraction = 0;
const unsigned long timeout = 3000; // 3 seconds timeout for feedback

void setup() {
  pinMode(relayPin, OUTPUT);
  digitalWrite(relayPin, LOW); // Ensure relay is off initially
  lcd.begin(16,2);
  lcd.backlight();
  lcd.print("Enter Password:");
}

void loop() {
  char key = keypad.getKey();
  if (key) {
    lastInteraction = millis();
    if (key == '#') {
      if (input == password) {
        lcd.clear();
        lcd.print("Access Granted");
        digitalWrite(relayPin, HIGH); // Activate relay
        delay(5000); // Keep relay on for 5 seconds
        digitalWrite(relayPin, LOW); // Deactivate relay
      } else {
        lcd.clear();
        lcd.print("Access Denied");
      }
      input = "";
    } else if (key == '*') {
      input = "";
      lcd.clear();
      lcd.print("Enter Password:");
    } else {
      input += key;
      lcd.setCursor(0, 1);
      lcd.print(input);
    }
  }
  if (millis() - lastInteraction > timeout && input != "") {
    lcd.clear();
    lcd.print("Enter Password:");
    input = "";
  }
}
This code initializes the keypad and LCD, sets up the relay pin, and continuously checks for key presses. When a key is pressed, it updates the input string and displays it on the LCD. If the '#' key is pressed, it checks if the input matches the predefined password. If it does, it activates the relay to unlock the door. If the '*' key is pressed, it clears the input. The code also includes a timeout feature to clear the input if no key is pressed for 3 seconds.