
Arduino and ESP8266 Nodemcu Controlled Robotic Vehicle with RFID and Ultrasonic Sensing
View and Edit Project In Cirkit Designer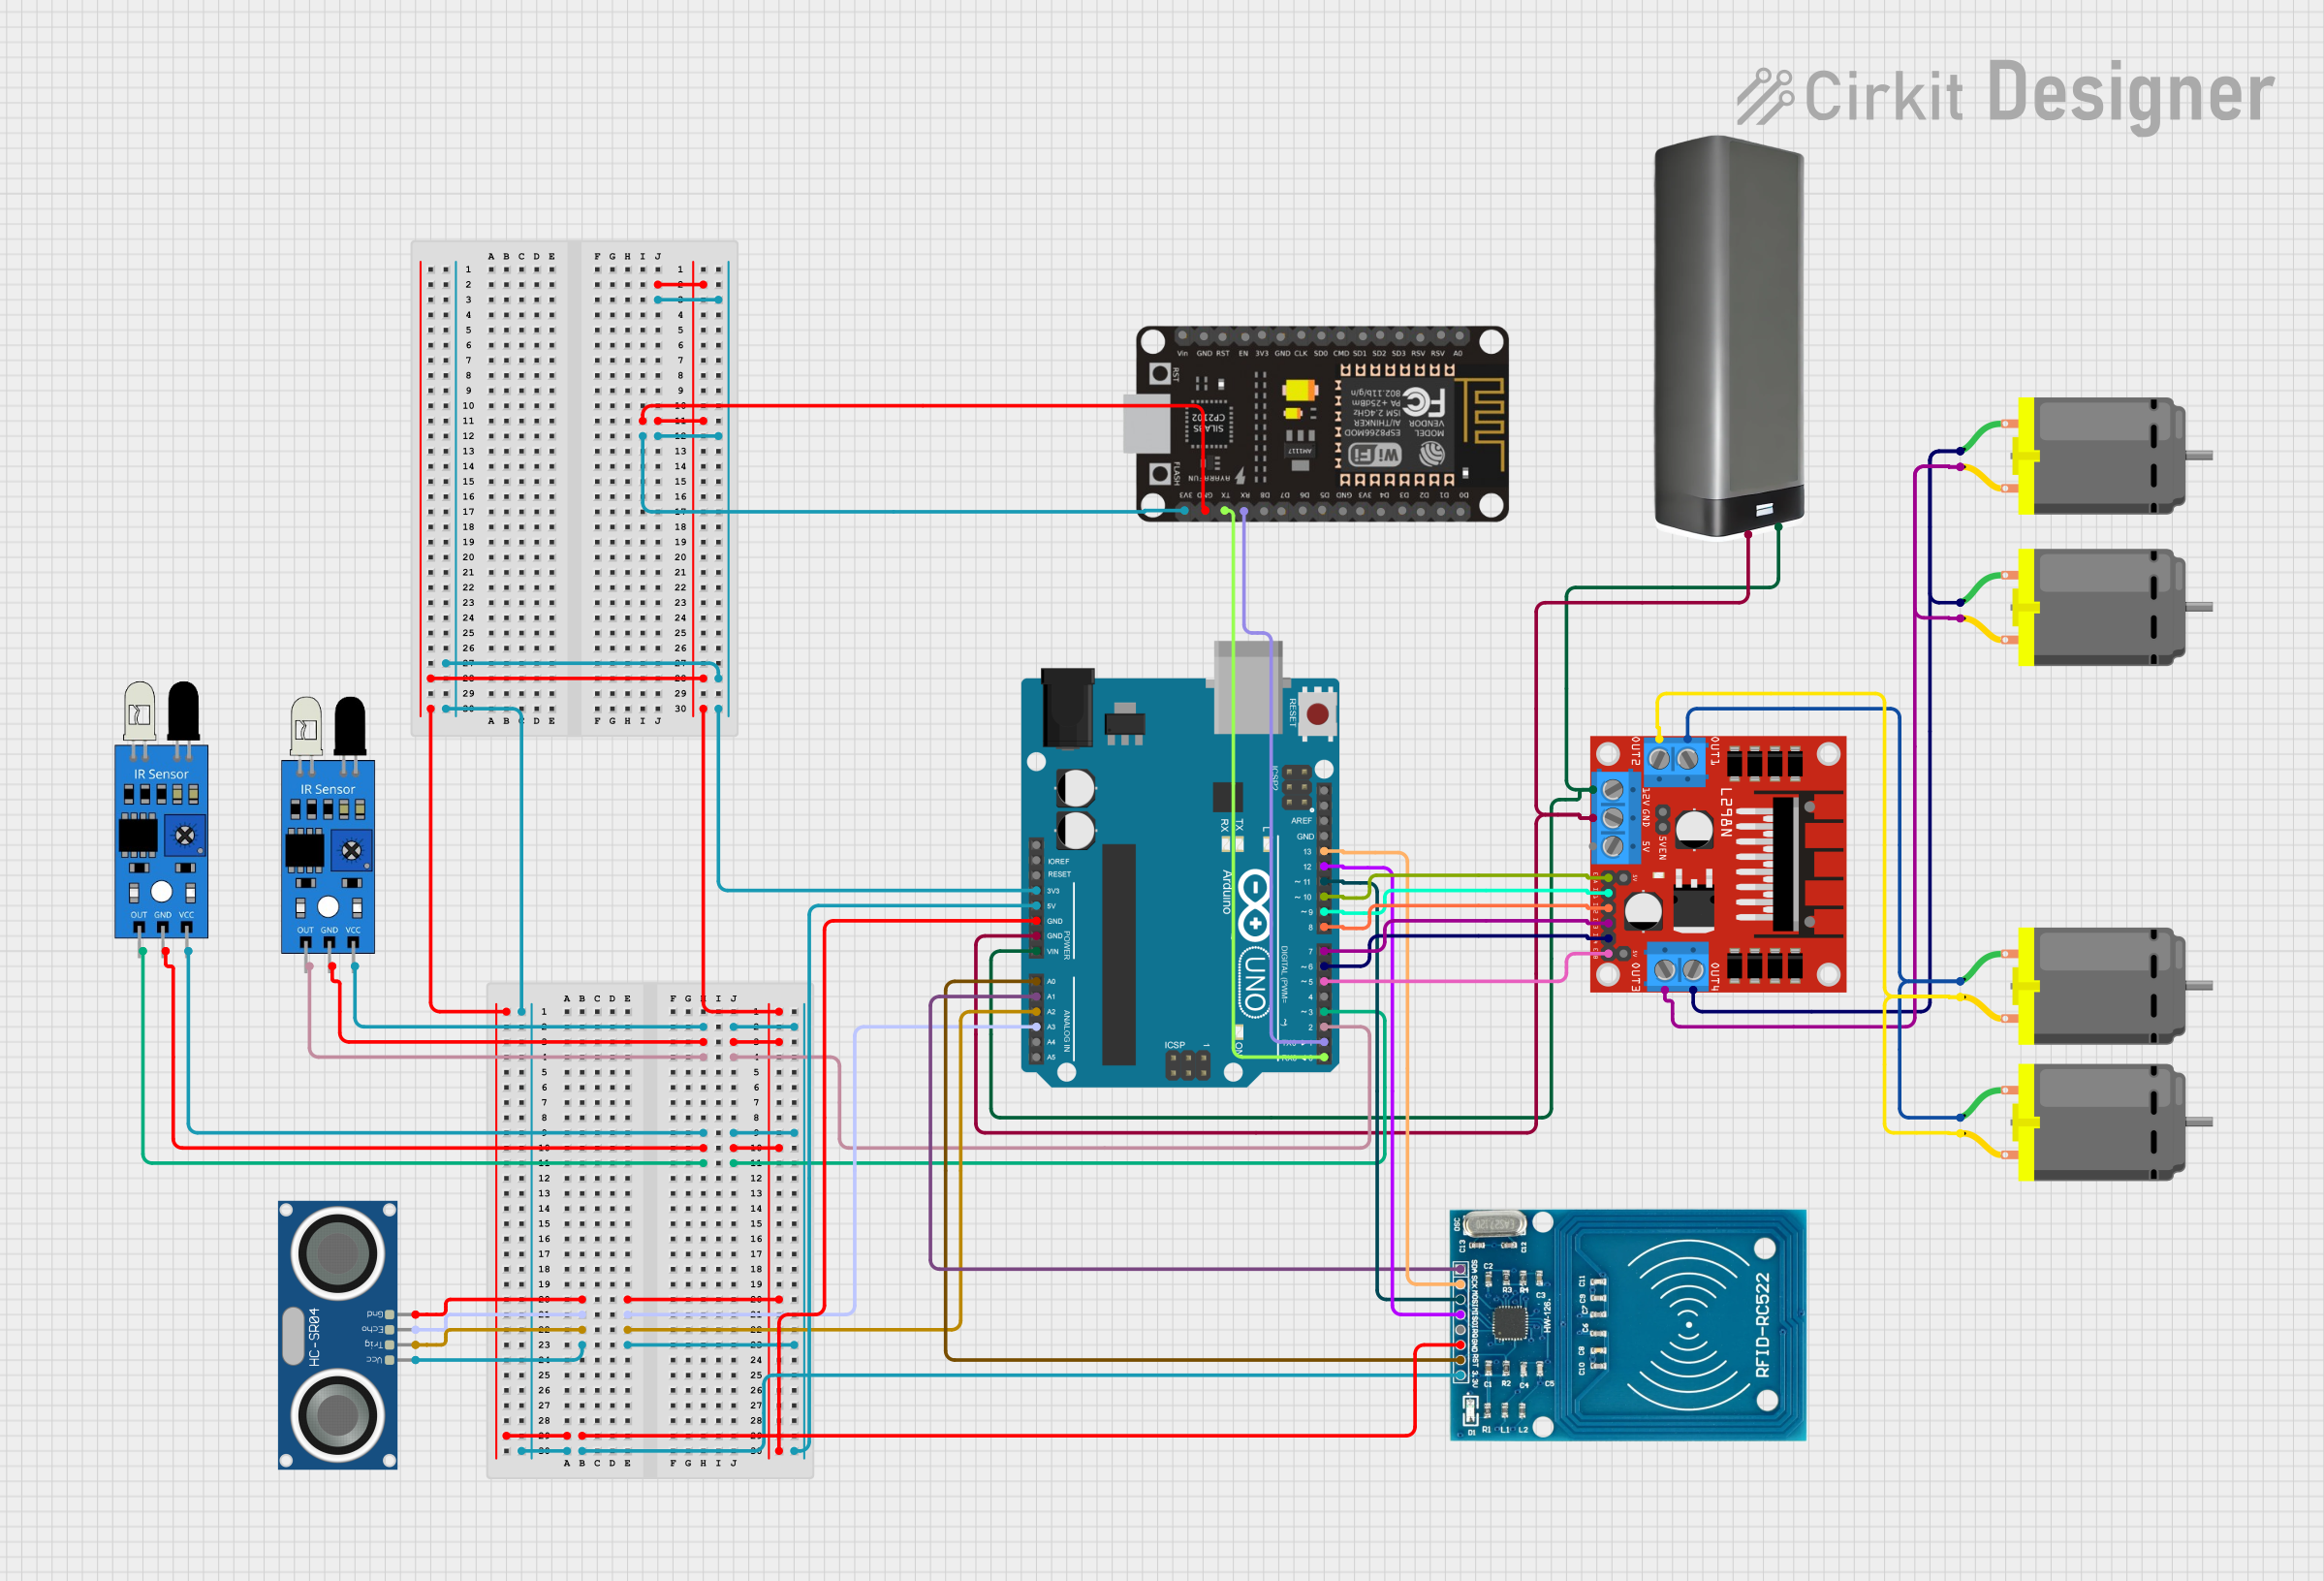
Circuit Documentation
Summary
The circuit in question is a complex system designed to control a robot with various sensors and actuators. It includes an Arduino UNO as the main microcontroller, interfaced with an IR sensor, an HC-SR04 ultrasonic sensor, an RFID-RC522 reader, an ESP8266 NodeMCU for WiFi connectivity, and a L298N motor driver to control multiple DC motors. A battery pack provides the power source for the motors and the motor driver, while the Arduino UNO and other sensors receive power from the Arduino's voltage regulators. The system is designed for autonomous navigation with manual override capabilities through a Blynk app interface.
Component List
Microcontrollers
- Arduino UNO: A microcontroller board based on the ATmega328P, featuring digital and analog I/O pins.
- ESP8266 NodeMCU: A WiFi module with an integrated microcontroller, capable of connecting to the internet or a local network.
Sensors
- IR Sensor: Used to detect the presence of objects or changes in a surface to navigate the environment.
- HC-SR04 Ultrasonic Sensor: Measures distances using ultrasonic waves, useful for obstacle avoidance and navigation.
- RFID-RC522: An RFID reader for contactless communication, used to identify RFID tags.
Actuators
- DC Motors: Electric motors that convert electrical energy into mechanical rotation.
- L298N DC Motor Driver: An integrated circuit used for controlling the speed and direction of DC motors.
Power
- Battery Pack: Provides the necessary power to the motors and the motor driver.
Wiring Details
Arduino UNO
- 5V: Powers the IR sensors and the HC-SR04 ultrasonic sensor.
- GND: Common ground for the IR sensors, HC-SR04, ESP8266 NodeMCU, RFID-RC522, and L298N motor driver.
- Digital Pins (D0-D13): Various connections to the IR sensors, HC-SR04, RFID-RC522, L298N motor driver, and ESP8266 NodeMCU for control signals.
- Analog Pins (A0-A5): Used for interfacing with the RFID-RC522 and HC-SR04 sensors.
- Vin: Connected to the battery pack to power the Arduino UNO.
IR Sensor
- VCC: Connected to the 5V output on the Arduino UNO.
- GND: Connected to the common ground.
- Out: Connected to digital pins on the Arduino UNO for object detection signals.
HC-SR04 Ultrasonic Sensor
- VCC: Connected to the 5V output on the Arduino UNO.
- GND: Connected to the common ground.
- ECHO: Connected to an analog pin on the Arduino UNO to receive the distance measurement.
- TRIG: Connected to an analog pin on the Arduino UNO to trigger distance measurement.
RFID-RC522
- VCC (3.3V): Connected to the 3.3V output on the Arduino UNO.
- RST: Connected to an analog pin on the Arduino UNO for reset control.
- GND: Connected to the common ground.
- SDA, SCK, MISO, MOSI: Connected to specific digital pins on the Arduino UNO for SPI communication.
L298N DC Motor Driver
- 12V: Connected to the positive terminal of the battery pack.
- GND: Connected to the common ground.
- 5V: Powers the internal logic of the motor driver.
- ENA, ENB: Connected to digital pins on the Arduino UNO for enabling motor outputs.
- IN1, IN2, IN3, IN4: Connected to digital pins on the Arduino UNO for motor direction control.
- OUT1, OUT2, OUT3, OUT4: Connected to the DC motors for driving them.
ESP8266 NodeMCU
- 3V3: Connected to the 3.3V output on the Arduino UNO.
- GND: Connected to the common ground.
- RX, TX: Connected to digital pins on the Arduino UNO for serial communication.
DC Motors
- Pin 1 and Pin 2: Connected to the outputs of the L298N motor driver to control the motor's rotation and speed.
Battery Pack
- + (Positive): Connected to the 12V input of the L298N motor driver and Vin of the Arduino UNO.
- - (Negative): Connected to the common ground.
Documented Code
Arduino UNO Code
#include <SPI.h>
#include <MFRC522.h>

// Define sensor pins
const int leftSensorPin = 2;
const int rightSensorPin = 3;
const int trigPin = 16;
const int echoPin = 17;

// Define motor pins
const int motor1Enable = 10;
const int motor1In1 = 9;
const int motor1In2 = 8;
const int motor2In3 = 7;
const int motor2In4 = 6;
const int motor2Enable = 5;
// Define RFID pins
#define RST_PIN 14
#define SS_PIN 15

MFRC522 mfrc522(SS_PIN, RST_PIN);  // Create instance of the RFID reader

bool manualMode = false; // Flag for manual mode

void setup() {
  // Initialize motor pins
  pinMode(motor1Enable, OUTPUT);
  pinMode(motor1In1, OUTPUT);
  pinMode(motor1In2, OUTPUT);
  pinMode(motor2Enable, OUTPUT);
  pinMode(motor2In3, OUTPUT);
  pinMode(motor2In4, OUTPUT);

  // Initialize sensor pins
  pinMode(leftSensorPin, INPUT);
  pinMode(rightSensorPin, INPUT);
  pinMode(trigPin, OUTPUT);
  pinMode(echoPin, INPUT);

  // RFID initialization
  SPI.begin();        // Start SPI communication
  mfrc522.PCD_Init(); // Init MFRC522 module

  Serial.begin(9600);  // For debugging
}

void loop() {
  if (Serial.available() > 0) {
    char command = Serial.read();
    handleCommand(command);
  }

  if (!manualMode) {
    autoNavigate(); // Only run automatic navigation if not in manual mode
  }
}

// Rest of the code...
ESP8266 NodeMCU Code
#include <ESP8266WiFi.h>
#include <BlynkSimpleEsp8266.h>
#include <Servo.h>

#define BLYNK_TEMPLATE_ID "YourTemplateID"
#define BLYNK_DEVICE_NAME "YourDeviceName"
#define BLYNK_AUTH_TOKEN "YourAuthToken"

char auth[] = BLYNK_AUTH_TOKEN;
char ssid[] = "YourSSID";
char pass[] = "YourPassword";

// Virtual pins for manual control
#define VPIN_FORWARD V1
#define VPIN_BACKWARD V2
#define VPIN_LEFT V3
#define VPIN_RIGHT V4
#define VPIN_STOP V5
#define VPIN_MODE V6

bool manualMode = false;

BLYNK_WRITE(VPIN_FORWARD) {
    if (manualMode && param.asInt() == 1) {
        Serial.write('F');
    }
}

// Rest of the code...
This documentation provides an overview of the circuit, including a description of each component, wiring details, and documented code for the microcontrollers. The code for the Arduino UNO includes setup and loop functions, sensor and motor pin definitions, and initialization for the RFID reader and serial communication. The ESP8266 NodeMCU code includes WiFi and Blynk library initialization, virtual pin definitions for manual control, and functions to handle Blynk app commands.