Cirkit Designer
Your all-in-one circuit design IDE
Home /
Project Documentation
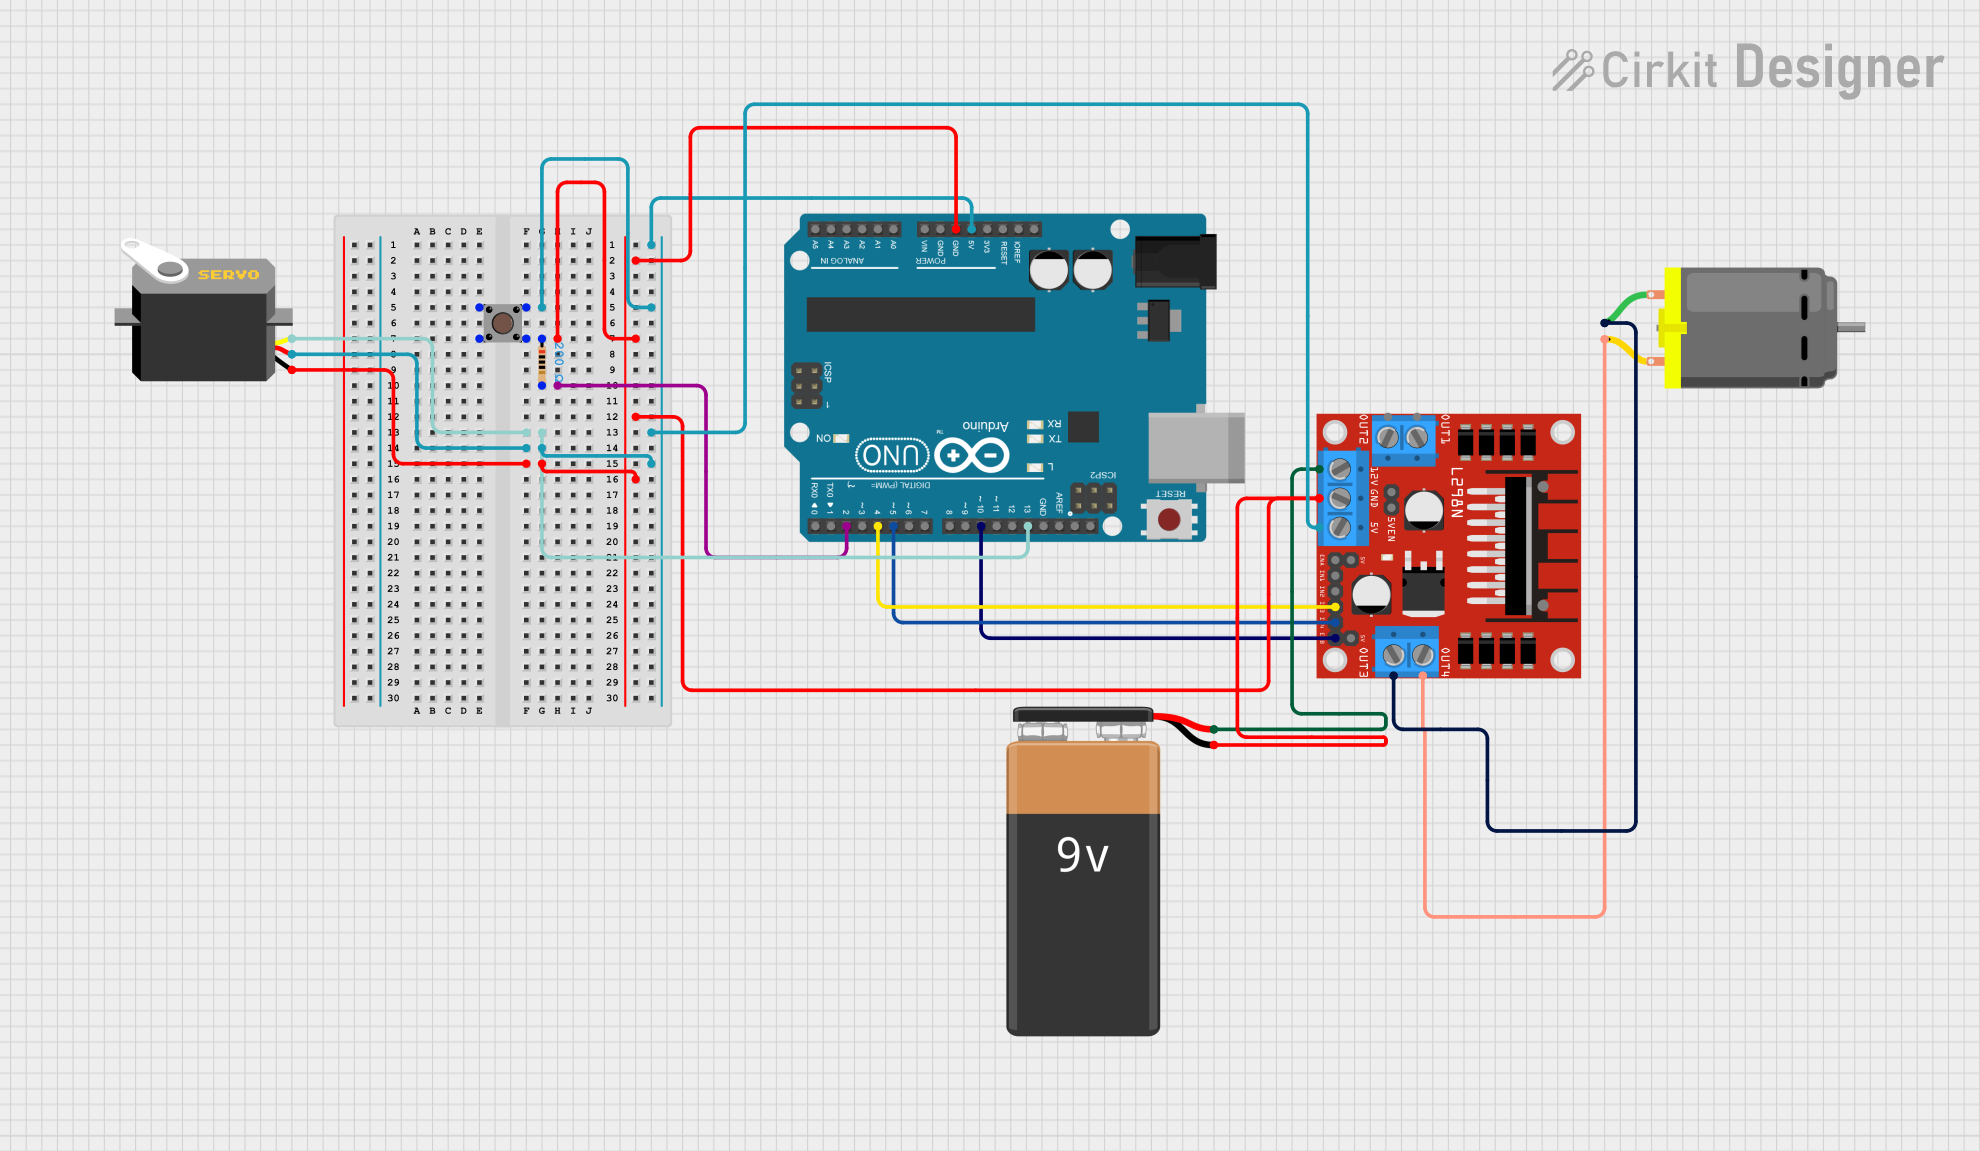
Arduino UNO Controlled Servo and DC Motor System with Pushbutton Activation
Circuit Documentation
Summary
This circuit involves an Arduino UNO microcontroller, a pushbutton, a servo motor, a DC motor controlled by an L298N motor driver, a resistor, and a 9V battery. The pushbutton is used to start the servo motor and the DC motor. The servo motor moves between 0 and 180 degrees, while the DC motor runs forward and then in reverse for a specified duration.
Component List
Arduino UNO
- Description: A microcontroller board based on the ATmega328P.
- Pins: UNUSED, IOREF, Reset, 3.3V, 5V, GND, Vin, A0, A1, A2, A3, A4, A5, SCL, SDA, AREF, D13, D12, D11, D10, D9, D8, D7, D6, D5, D4, D3, D2, D1, D0
Pushbutton
- Description: A simple pushbutton switch.
- Pins: Pin 3 (out), Pin 4 (out), Pin 1 (in), Pin 2 (in)
Servo
- Description: A servo motor for precise control of angular position.
- Pins: gnd, vcc, pulse
Resistor
- Description: A resistor with a resistance of 200 Ohms.
- Pins: pin1, pin2
- Properties: Resistance: 200 Ohms
9V Battery
- Description: A 9V battery for power supply.
- Pins: -, +
L298N DC Motor Driver
- Description: A dual H-bridge motor driver for controlling DC motors.
- Pins: OUT1, OUT2, 12V, GND, 5V, OUT3, OUT4, 5V-ENA-JMP-I, 5V-ENA-JMP-O, +5V-J1, +5V-J2, ENA, IN1, IN2, IN3, IN4, ENB
DC Motor
- Description: A DC motor for rotational motion.
- Pins: pin 1, pin 2
Wiring Details
Arduino UNO
- 5V: Connected to Pushbutton Pin 1 (in), Servo vcc, L298N DC motor driver 5V
- GND: Connected to Pushbutton Pin 3 (out), Resistor pin1, Servo gnd, 9V Battery -, L298N DC motor driver GND
- D2: Connected to Resistor pin2
- D13: Connected to Servo pulse
- D10: Connected to L298N DC motor driver ENB
- D5: Connected to L298N DC motor driver IN4
- D4: Connected to L298N DC motor driver IN3
Pushbutton
- Pin 1 (in): Connected to Arduino UNO 5V
- Pin 3 (out): Connected to Resistor pin1, Arduino UNO GND
Servo
- vcc: Connected to Arduino UNO 5V
- gnd: Connected to Resistor pin1, Arduino UNO GND
- pulse: Connected to Arduino UNO D13
Resistor
- pin1: Connected to Pushbutton Pin 3 (out), Servo gnd, Arduino UNO GND
- pin2: Connected to Arduino UNO D2
9V Battery
- -: Connected to Resistor pin1, Arduino UNO GND, L298N DC motor driver GND
- +: Connected to L298N DC motor driver 12V
L298N DC Motor Driver
- 5V: Connected to Arduino UNO 5V
- GND: Connected to Resistor pin1, Arduino UNO GND, 9V Battery -
- 12V: Connected to 9V Battery +
- ENB: Connected to Arduino UNO D10
- IN4: Connected to Arduino UNO D5
- IN3: Connected to Arduino UNO D4
- OUT3: Connected to DC Motor pin 1
- OUT4: Connected to DC Motor pin 2
DC Motor
- pin 1: Connected to L298N DC motor driver OUT3
- pin 2: Connected to L298N DC motor driver OUT4
Code Documentation
#include <Servo.h>

int ServoPin = 13;   // 서보 핀 번호
Servo sun;           // Servo 객체 생성

int buttonPin = 2;   // 버튼 핀 번호
bool programStarted = false; // 프로그램 시작 상태

// DC 모터 핀 설정
int motorIn3 = 4;    // IN3 핀
int motorIn4 = 5;    // IN4 핀
int motorEn2 = 10;   // EN2 핀 (PWM 제어)

void setup() {
  // 서보 모터 설정
  sun.attach(ServoPin);  // 서보 핀 연결

  // 버튼 설정
  pinMode(buttonPin, INPUT_PULLUP); // 버튼 핀을 풀업 입력으로 설정

  // DC 모터 핀 설정
  pinMode(motorIn3, OUTPUT);
  pinMode(motorIn4, OUTPUT);
  pinMode(motorEn2, OUTPUT);

  Serial.begin(9600);
  Serial.println("Press the button to start the servo motor.");
}

void loop() {
  // 버튼이 눌렸는지 확인
  if (digitalRead(buttonPin) == LOW && !programStarted) {
    delay(50); // 디바운싱
    if (digitalRead(buttonPin) == LOW) { // 버튼 상태 다시 확인
      programStarted = true; // 프로그램 시작
      Serial.println("Button pressed, servo motor starting!");
      controlServo();   // 서보 모터 제어 함수 호출
      controlDCMotor(); // DC 모터 제어 함수 호출
      reverseDCMotor(); // DC 모터 반대 방향 제어 함수 호출
      programStarted = false; // 프로그램 종료 후 재작동 가능
    }
  }
}

// 서보 모터를 제어하는 함수
void controlServo() {
  // 서보를 0도에서 180도로 이동
  Serial.println("Servo moving from 0 to 180 degrees...");
  sun.write(180);  // 바로 180도로 이동
  delay(1000);     // 1초 대기 (이동 시간 보장)

  // 3초 동안 멈춤
  Serial.println("Servo stopped at 180 degrees for 10 seconds.");
  delay(3000);

  // 서보를 180도에서 0도로 이동
  Serial.println("Servo returning to 0 degrees...");
  sun.write(0);    // 바로 0도로 이동
  delay(1000);     // 1초 대기

  // 3초 동안 대기
  Serial.println("Servo stopped at 0 degrees for 5 seconds.");
  delay(3000);
}

// DC 모터를 전진시키는 함수
void controlDCMotor() {
  // DC 모터를 40초 동안 동작
  Serial.println("DC motor running forward for 40 seconds...");
  digitalWrite(motorIn3, HIGH); // IN3 HIGH
  digitalWrite(motorIn4, LOW);  // IN4 LOW (모터 전진)
  analogWrite(motorEn2, 255);   // 최대 속도로 동작 (PWM 255)

  delay(40000); // 40초 동안 동작

  // DC 모터 정지
  Serial.println("DC motor stopped.");
  digitalWrite(motorIn3, LOW); // IN3 LOW
  digitalWrite(motorIn4, LOW); // IN4 LOW (모터 정지)
  analogWrite(motorEn2, 0);    // PWM 신호 0
}

// DC 모터를 반대 방향으로 동작시키는 함수
void reverseDCMotor() {
  // DC 모터를 40초 동안 반대 방향으로 동작
  Serial.println("DC motor running in reverse for 40 seconds...");
  digitalWrite(motorIn3, LOW); // IN3 LOW
  digitalWrite(motorIn4, HIGH); // IN4 HIGH (모터 반대 방향)
  analogWrite(motorEn2, 255);  // 최대 속도로 동작 (PWM 255)

  delay(40000); // 40초 동안 동작

  // DC 모터 정지
  Serial.println("DC motor stopped.");
  digitalWrite(motorIn3, LOW); // IN3 LOW
  digitalWrite(motorIn4, LOW); // IN4 LOW (모터 정지)
  analogWrite(motorEn2, 0);    // PWM 신호 0
}
This code controls the servo motor and the DC motor based on the pushbutton input. The servo motor moves between 0 and 180 degrees, and the DC motor runs forward and then in reverse for 40 seconds each.