
Arduino UNO Controlled Peltier Temperature Regulator with Bluetooth Interface and I2C LCD Display
View and Edit Project In Cirkit Designer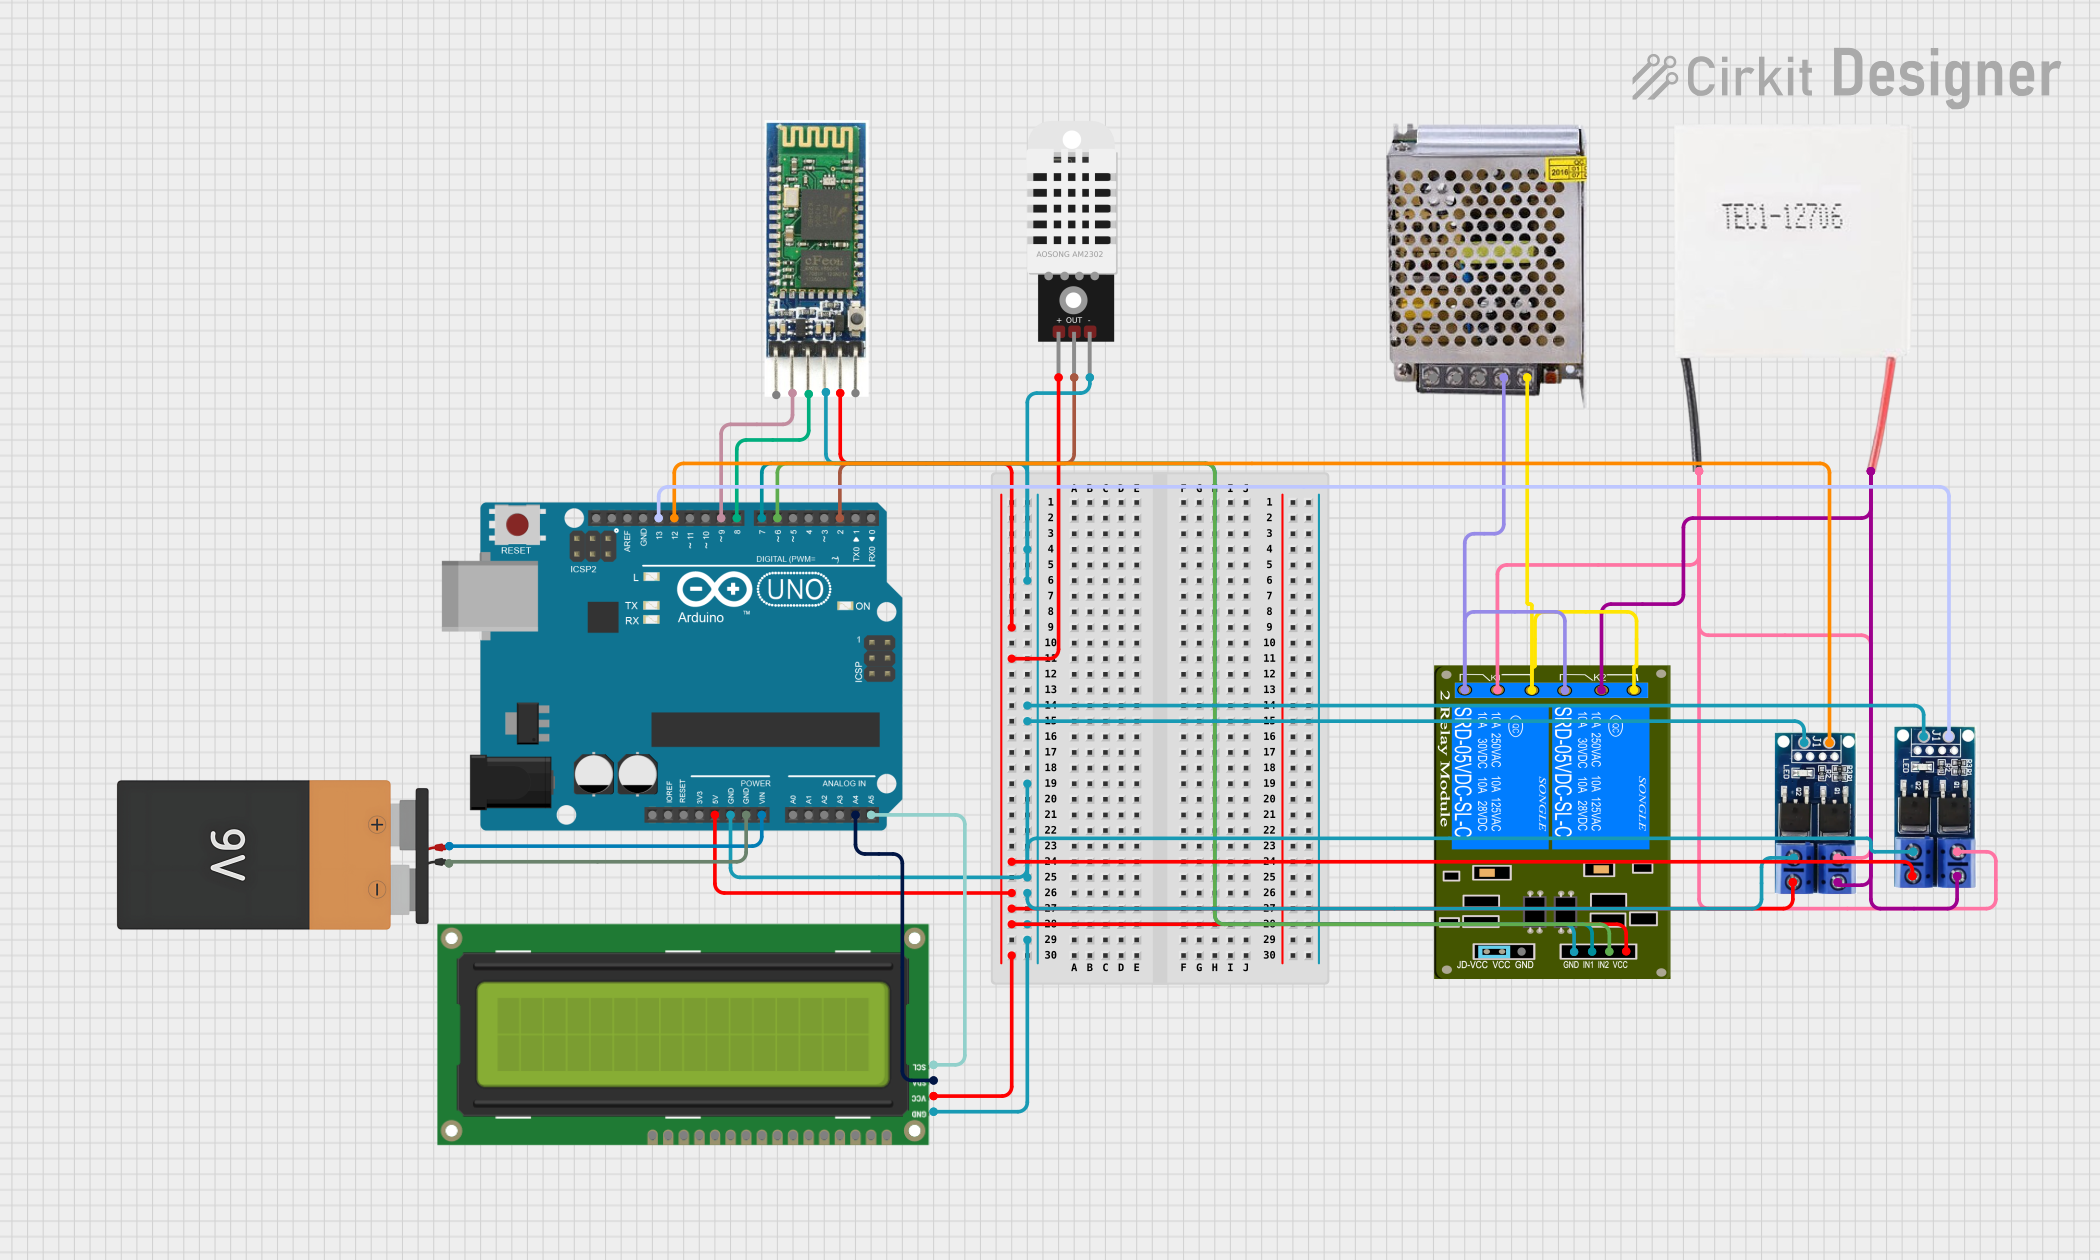
Circuit Documentation
Summary
This circuit is designed around an Arduino UNO microcontroller and includes various components such as a 2-Channel Relay, a Peltier Module, a 12V Power Supply, an I2C LCD 16x2 Screen, a Bluetooth module, a 9V Battery, a DHT22 temperature and humidity sensor, and two instances of an N-Mos PWM Trigger Motor Driver. The circuit is powered by a 9V battery connected to the Arduino UNO, which also distributes power to other components. The Arduino UNO interfaces with the I2C LCD screen, Bluetooth module, DHT22 sensor, and controls the relay and motor drivers. The relay switches the Peltier Module, which is powered by a separate 12V power supply.
Component List
- Arduino UNO: A microcontroller board based on the ATmega328P, with digital and analog I/O pins.
- 2-Channel Relay (5V 10A): A relay module capable of controlling high power devices.
- Peltier Module: A thermoelectric device used for heating or cooling applications.
- POWER SUPPLY 12V 5AMP: Provides 12V DC power for the Peltier Module.
- I2C LCD 16x2 Screen: A liquid crystal display that can show 16 characters per 2 lines, with an I2C interface.
- Bluetooth Module: Enables wireless communication with other Bluetooth-enabled devices.
- Battery 9V: Provides power to the Arduino UNO.
- DHT22: A sensor that measures temperature and humidity.
- Motor Driver - N-Mos PWM Trigger: Controls the speed and direction of a motor using PWM signals.
Wiring Details
Arduino UNO
- GND: Connected to the common ground net.
- 5V: Powers the 5V net, supplying the Bluetooth module, DHT22, Relay VCC, and I2C LCD screen.
- Vin: Connected to the 9V battery VCC.
- A4 (SDA): Connected to the I2C LCD SDA pin.
- A5 (SCL): Connected to the I2C LCD SCL pin.
- D13: Controls the PWM input of one Motor Driver.
- D12: Controls the PWM input of the other Motor Driver.
- D9: Connected to the Bluetooth module RXD pin.
- D8: Connected to the Bluetooth module TXD pin.
- D7: Controls the Relay IN1 pin.
- D6: Controls the Relay IN2 pin.
- D2: Reads the DHT22 sensor output.
2-Channel Relay (5V 10A)
- GND: Connected to the common ground net.
- VCC: Powered by the 5V net from the Arduino UNO.
- IN1: Controlled by Arduino UNO D7.
- IN2: Controlled by Arduino UNO D6.
- K1-Off, K2-Off: Connected to the 12V power supply GND (DC).
- K1-In: Connected to the negative side of the Peltier Module and Motor Driver OUT-.
- K2-On, K1-On: Connected to the 12V power supply 12V-24V Output (DC).
- K2-In: Connected to the positive side of the Peltier Module and Motor Driver OUT+.
Peltier Module
- Negative: Connected to Relay K1-In.
- Positive: Connected to Relay K2-In.
POWER SUPPLY 12V 5AMP
- GND (DC): Connected to Relay K1-Off and K2-Off.
- 12V-24V Output (DC): Connected to Relay K2-On and K1-On.
I2C LCD 16x2 Screen
- GND: Connected to the common ground net.
- VCC (5V): Powered by the 5V net from the Arduino UNO.
- SDA: Connected to Arduino UNO A4.
- SCL: Connected to Arduino UNO A5.
Bluetooth Module
- GND: Connected to the common ground net.
- VCC: Powered by the 5V net from the Arduino UNO.
- RXD: Connected to Arduino UNO D9.
- TXD: Connected to Arduino UNO D8.
Battery 9V
- GND: Connected to the common ground net.
- VCC: Connected to Arduino UNO Vin.
DHT22
- -: Connected to the common ground net.
- +: Powered by the 5V net from the Arduino UNO.
- Out: Connected to Arduino UNO D2.
Motor Driver - N-Mos PWM Trigger
- GND: Connected to the common ground net.
- DC OUT +: Powered by the 5V net from the Arduino UNO.
- + PWM: One connected to Arduino UNO D13, the other to D12.
- OUT -: Connected to Relay K1-In.
- OUT +: Connected to Relay K2-In.
Documented Code
Arduino UNO Code (sketch.ino)
void setup() {
  // put your setup code here, to run once:
  pinMode(12, OUTPUT);
}

void loop() {
  // put your main code here, to run repeatedly:

}
This code snippet is a basic template for the Arduino UNO. It includes a setup() function where pin 12 is set as an output, which corresponds to one of the Motor Driver's PWM control pins. The loop() function is currently empty and should contain the main logic that will be executed repeatedly. Additional code is required to control the components connected to the Arduino UNO, such as the relay, motor drivers, I2C LCD, Bluetooth module, and DHT22 sensor.