
ESP32-Based Water Level Monitoring System with Servo Control and I2C LCD Display
View and Edit Project In Cirkit Designer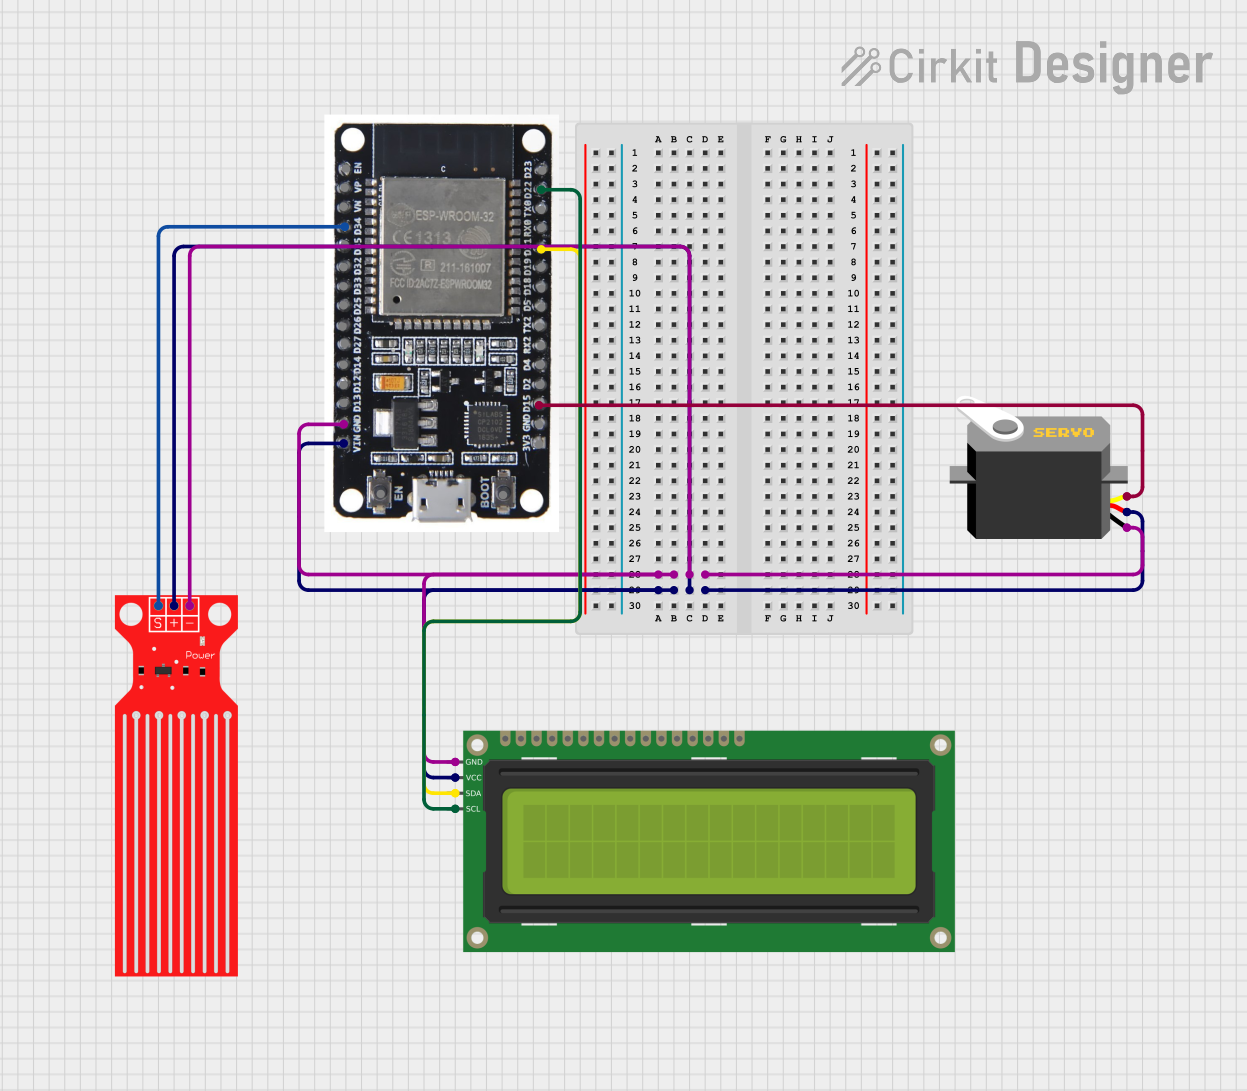
Circuit Documentation
Summary
This circuit is designed to monitor the water level in a tank and display the level on a 16x2 I2C LCD. Additionally, a servo motor is used to perform an action based on the water level. The circuit uses an ESP32 microcontroller to read the water level sensor, control the servo motor, and communicate with the LCD.
Component List
Water Level Sensor
- Description: Measures the water level in the tank.
- Pins: SIG, VCC, GND
16x2 I2C LCD
- Description: Displays the water level percentage.
- Pins: GND, VCC, SDA, SCL
Servo
- Description: Performs an action based on the water level.
- Pins: gnd, vcc, pulse
ESP32
- Description: Microcontroller that reads the water level sensor, controls the servo, and communicates with the LCD.
- Pins: EN, VP, VN, D34, D35, D32, D33, D25, D26, D27, D14, D12, D13, GND, VIN, 3V3, D15, D2, D4, RX2, TX2, D5, D18, D19, D21, RX0, TX0, D22, D23, BOOT
Wiring Details
Water Level Sensor
- SIG connected to ESP32 D34
- VCC connected to ESP32 VIN
- GND connected to ESP32 GND
16x2 I2C LCD
- GND connected to ESP32 GND
- VCC connected to ESP32 VIN
- SDA connected to ESP32 D21
- SCL connected to ESP32 D22
Servo
- gnd connected to ESP32 GND
- vcc connected to ESP32 VIN
- pulse connected to ESP32 D15
ESP32
- D34 connected to Water Level Sensor SIG
- VIN connected to Water Level Sensor VCC, Servo vcc, 16x2 I2C LCD VCC
- GND connected to Water Level Sensor GND, Servo gnd, 16x2 I2C LCD GND
- D21 connected to 16x2 I2C LCD SDA
- D22 connected to 16x2 I2C LCD SCL
- D15 connected to Servo pulse
Documented Code
#include <Wire.h>
#include <LiquidCrystal_I2C.h>
#include <ESP32Servo.h>

// Inisialisasi LCD dengan alamat I2C
LiquidCrystal_I2C lcd(0x27, 16, 2); // 16 kolom dan 2 baris

// Pin untuk sensor level air
const int waterLevelPin = 34; // Pin analog untuk sensor level air

// Pin untuk servo
const int servoPin = 15; // Ubah sesuai pin GPIO ESP32
Servo myServo;

// Variabel untuk menyimpan nilai kalibrasi
int minLevelValue = 0; // Nilai sensor saat air kosong
int maxLevelValue = 4095; // Nilai sensor saat air penuh (nilai default)

// Variabel level air
float waterLevelPercentage = 0;

void setup() {
  // Inisialisasi komunikasi dan perangkat
  Serial.begin(115200);
  Wire.begin();

  // Inisialisasi LCD
  lcd.begin(16, 2);
  lcd.backlight(); // Menyalakan backlight
  lcd.print("Calibrating...");
  delay(2000);

  // Kalibrasi sensor level air
  lcd.clear();
  lcd.print("Empty Tank...");
  delay(15000); // Tunggu hingga user mengosongkan tangki
  minLevelValue = analogRead(waterLevelPin);

  lcd.clear();
  lcd.print("Fill Tank...");
  delay(10000); // Tunggu hingga user mengisi tangki penuh
  maxLevelValue = analogRead(waterLevelPin);

  lcd.clear();
  lcd.print("Calibration Done");
  delay(2000);

  // Inisialisasi servo
  myServo.attach(servoPin);
  lcd.clear();
  lcd.print("System Ready");
  delay(2000);
}

void loop() {
  // Membaca nilai dari sensor level air
  int waterLevelValue = analogRead(waterLevelPin);

  // Mengonversi nilai sensor ke level air (0-100%)
  waterLevelPercentage = map(waterLevelValue, minLevelValue, maxLevelValue, 0, 100);
  waterLevelPercentage = constrain(waterLevelPercentage, 0, 100); // Membatasi nilai antara 0-100

  // Menampilkan nilai level air di LCD
  lcd.clear();
  lcd.setCursor(0, 0);
  lcd.print("Water Level:");
  lcd.setCursor(0, 1);
  lcd.print(waterLevelPercentage);
  lcd.print("%");

  // Menampilkan nilai level air di serial monitor
  Serial.print("Water Level: ");
  Serial.print(waterLevelPercentage);
  Serial.println("%");

  // Kontrol servo berdasarkan level air
  int servoPosition = map(waterLevelPercentage, 0, 100, 0, 180); // Konversi level air ke posisi servo
  myServo.write(servoPosition); // Atur posisi servo
  delay(1000); // Delay sebelum pembacaan berikutnya
}
This code initializes the LCD, calibrates the water level sensor, and sets up the servo. In the main loop, it reads the water level, displays it on the LCD and serial monitor, and adjusts the servo position based on the water level.