
Circuit Documentation
Summary
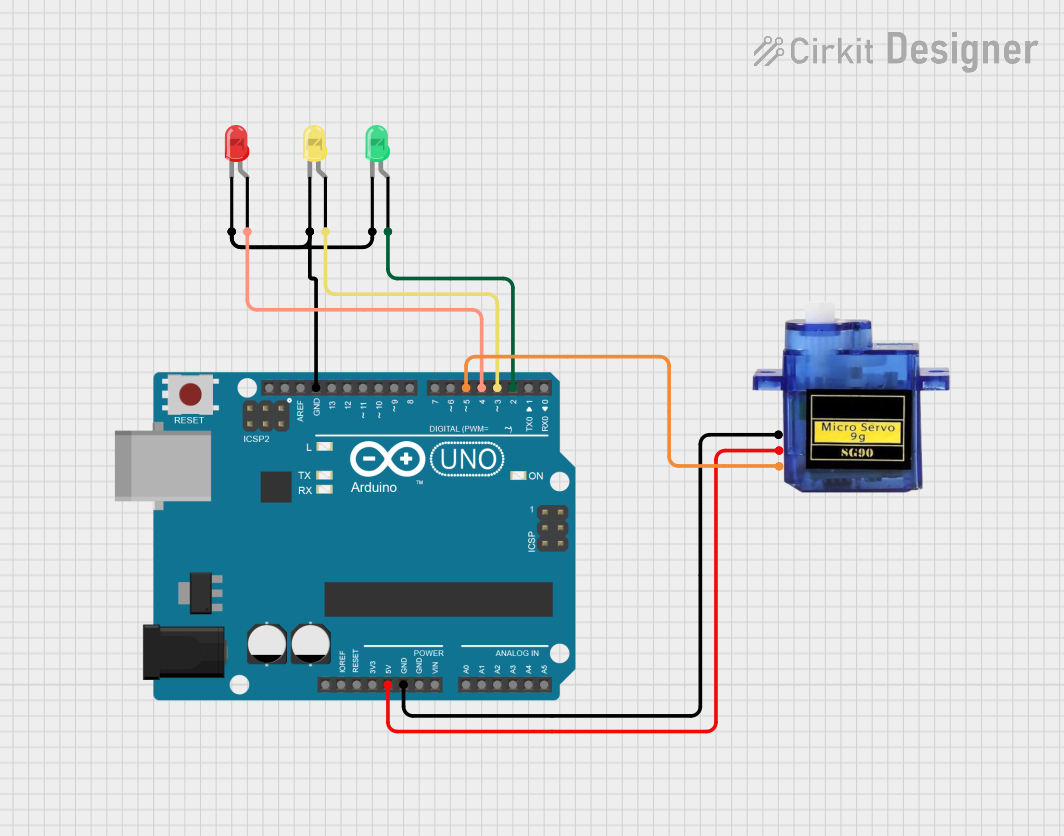
This circuit involves an Arduino UNO microcontroller, three LEDs (red, yellow, and green), and a Micro servo 9G. The Arduino UNO controls the LEDs and the servo motor. The LEDs are connected to digital pins D2, D3, and D4, while the servo motor is connected to digital pin D5. The power and ground connections are shared among the components.
Component List
Arduino UNO
- Description: A microcontroller board based on the ATmega328P.
- Pins: UNUSED, IOREF, Reset, 3.3V, 5V, GND, Vin, A0, A1, A2, A3, A4, A5, SCL, SDA, AREF, D13, D12, D11, D10, D9, D8, D7, D6, D5, D4, D3, D2, D1, D0
LED: Two Pin (red)
- Description: A red LED with two pins.
- Pins: cathode, anode
LED: Two Pin (yellow)
- Description: A yellow LED with two pins.
- Pins: cathode, anode
LED: Two Pin (green)
- Description: A green LED with two pins.
- Pins: cathode, anode
Micro servo 9G
- Description: A small servo motor with three pins.
- Pins: GND, +5V, PWM
Wiring Details
Arduino UNO
- 5V: Connected to the +5V pin of the Micro servo 9G.
- GND: Connected to the GND pin of the Micro servo 9G, cathode of the red LED, cathode of the yellow LED, and cathode of the green LED.
- D5: Connected to the PWM pin of the Micro servo 9G.
- D4: Connected to the anode of the red LED.
- D3: Connected to the anode of the yellow LED.
- D2: Connected to the anode of the green LED.
LED: Two Pin (red)
- cathode: Connected to GND of the Arduino UNO.
- anode: Connected to D4 of the Arduino UNO.
LED: Two Pin (yellow)
- cathode: Connected to GND of the Arduino UNO.
- anode: Connected to D3 of the Arduino UNO.
LED: Two Pin (green)
- cathode: Connected to GND of the Arduino UNO.
- anode: Connected to D2 of the Arduino UNO.
Micro servo 9G
- GND: Connected to GND of the Arduino UNO.
- +5V: Connected to 5V of the Arduino UNO.
- PWM: Connected to D5 of the Arduino UNO.
Code Documentation
Arduino UNO Code
void setup() {
  // put your setup code here, to run once:

}

void loop() {
  // put your main code here, to run repeatedly:

}
This code is a basic template for the Arduino UNO. The setup() function is where you initialize your components, and the loop() function is where you place the code that you want to run continuously.