
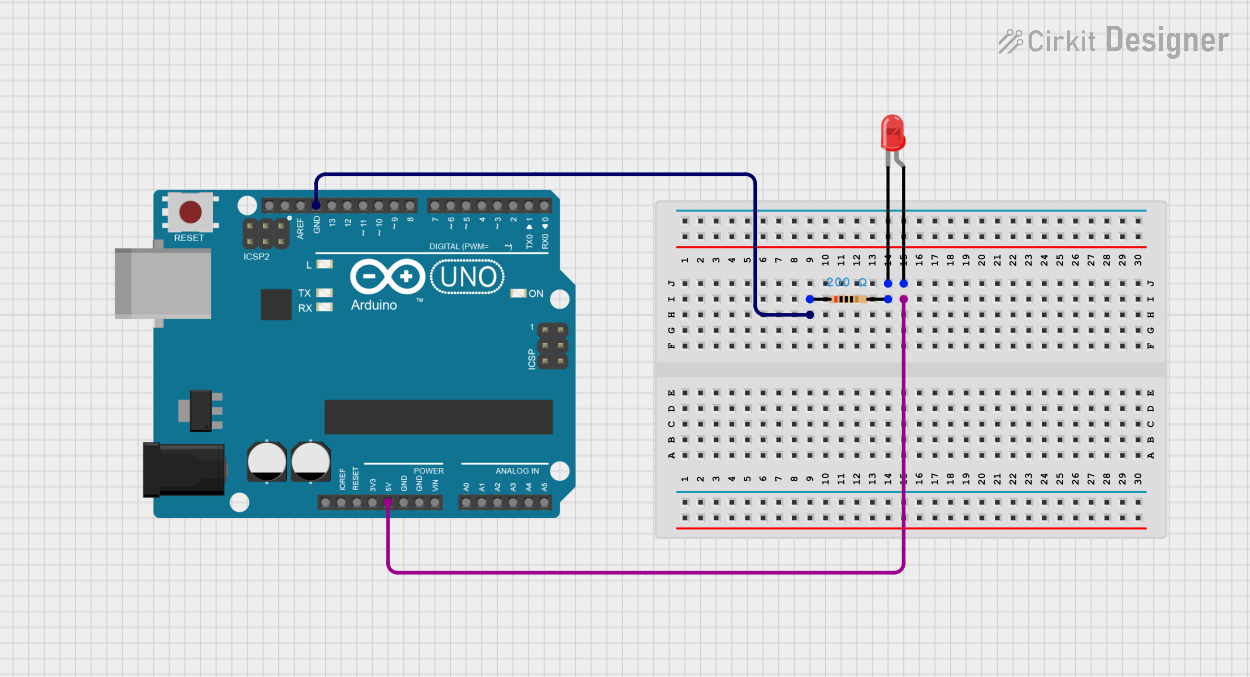
Circuit Documentation
Summary of the Circuit
The circuit described by the provided inputs consists of an Arduino UNO microcontroller, a resistor, and a red two-pin LED. The Arduino UNO is used as the central control unit for the circuit, providing power to the LED through a resistor to limit the current and protect the LED from damage. The circuit is designed to light up the LED by connecting it to a 5V power supply from the Arduino and grounding it through the resistor.
Component List
Arduino UNO
- Description: A microcontroller board based on the ATmega328P.
- Pins: UNUSED, IOREF, Reset, 3.3V, 5V, GND, Vin, A0-A5, SCL, SDA, AREF, D0-D13.
- Purpose: Acts as the central control unit for the circuit.
Resistor
- Description: A passive two-terminal electrical component that implements electrical resistance as a circuit element.
- Resistance: 200 Ohms.
- Purpose: Limits the current flowing through the LED to prevent damage.
LED: Two Pin (red)
- Description: A red light-emitting diode with two pins, anode, and cathode.
- Purpose: Emits light when powered.
Wiring Details
Arduino UNO
- 5V: Provides power to the anode of the LED.
- GND: Connected to one pin of the resistor to establish a ground reference.
Resistor
- Pin1: Connected to the GND pin of the Arduino UNO.
- Pin2: Connected to the cathode of the LED to limit the current flowing through the LED.
LED: Two Pin (red)
- Anode: Connected to the 5V pin of the Arduino UNO to receive power.
- Cathode: Connected to pin2 of the resistor, completing the circuit to ground.
Documented Code
The code provided is for the Arduino UNO microcontroller. It consists of two functions, setup() and loop(), which are standard in Arduino programming. The setup() function is called once when the program starts and is used to initialize settings. The loop() function is called repeatedly and contains the main logic of the program.
void setup() {
  // put your setup code here, to run once:

}

void loop() {
  // put your main code here, to run repeatedly:

}
The code is currently empty and does not contain any instructions to control the circuit. To light up the LED, one would typically configure one of the digital pins as an output and set it to HIGH to provide power to the LED. However, since the LED is connected directly to the 5V pin, no additional code is required for it to light up as long as the Arduino is powered on.