
Arduino UNO-Based GPS and GSM Tracker with MPU6050 and LED Indicator
View and Edit Project In Cirkit Designer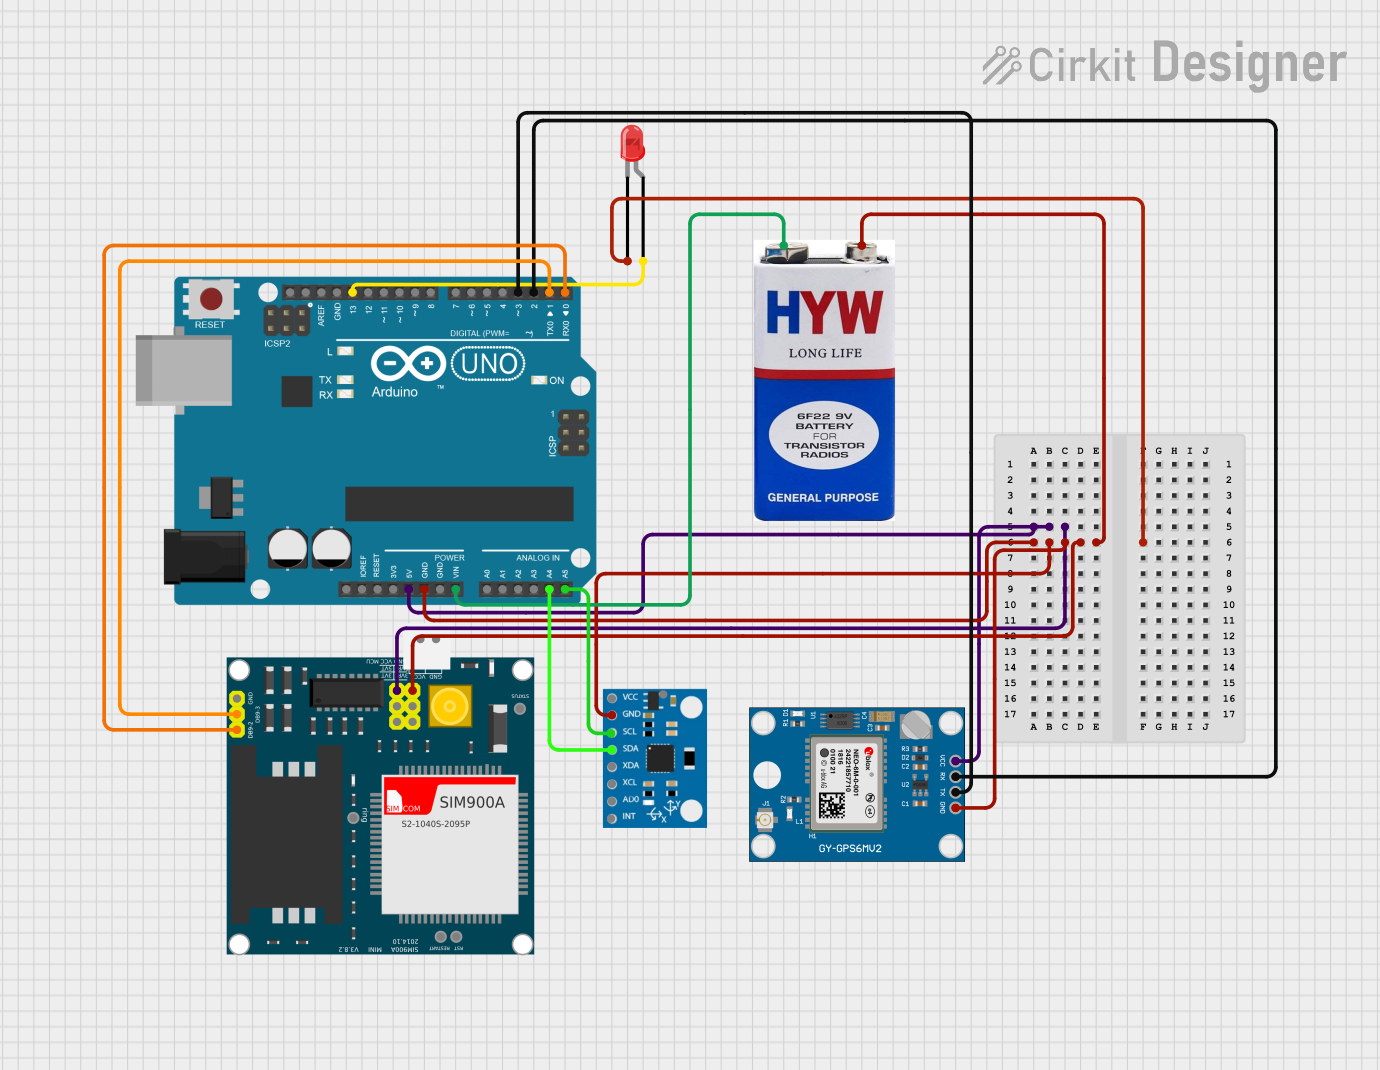
Circuit Documentation
Summary
This document provides a detailed overview of a circuit that includes an Arduino UNO microcontroller, an MPU6050 sensor, a Neo 6M GPS module, a SIM900A GSM module, a 9V battery, and a red LED. The circuit is designed to interface these components for various functionalities such as GPS tracking, GSM communication, and sensor data acquisition.
Component List
Arduino UNO
- Description: A microcontroller board based on the ATmega328P.
- Pins: UNUSED, IOREF, Reset, 3.3V, 5V, GND, Vin, A0, A1, A2, A3, A4, A5, SCL, SDA, AREF, D13, D12, D11, D10, D9, D8, D7, D6, D5, D4, D3, D2, D1, D0
MPU6050
- Description: A 6-axis motion tracking device that combines a 3-axis gyroscope and a 3-axis accelerometer.
- Pins: vcc, gnd, scl, sda, xda, xcl, AD0, int, 3.3v
Neo 6M GPS Module
- Description: A GPS module used for tracking and navigation.
- Pins: GND, TX, RX, VCC
SIM900A
- Description: A GSM module used for communication over cellular networks.
- Pins: GND, DB9-3 (RXD), DB9-2 (TXD), 5V, 3VR, 5VR, 3VT, 5VT, VCC, Ring, RESTART, RESET, STATUS
9V Battery
- Description: A standard 9V battery used to power the circuit.
- Pins: +, -
LED: Two Pin (red)
- Description: A red LED used for visual indication.
- Pins: cathode, anode
Wiring Details
Arduino UNO
- 5V connected to VCC of SIM900A and Neo 6M GPS Module
- GND connected to - of 9V battery, gnd of MPU6050, GND of SIM900A, and GND of Neo 6M GPS Module
- A5 connected to scl of MPU6050
- A4 connected to sda of MPU6050
- D3 connected to TX of Neo 6M GPS Module
- D2 connected to RX of Neo 6M GPS Module
- Vin connected to + of 9V battery
- D13 connected to anode of LED
- D1 connected to DB9-3 (RXD) of SIM900A
- D0 connected to DB9-2 (TXD) of SIM900A
MPU6050
- gnd connected to GND of Arduino UNO
- scl connected to A5 of Arduino UNO
- sda connected to A4 of Arduino UNO
Neo 6M GPS Module
- VCC connected to 5V of Arduino UNO
- GND connected to GND of Arduino UNO
- TX connected to D3 of Arduino UNO
- RX connected to D2 of Arduino UNO
SIM900A
- VCC connected to 5V of Arduino UNO
- GND connected to GND of Arduino UNO
- DB9-3 (RXD) connected to D1 of Arduino UNO
- DB9-2 (TXD) connected to D0 of Arduino UNO
9V Battery
- - connected to GND of Arduino UNO
- + connected to Vin of Arduino UNO
LED: Two Pin (red)
- cathode connected to GND
- anode connected to D13 of Arduino UNO
Documented Code
Arduino UNO Code
void setup() {
  // put your setup code here, to run once:

}

void loop() {
  // put your main code here, to run repeatedly:

}
This code is a basic template for the Arduino UNO. The setup() function is where you initialize your components, and the loop() function is where you place the code that needs to run continuously.