
Arduino UNO-Based Dual Ultrasonic Sensor System with Buzzer and LED Indicator
View and Edit Project In Cirkit Designer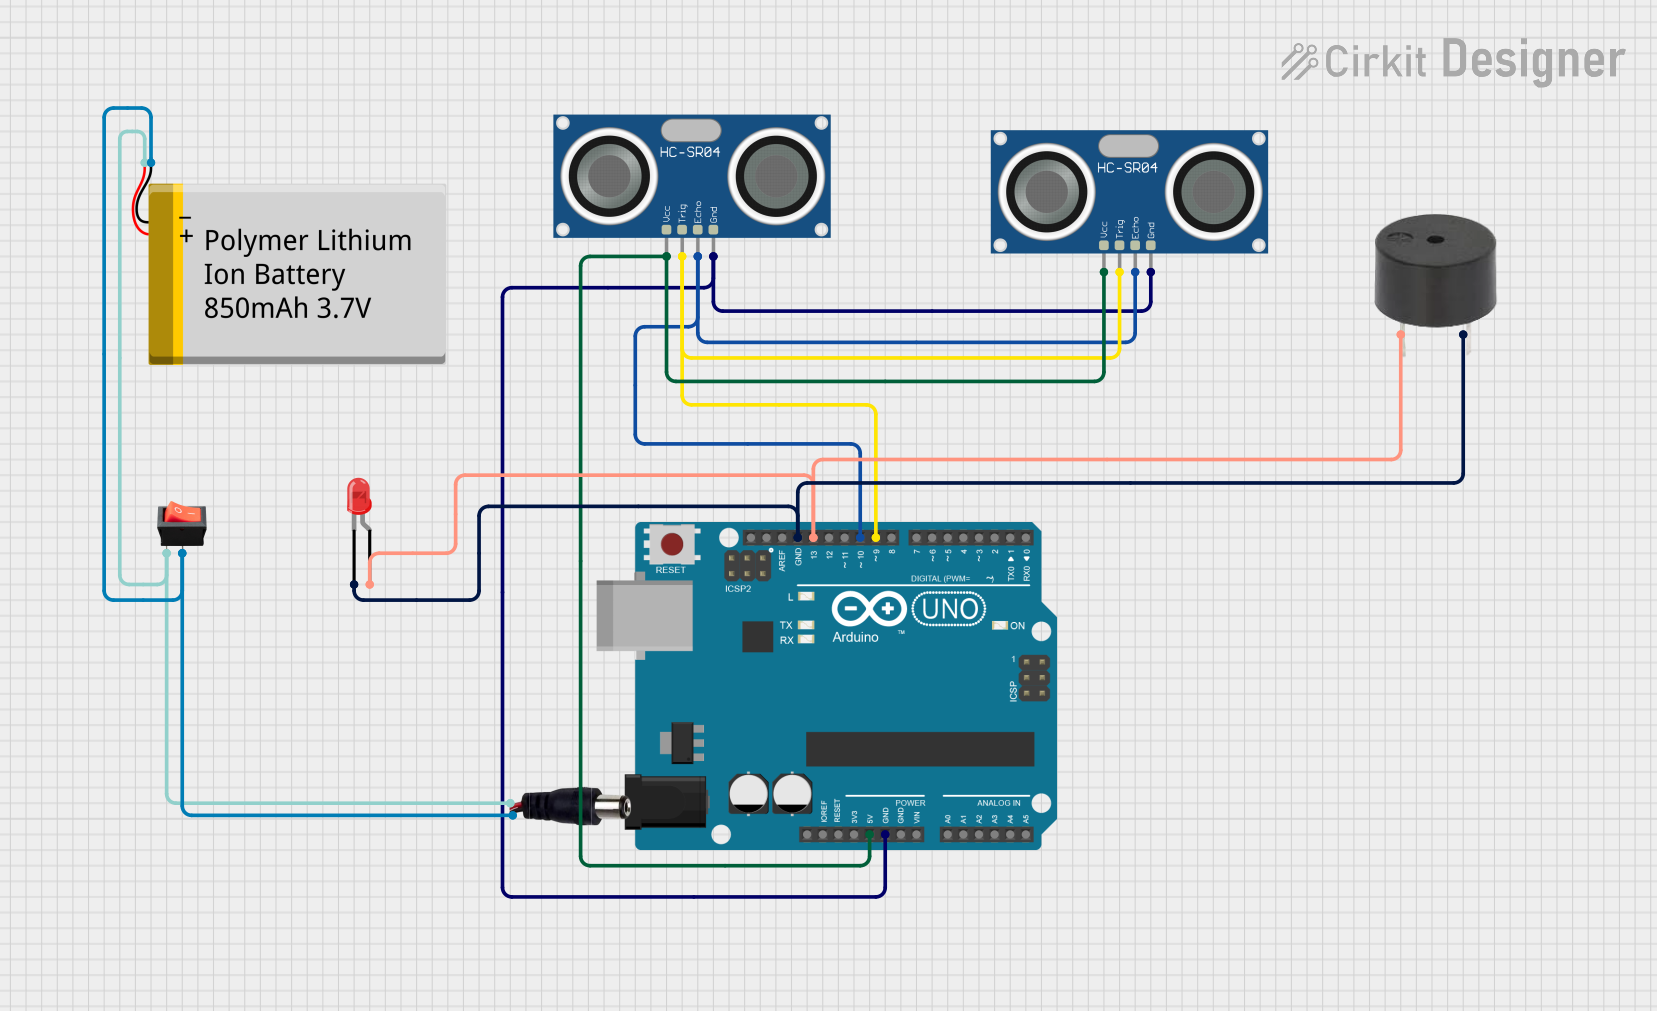
Circuit Documentation
Summary
This circuit involves an Arduino UNO microcontroller interfacing with two HC-SR04 Ultrasonic Sensors, a buzzer, a red LED, a power jack, a Polymer Lithium Ion Battery, and a rocker switch. The circuit is designed to measure distances using the ultrasonic sensors and provide feedback through the buzzer and LED. The power is supplied via a Polymer Lithium Ion Battery connected through a rocker switch and a power jack.
Component List
Arduino UNO
- Description: A microcontroller board based on the ATmega328P.
- Pins: UNUSED, IOREF, Reset, 3.3V, 5V, GND, Vin, A0, A1, A2, A3, A4, A5, SCL, SDA, AREF, D13, D12, D11, D10, D9, D8, D7, D6, D5, D4, D3, D2, D1, D0
HC-SR04 Ultrasonic Sensor
- Description: A sensor used to measure distance by using ultrasonic waves.
- Pins: VCC, TRIG, ECHO, GND
HC-SR04 Ultrasonic Sensor
- Description: A sensor used to measure distance by using ultrasonic waves.
- Pins: VCC, TRIG, ECHO, GND
Buzzer
- Description: An audio signaling device.
- Pins: PIN, GND
Power Jack
- Description: A connector for supplying power to the circuit.
- Pins: POSITIF, NEGATIF
Polymer Lithium Ion Battery - 850mAh
- Description: A rechargeable battery.
- Pins: GND, VCC
Rocker Switch
- Description: A switch used to control the power supply.
- Pins: output, input
LED: Two Pin (red)
- Description: A red light-emitting diode.
- Pins: cathode, anode
Wiring Details
Arduino UNO
5V is connected to:
- VCC of both HC-SR04 Ultrasonic Sensors
GND is connected to:
- GND of both HC-SR04 Ultrasonic Sensors
- GND of the buzzer
- cathode of the LED
D13 is connected to:
- anode of the LED
- PIN of the buzzer
D10 is connected to:
- ECHO of both HC-SR04 Ultrasonic Sensors
D9 is connected to:
- TRIG of both HC-SR04 Ultrasonic Sensors
HC-SR04 Ultrasonic Sensor
VCC is connected to:
- 5V of the Arduino UNO
GND is connected to:
- GND of the Arduino UNO
ECHO is connected to:
- D10 of the Arduino UNO
TRIG is connected to:
- D9 of the Arduino UNO
HC-SR04 Ultrasonic Sensor
VCC is connected to:
- 5V of the Arduino UNO
GND is connected to:
- GND of the Arduino UNO
ECHO is connected to:
- D10 of the Arduino UNO
TRIG is connected to:
- D9 of the Arduino UNO
Buzzer
PIN is connected to:
- D13 of the Arduino UNO
GND is connected to:
- GND of the Arduino UNO
Power Jack
POSITIF is connected to:
- input of the rocker switch
- VCC of the Polymer Lithium Ion Battery
NEGATIF is connected to:
- output of the rocker switch
- GND of the Polymer Lithium Ion Battery
Polymer Lithium Ion Battery - 850mAh
VCC is connected to:
- POSITIF of the power jack
GND is connected to:
- NEGATIF of the power jack
Rocker Switch
input is connected to:
- POSITIF of the power jack
output is connected to:
- NEGATIF of the power jack
LED: Two Pin (red)
cathode is connected to:
- GND of the Arduino UNO
anode is connected to:
- D13 of the Arduino UNO
Code Documentation
Arduino UNO Code
void setup() {
  // put your setup code here, to run once:

}

void loop() {
  // put your main code here, to run repeatedly:

}
This code is a basic template for the Arduino UNO. The setup() function is where you initialize your components and settings, and the loop() function is where the main logic of your program runs repeatedly.
Additional Documentation
The additional documentation file is empty and can be used to add further details or instructions as needed.