
Arduino UNO-Based Temperature-Controlled Water Pump with DHT11 Sensor and Relay
View and Edit Project In Cirkit Designer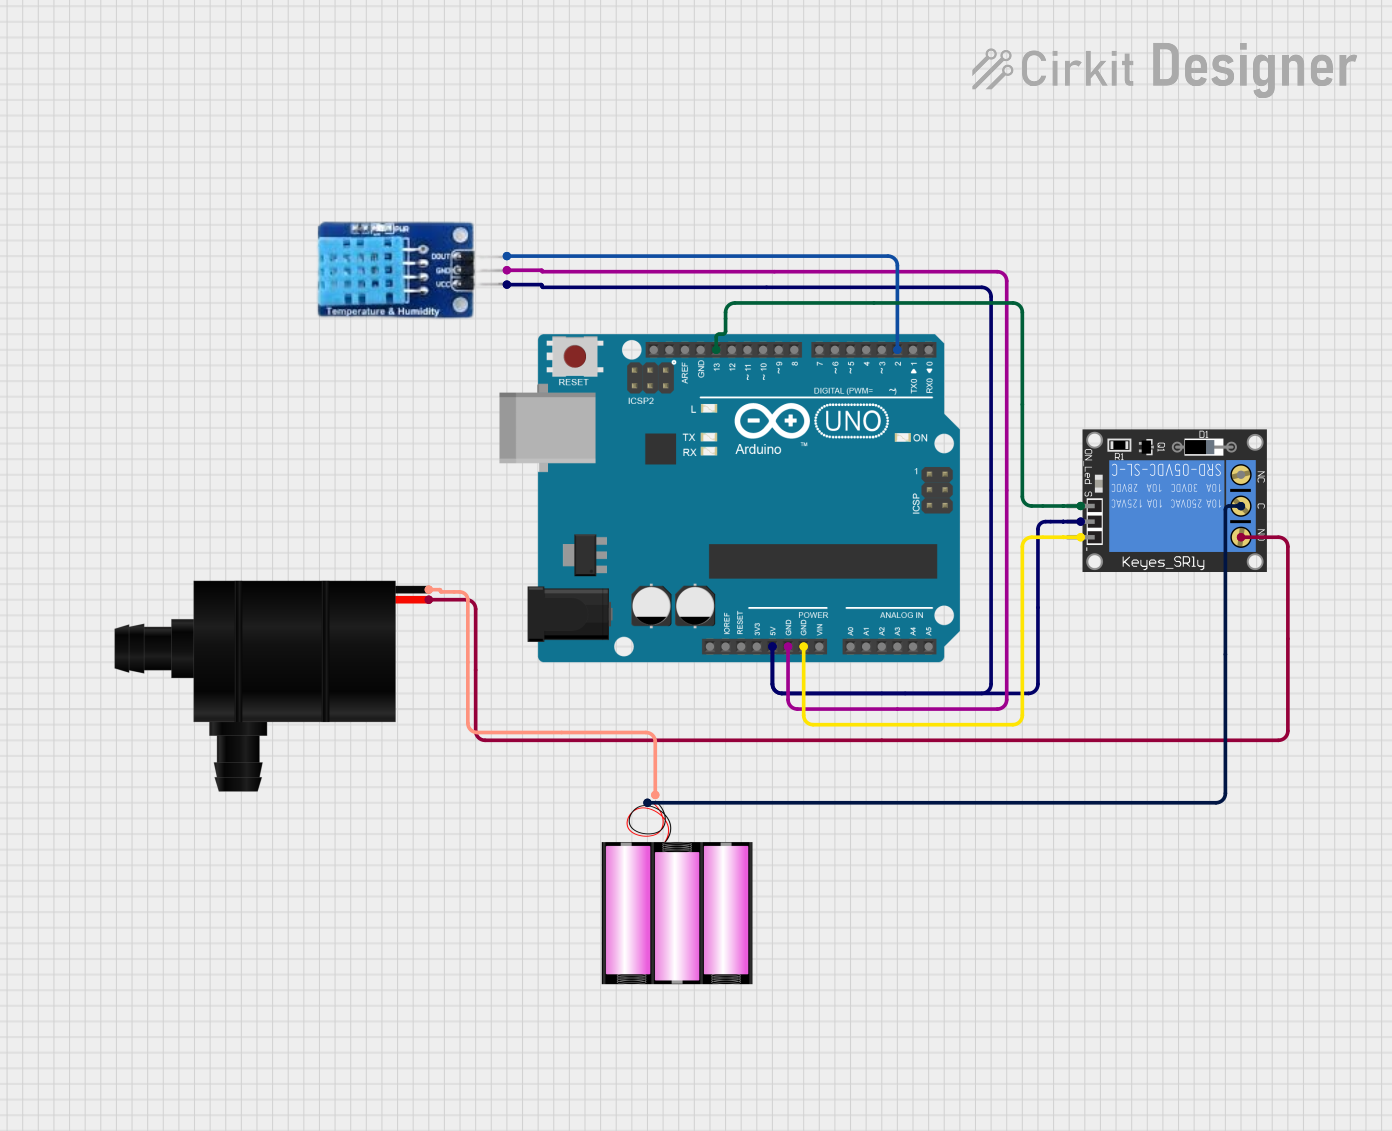
Circuit Documentation
Summary
This circuit is designed to monitor temperature using a DHT11 sensor and control a water pump via a relay module based on the temperature readings. The core of the circuit is an Arduino UNO microcontroller, which reads data from the DHT11 sensor and controls the relay module to turn the water pump on or off.
Component List
Arduino UNO
- Description: A microcontroller board based on the ATmega328P.
- Pins: UNUSED, IOREF, Reset, 3.3V, 5V, GND, Vin, A0, A1, A2, A3, A4, A5, SCL, SDA, AREF, D13, D12, D11, D10, D9, D8, D7, D6, D5, D4, D3, D2, D1, D0
DHT11
- Description: A basic, low-cost digital temperature and humidity sensor.
- Pins: DATA, GND, VCC
Water Pump
- Description: A small water pump used for liquid transfer.
- Pins: VCC, GND
1-Channel Relay (5V 10A)
- Description: A relay module used to control high voltage devices with a low voltage signal.
- Pins: NC, signal, C, power, NO, ground
Battery 12V
- Description: A 12V battery used to power the water pump.
- Pins: +, -
Wiring Details
Arduino UNO
- 5V: Connected to the power pin of the 1-Channel Relay and the VCC pin of the DHT11.
- GND: Connected to the ground pin of the 1-Channel Relay and the GND pin of the DHT11.
- D13: Connected to the signal pin of the 1-Channel Relay.
- D2: Connected to the DATA pin of the DHT11.
DHT11
- VCC: Connected to the 5V pin of the Arduino UNO.
- GND: Connected to the GND pin of the Arduino UNO.
- DATA: Connected to the D2 pin of the Arduino UNO.
Water Pump
- VCC: Connected to the NO (Normally Open) pin of the 1-Channel Relay.
- GND: Connected to the negative terminal of the 12V battery.
1-Channel Relay (5V 10A)
- power: Connected to the 5V pin of the Arduino UNO.
- ground: Connected to the GND pin of the Arduino UNO.
- signal: Connected to the D13 pin of the Arduino UNO.
- NO: Connected to the VCC pin of the Water Pump.
- C: Connected to the positive terminal of the 12V battery.
Battery 12V
- +: Connected to the C (Common) pin of the 1-Channel Relay.
- -: Connected to the GND pin of the Water Pump.
Code Documentation
#include <Wire.h>
#include <LiquidCrystal_I2C.h>
#include <DHT.h>

// Pin definitions
#define DHTPIN 2      // DHT11 data pin
#define DHTTYPE DHT11 // DHT sensor type
#define RELAYPIN 7    // Relay module control pin

// Initialize LCD (16 columns, 2 rows)
LiquidCrystal_I2C lcd(0x27, 16, 2); // Set LCD address to 0x27 (may vary)

// Initialize DHT sensor
DHT dht(DHTPIN, DHTTYPE);

void setup() {
  // Initialize serial communication
  Serial.begin(9600);

  // Initialize LCD
  lcd.begin(16, 2); // Specify 16 columns and 2 rows
  lcd.backlight();
  lcd.print("Temp Monitor");

  // Initialize DHT sensor
  dht.begin();

  // Set relay pin as output
  pinMode(RELAYPIN, OUTPUT);
  digitalWrite(RELAYPIN, HIGH); // Turn off relay initially
}

void loop() {
  // Read temperature
  float temperature = dht.readTemperature();

  // Check if the reading is valid
  if (isnan(temperature)) {
    lcd.setCursor(0, 1);
    lcd.print("Error reading");
    delay(2000);
    return;
  }

  // Display temperature on LCD
  lcd.setCursor(0, 0);
  lcd.print("Temp: ");
  lcd.print(temperature);
  lcd.print((char)223); // Degree symbol
  lcd.print("C  ");

  // Control relay and water pump
  if (temperature < 25.0) {
    digitalWrite(RELAYPIN, LOW); // Turn on relay
    lcd.setCursor(0, 1);
    lcd.print("Pump: ON       ");
  } else {
    digitalWrite(RELAYPIN, HIGH); // Turn off relay
    lcd.setCursor(0, 1);
    lcd.print("Pump: OFF      ");
  }

  delay(2000); // Wait 2 seconds before next reading
}
This code initializes the DHT11 sensor and the LCD display, reads the temperature from the DHT11 sensor, and controls the relay module to turn the water pump on or off based on the temperature reading. The temperature is displayed on the LCD, and the status of the water pump is also shown.