
Voice-Controlled Robotic Vehicle with Flame Detection and Water Pump Activation
View and Edit Project In Cirkit Designer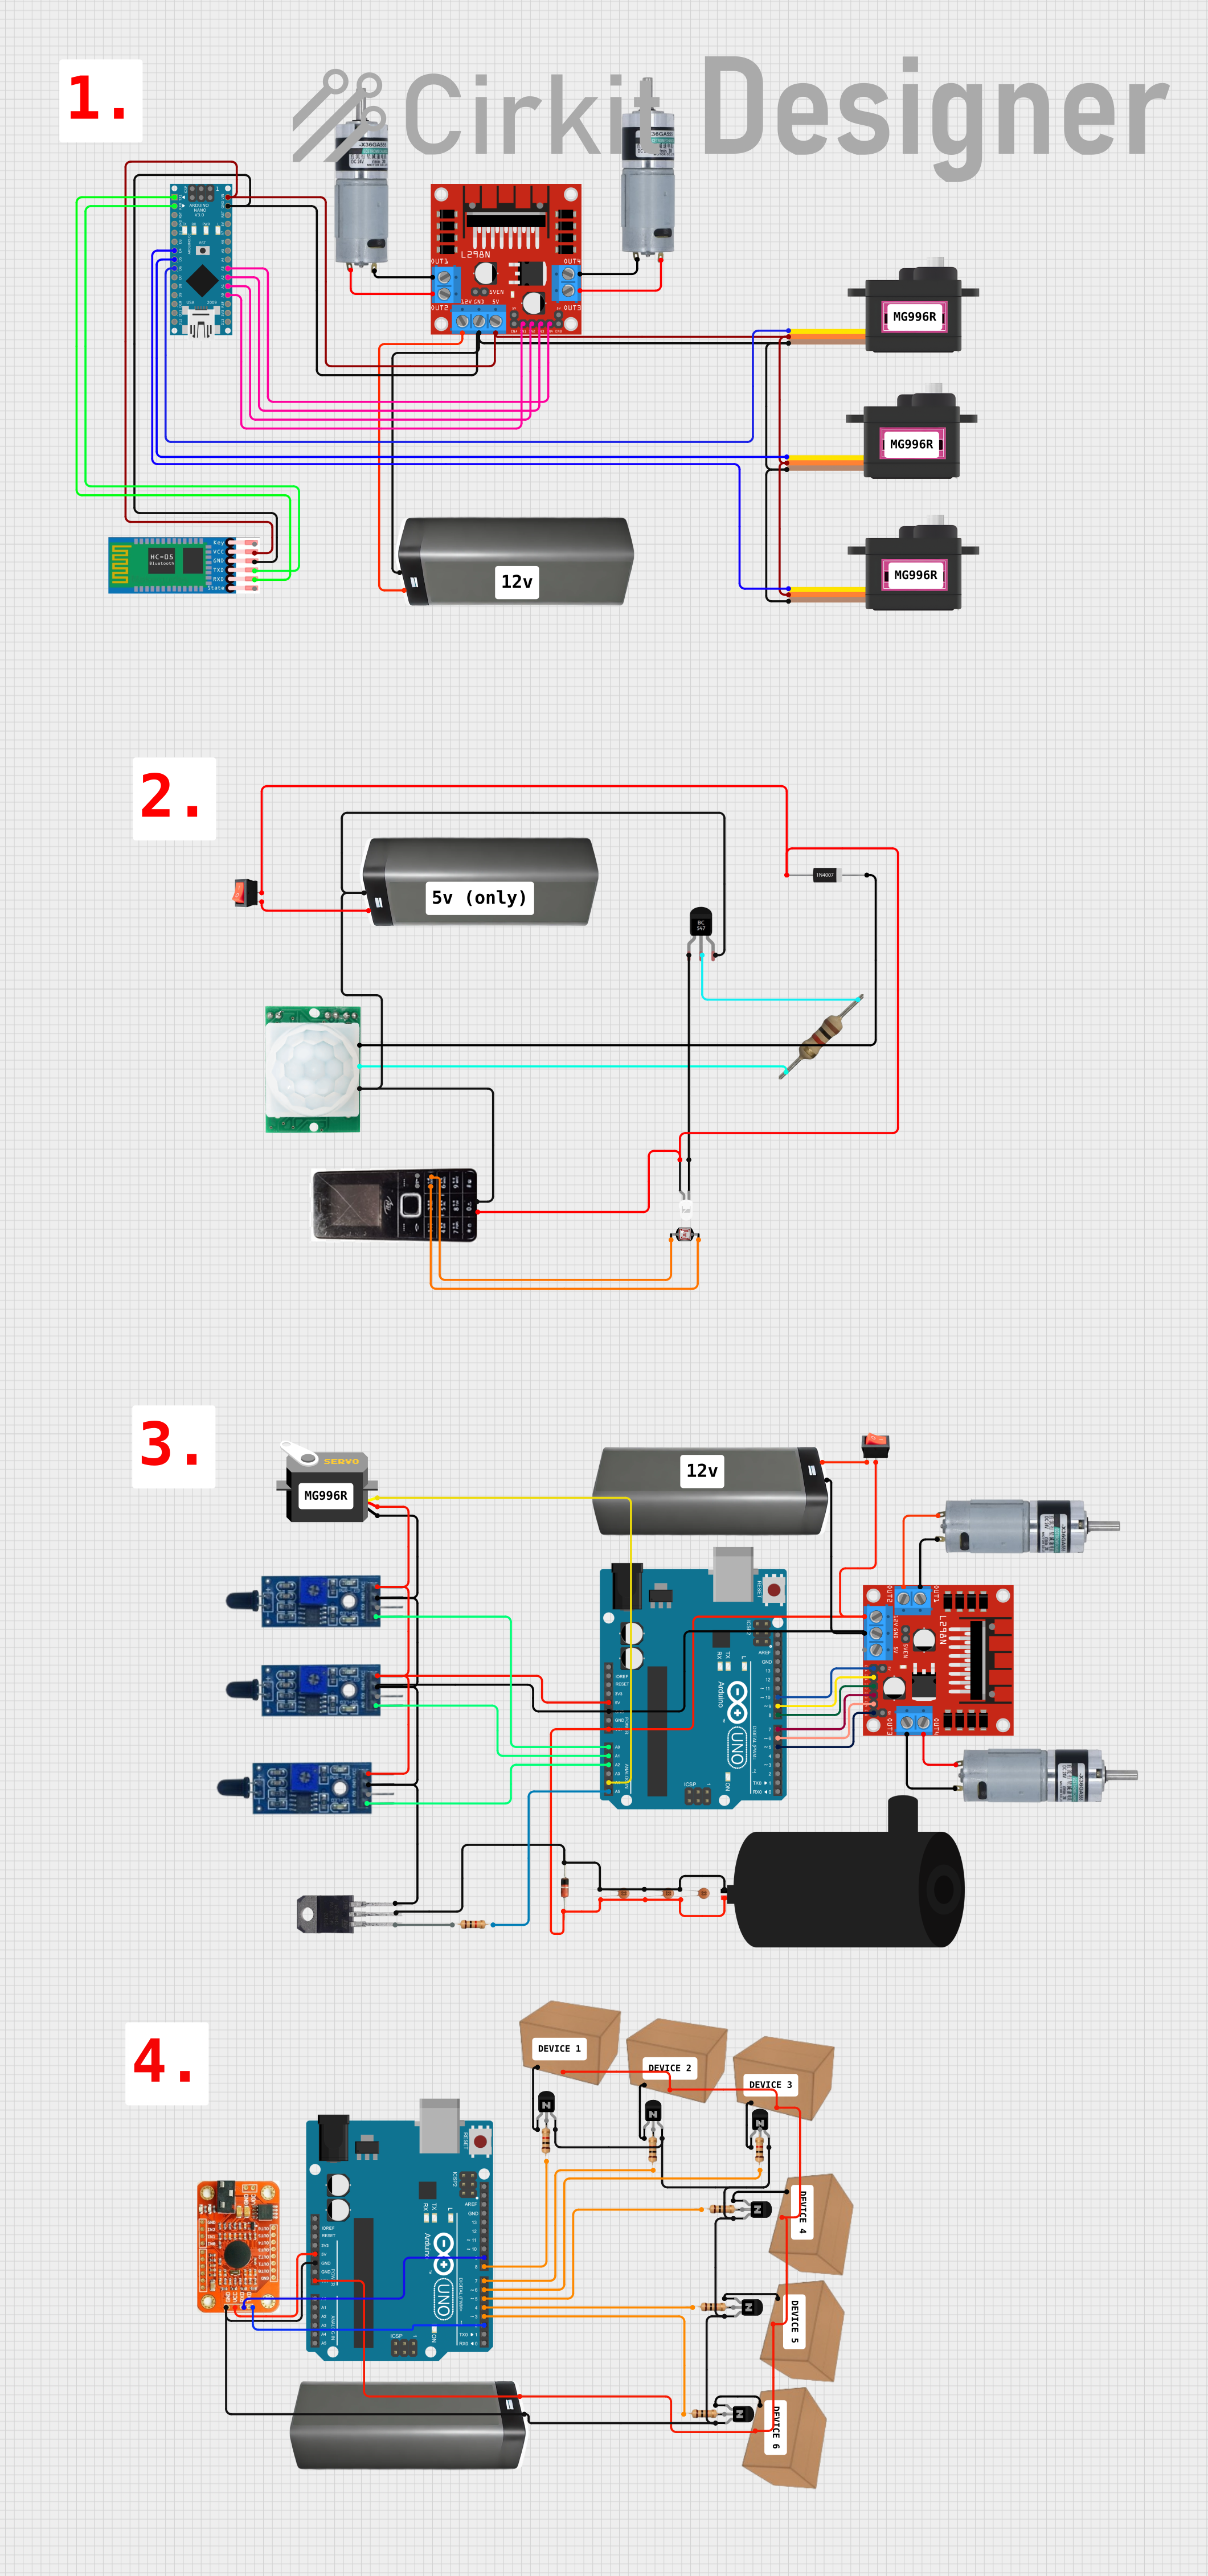
Circuit Documentation
Summary
The circuit described in the provided data is a complex system that includes a variety of electronic components, such as sensors, actuators, microcontrollers, and power management devices. The primary control is handled by an Arduino Nano, which is programmed to respond to voice commands to control motors and servos. Additionally, an Arduino UNO is used to manage sensors and a motor driver. The circuit features motor drivers for controlling MRB Planetary gearbox motors, servomotors for precise movement, and various sensors for detecting motion and flame. Power is supplied by battery packs, and a mobile phone is integrated into the system, likely for communication or control purposes.
Component List
- 1k 1/4 watt resistor: A standard resistor used for current limiting or voltage division.
- Photocell (LDR): A light-dependent resistor used for detecting light levels.
- LED (white): A white light-emitting diode used as an indicator or light source.
- BC547 Transistor: An NPN transistor used for switching or amplification.
- Mobile phone: A device included in the circuit, possibly for communication or control.
- HC-SR501 Motion sensor: A PIR sensor used for detecting motion.
- Servomotor MG90S: A small servo used for precise control of movement.
- L298N DC motor driver: A motor driver module used for controlling the direction and speed of DC motors.
- Arduino Nano: A compact microcontroller board used for controlling the circuit.
- MRB Planetary gearbox motor: A DC motor with a gearbox for increased torque.
- Hc 05: A Bluetooth module used for wireless communication.
- 1N4007 Rectifier Diode: A diode used for protecting the circuit from reverse voltage.
- Battery pack: A power source for the circuit.
- 33 pF capacitor: A small capacitor used for filtering or timing circuits.
- IN4148 diode: A fast-switching diode used for signal processing or protection.
- 1K resistor: A standard resistor used for current limiting or voltage division.
- TIP 122 transistor: A power transistor used for controlling high current loads.
- Servo: A generic servomotor for precise control of movement.
- Flame Sensor: A sensor used for detecting the presence of a flame.
- Rocker switch: A switch used for toggling the circuit on or off.
- Voice recognition module: A module used for recognizing voice commands.
- NPN Transistor (CBE): A generic NPN transistor used for switching or amplification.
- Any Electronic Device: A placeholder for any electronic device that can be connected to the circuit.
Wiring Details
Power Distribution
- Battery packs supply power to the L298N DC motor drivers, Arduino Nano, Arduino UNO, Servomotors, HC-SR501 Motion sensor, Mobile phone, Hc 05 Bluetooth module, Voice recognition module, and Any Electronic Device.
- GND lines are commonly connected among the Arduino Nano, Servomotors, Hc 05, L298N DC motor drivers, and HC-SR501 Motion sensor.
Motor Control
- MRB Planetary gearbox motors are connected to the L298N DC motor drivers for directional control.
- Arduino Nano controls the L298N DC motor driver using digital pins A0 to A3 for motor direction control.
Sensor and Actuator Interface
- HC-SR501 Motion sensor output is connected to a 1k 1/4 watt resistor.
- Photocell (LDR) is interfaced with the Mobile phone.
- Flame Sensors are connected to the Arduino UNO for flame detection.
- Servomotors are controlled by the Arduino Nano using digital pins D4, D5, and D6.
Communication
- Hc 05 Bluetooth module communicates with the Arduino Nano via serial connection using pins D0/RX and D1/TX.
- Voice recognition module is interfaced with the Arduino UNO for voice command recognition.
Switching and Protection
- LED is connected to the BC547 Transistor for switching.
- 1N4007 Rectifier Diode is used for protecting the HC-SR501 Motion sensor and Mobile phone from reverse voltages.
- Rocker switches are used to control the power flow to the circuit.
Documented Code
Arduino Nano Code (Instance ID: 689bde6e-aac7-4750-9a66-eddc7969e5cb)
// Voice control robot || Tech Yogi by NIKSON
#include<Servo.h>
Servo s1, s2, s3;
String voice;

// Motor control pins
const int LeftMotorForward = A0;
const int LeftMotorBackward = A1;
const int RightMotorForward = A2;
const int RightMotorBackward = A3;

// Function prototypes
void moveForward();
void moveBackward();
void turnRight();
void turnLeft();

void setup() {
  Serial.begin(9600);
  s1.attach(4);
  s2.attach(5);
  s3.attach(6);
  pinMode(13, OUTPUT);

  pinMode(RightMotorForward, OUTPUT);
  pinMode(LeftMotorForward, OUTPUT);
  pinMode(LeftMotorBackward, OUTPUT);
  pinMode(RightMotorBackward, OUTPUT);

  s1.write(130);
  s2.write(90);
  s3.write(50);

  digitalWrite(13, HIGH);
  delay(2000);
}

void loop() {
  while (Serial.available()) {
    delay(10);
    char c = Serial.read();
    if (c == '#') { break; }
    voice += c;
  }

  if (voice.length() > 0) {
    Serial.println(voice);
    // Voice command actions
    if (voice == "*hands up") {
      // Action for hands up
    } else if (voice == "*hands down") {
      // Action for hands down
    }
    // More voice commands...
    voice = ""; // Clear the voice command
  }
}

// Define movement functions below...
Arduino UNO Code (Instance ID: c15572e3-459c-4677-a280-0560bcfe135c)
#define enA 10
#define in1 9
#define in2 8
#define in3 7
#define in4 6
#define enB 5
#define ir_R A0
#define ir_F A1
#define ir_L A2
#define servo A4
#define pump A5
int Speed = 160;
int s1, s2, s3;

void setup() {
  Serial.begin(9600);
  pinMode(ir_R, INPUT);
  pinMode(ir_F, INPUT);
  pinMode(ir_L, INPUT);
  pinMode(enA, OUTPUT);
  pinMode(in1, OUTPUT);
  pinMode(in2, OUTPUT);
  pinMode(in3, OUTPUT);
  pinMode(in4, OUTPUT);
  pinMode(enB, OUTPUT);
  pinMode(servo, OUTPUT);
  pinMode(pump, OUTPUT);
  // Initial servo movement...
  analogWrite(enA, Speed);
  analogWrite(enB, Speed);
  delay(500);
}

void loop() {
  s1 = analogRead(ir_R);
  s2 = analogRead(ir_F);
  s3 = analogRead(ir_L);
  // Auto control logic...
}

// Define servoPulse and motor control functions below...
Arduino UNO Code for Voice Recognition (Instance ID: f7f9233b-686c-421b-854a-57422720b896)
#include <SoftwareSerial.h>
#include <VoiceRecognitionV3.h>

SoftwareSerial mySerial(2, 9); // RX, TX
VR myVR(mySerial);

uint8_t records[6];
uint8_t buf[50];

void setup() {
  mySerial.begin(9600);
  Serial.begin(9600);
  if (myVR.begin()) {
    Serial.println("VR Module ready.");
  } else {
    Serial.println("VR Module not detected.");
    while (1);
  }
  myVR.clear();
  myVR.load((uint8_t)0, records, 6);
  Serial.println("Speak to the module for training...");
}

void loop() {
  int ret = myVR.recognize(buf, 50);
  if (ret > 0) {
    Serial.print("Command Index: ");
    Serial.println(buf[1]);
    delay(1000);
  }
}
This documentation provides an overview of the circuit, including the components used, their wiring, and the code that controls the system. The code sections are simplified and include comments to indicate where additional functionality should be implemented.