
Arduino UNO-Based Temperature and Humidity Monitor with DHT11 Sensor and I2C LCD Display
View and Edit Project In Cirkit Designer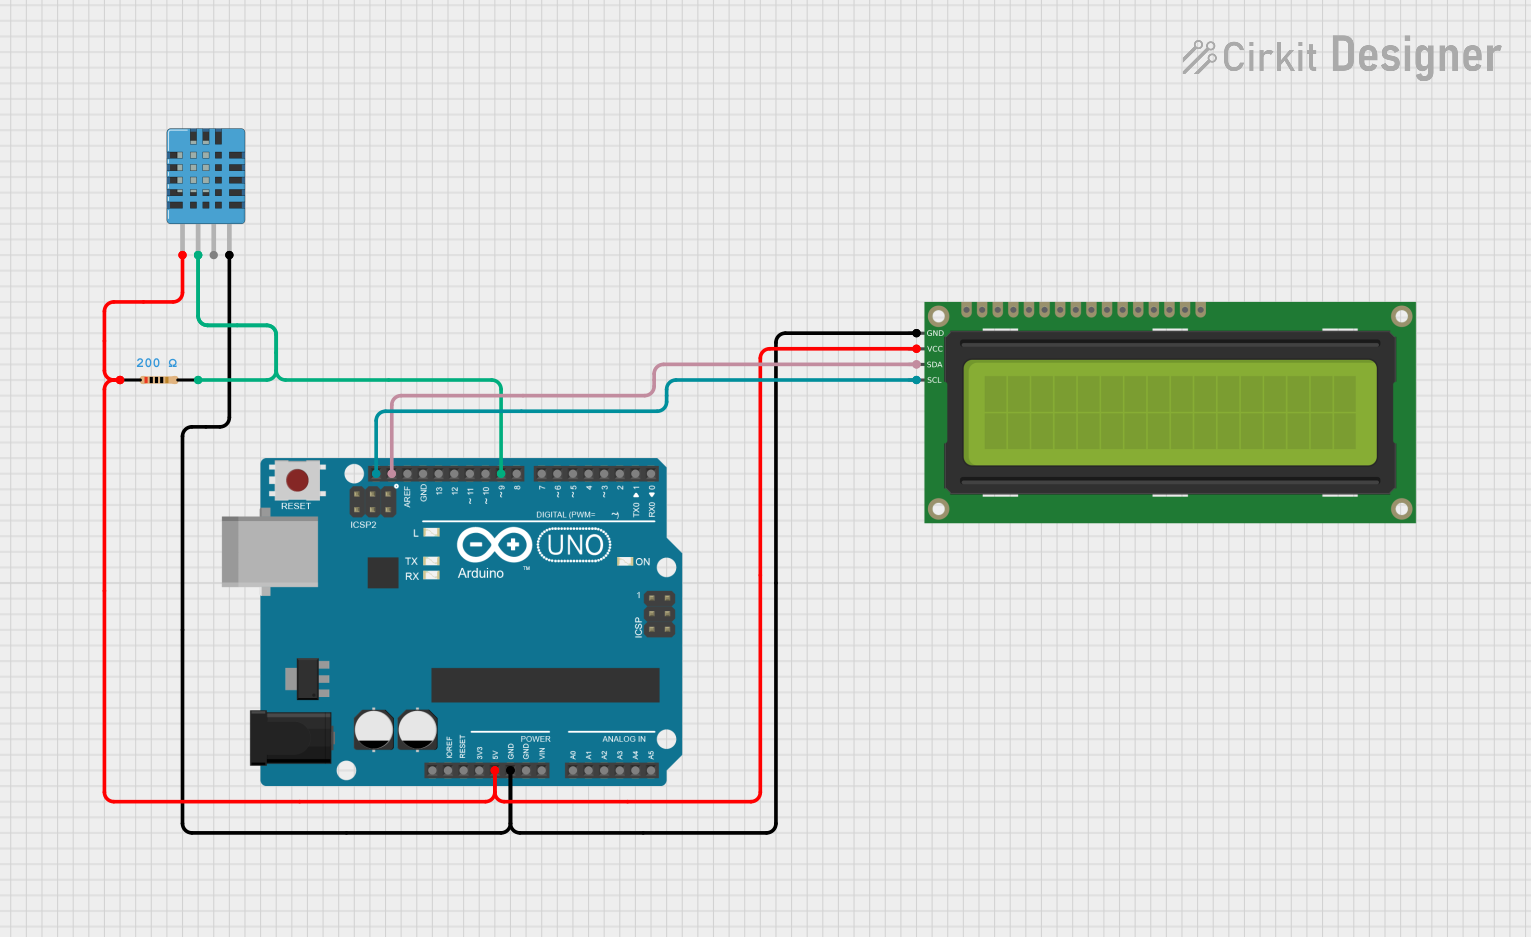
Circuit Documentation
Summary
This circuit is designed to measure temperature and humidity using a DHT11 sensor and display the readings on a 16x2 I2C LCD. The circuit is controlled by an Arduino UNO, which reads data from the DHT11 sensor and updates the LCD display accordingly. A resistor is used to ensure proper operation of the DHT11 sensor.
Component List
DHT11 Humidity and Temperature Sensor
- Description: Measures temperature and humidity.
- Pins: VDD, DATA, NULL, GND
Resistor
- Description: Provides resistance to ensure proper operation of the DHT11 sensor.
- Properties:
- Resistance: 200 Ohms
- Pins: pin1, pin2
Arduino UNO
- Description: Microcontroller used to control the circuit.
- Pins: UNUSED, IOREF, Reset, 3.3V, 5V, GND, Vin, A0, A1, A2, A3, A4, A5, SCL, SDA, AREF, D13, D12, D11, D10, D9, D8, D7, D6, D5, D4, D3, D2, D1, D0
16x2 I2C LCD
- Description: Displays temperature and humidity readings.
- Pins: GND, VCC, SDA, SCL
Wiring Details
DHT11 Humidity and Temperature Sensor
- VDD: Connected to 5V via a 200 Ohm resistor.
- DATA: Connected to Arduino UNO pin D9 via a 200 Ohm resistor.
- GND: Connected to GND.
Resistor
- pin1: Connected to 5V.
- pin2: Connected to DHT11 DATA pin and Arduino UNO pin D9.
Arduino UNO
- 5V: Connected to DHT11 VDD pin via a 200 Ohm resistor.
- GND: Connected to DHT11 GND pin and 16x2 I2C LCD GND pin.
- SCL: Connected to 16x2 I2C LCD SCL pin.
- SDA: Connected to 16x2 I2C LCD SDA pin.
- D9: Connected to DHT11 DATA pin via a 200 Ohm resistor.
16x2 I2C LCD
- GND: Connected to GND.
- VCC: Connected to 5V via a 200 Ohm resistor.
- SCL: Connected to Arduino UNO SCL pin.
- SDA: Connected to Arduino UNO SDA pin.
Code Documentation
#include <Wire.h>
#include <LiquidCrystal_I2C.h>
#include <DHT.h>

// Initialize the LCD with the I2C address (usually 0x27 or 0x3F)
LiquidCrystal_I2C lcd(0x27, 16, 2);

// Define the DHT sensor pin and type
#define DHTPIN 9
#define DHTTYPE DHT11

// Initialize the DHT sensor
DHT dht(DHTPIN, DHTTYPE);

unsigned long startTime;
float previousTemperature = NAN;

void setup() {
  // Initialize the LCD
  lcd.begin(16, 2);
  lcd.backlight();

  // Print a message to the LCD
  lcd.print("Initializing...");

  delay(500);

  // Initialize the start time
  startTime = millis();

  // Initialize the DHT sensor
  dht.begin();

  pinMode(6, OUTPUT);
  pinMode(7, OUTPUT);

  digitalWrite(6, LOW);
  digitalWrite(7, HIGH);
}

void loop() {
  // Calculate the elapsed time in milliseconds
  unsigned long elapsedTime = millis() - startTime;

  // Convert elapsed time to seconds with one decimal place
  float elapsedTimeSec = elapsedTime / 1000.0;

  // Read temperature as Celsius
  float temperature = dht.readTemperature();

  // Check if any reads failed and exit early (to try again).
  if (isnan(temperature)) {
    lcd.setCursor(0, 0);
    lcd.print("Error reading");
    return;
  }

  // Only update the display if the temperature has changed
  if (temperature != previousTemperature) {
    // Clear the first row
    lcd.setCursor(0, 0);
    lcd.print("                "); // Clear the first row by printing spaces

    // Set the cursor to the first row, first column
    lcd.setCursor(0, 0);
    lcd.print("Temp: ");

    // Clear the second row
    lcd.setCursor(0, 1);
    lcd.print("                "); // Clear the second row by printing spaces

    // Set the cursor to the second row, first column
    lcd.setCursor(0, 1);

    // Print the temperature to the LCD
    lcd.print(temperature);
    lcd.print(" C");

    // Update the previous temperature
    previousTemperature = temperature;
  }

  // Add a small delay to avoid flickering
  delay(50);
}
This code initializes the LCD and DHT11 sensor, reads the temperature from the sensor, and displays it on the LCD. The display is only updated if the temperature changes, and a small delay is added to avoid flickering.