
Arduino UNO and DHT11 Sensor-Based Temperature and Humidity Monitor
View and Edit Project In Cirkit Designer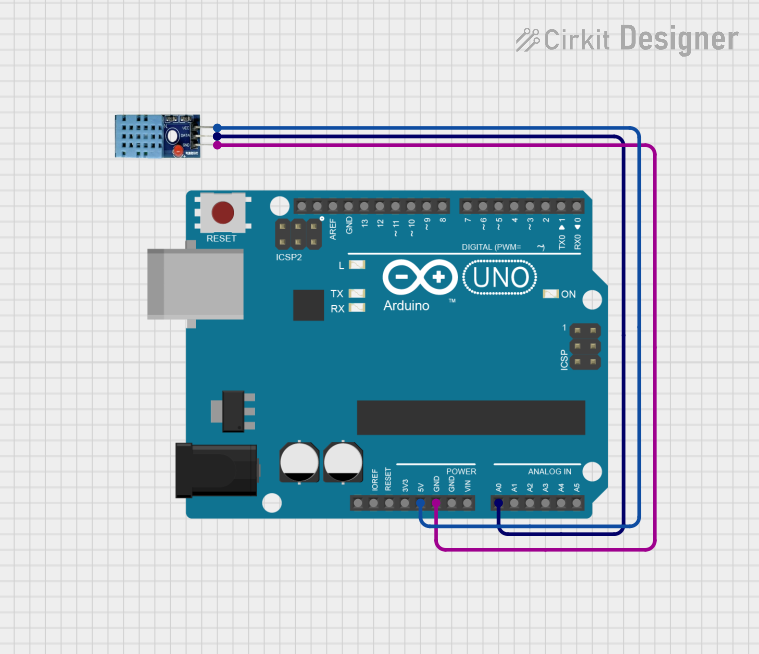
Circuit Documentation
Summary
This circuit involves an Arduino UNO microcontroller interfaced with a DHT11 temperature and humidity sensor. The Arduino reads temperature and humidity data from the DHT11 sensor and sends the data to a serial monitor for display.
Component List
DHT11 Sensor
- Description: The DHT11 is a basic, low-cost digital temperature and humidity sensor. It uses a capacitive humidity sensor and a thermistor to measure the surrounding air and spits out a digital signal on the data pin.
- Pins:
- VCC: Power supply pin (3.3V to 5V)
- GND: Ground pin
- DATA: Data pin for communication
Arduino UNO
- Description: The Arduino UNO is a microcontroller board based on the ATmega328P. It has 14 digital input/output pins, 6 analog inputs, a 16 MHz quartz crystal, a USB connection, a power jack, an ICSP header, and a reset button.
- Pins:
- 5V: 5V power supply pin
- GND: Ground pin
- A0: Analog input pin 0
- Other pins: Various digital and analog I/O pins
Wiring Details
DHT11 Sensor
- VCC: Connected to 5V on the Arduino UNO
- GND: Connected to GND on the Arduino UNO
- DATA: Connected to A0 on the Arduino UNO
Arduino UNO
- 5V: Connected to VCC on the DHT11 Sensor
- GND: Connected to GND on the DHT11 Sensor
- A0: Connected to DATA on the DHT11 Sensor
Code Documentation
/*
 * This Arduino Sketch reads temperature and humidity data from a DHT11 sensor
 * connected to pin A0 of an Arduino UNO. The data is then sent to the serial
 * monitor on a PC for display.
 */

#include <DHT.h>

#define DHTPIN A0     // Pin where the DHT11 is connected
#define DHTTYPE DHT11 // DHT 11

DHT dht(DHTPIN, DHTTYPE);

void setup() {
  Serial.begin(9600); // Initialize serial communication
  dht.begin();        // Initialize the DHT sensor
}

void loop() {
  // Wait a few seconds between measurements
  delay(2000);

  // Reading temperature or humidity takes about 250 milliseconds!
  float h = dht.readHumidity();    // Read humidity
  float t = dht.readTemperature(); // Read temperature in Celsius

  // Check if any reads failed and exit early (to try again).
  if (isnan(h) || isnan(t)) {
    Serial.println("Failed to read from DHT sensor!");
    return;
  }

  // Print the results to the Serial Monitor
  Serial.print("Humidity: ");
  Serial.print(h);
  Serial.print(" %\t");
  Serial.print("Temperature: ");
  Serial.print(t);
  Serial.println(" *C");
}
This code initializes the DHT11 sensor and reads the temperature and humidity data every 2 seconds. The data is then printed to the serial monitor. If the sensor fails to read data, an error message is displayed.