
Arduino UNO Air Quality Monitor with LED Indicator and Piezo Speaker
View and Edit Project In Cirkit Designer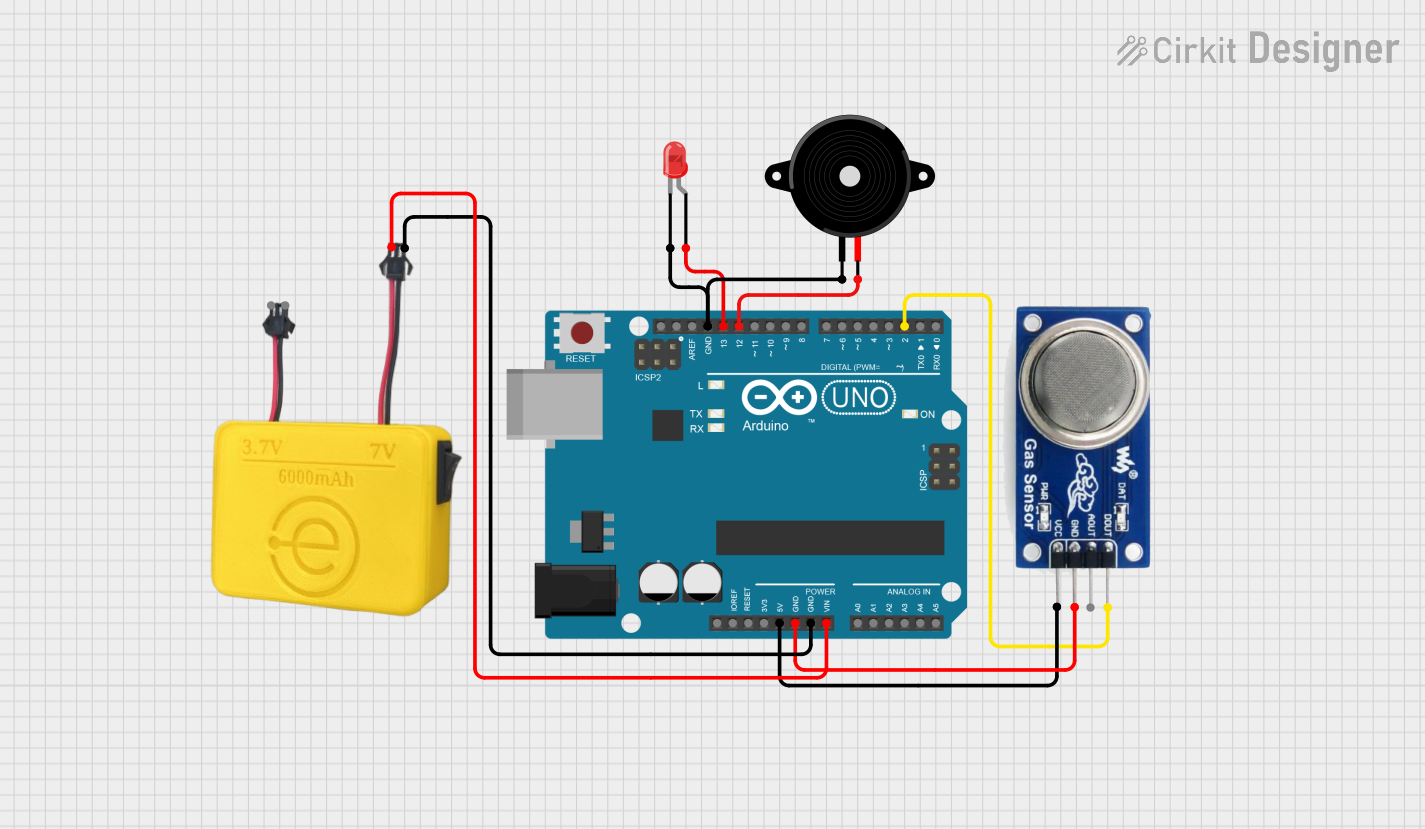
Circuit Documentation
Summary
This document provides a detailed overview of a circuit that includes an Arduino UNO microcontroller, an MQ 135 gas sensor, a red LED, a piezo speaker, and a MAHIR 7.0 power supply. The circuit is designed to power the MQ 135 sensor, control the LED and piezo speaker, and read data from the MQ 135 sensor.
Component List
Arduino UNO
- Description: A microcontroller board based on the ATmega328P.
- Pins: UNUSED, IOREF, Reset, 3.3V, 5V, GND, Vin, A0, A1, A2, A3, A4, A5, SCL, SDA, AREF, D13, D12, D11, D10, D9, D8, D7, D6, D5, D4, D3, D2, D1, D0
LED: Two Pin (red)
- Description: A red LED with two pins: cathode and anode.
- Pins: cathode, anode
Piezo Speaker
- Description: A piezoelectric speaker with two pins.
- Pins: pin1, pin2
MQ 135
- Description: A gas sensor for detecting air quality.
- Pins: D OUT, A OUT, GND, VCC
MAHIR 7.0
- Description: A power supply module.
- Pins: GND, 7V, 3.7v
Wiring Details
Arduino UNO
- 5V is connected to VCC of the MQ 135.
- GND is connected to:
- GND of the MQ 135.
- GND of the MAHIR 7.0.
- cathode of the LED: Two Pin (red).
- pin1 of the Piezo Speaker.
- Vin is connected to 7V of the MAHIR 7.0.
- D13 is connected to anode of the LED: Two Pin (red).
- D12 is connected to pin2 of the Piezo Speaker.
- D2 is connected to D OUT of the MQ 135.
LED: Two Pin (red)
- cathode is connected to GND of the Arduino UNO.
- anode is connected to D13 of the Arduino UNO.
Piezo Speaker
- pin1 is connected to GND of the Arduino UNO.
- pin2 is connected to D12 of the Arduino UNO.
MQ 135
- VCC is connected to 5V of the Arduino UNO.
- GND is connected to GND of the Arduino UNO.
- D OUT is connected to D2 of the Arduino UNO.
MAHIR 7.0
- GND is connected to GND of the Arduino UNO.
- 7V is connected to Vin of the Arduino UNO.
Code Documentation
Arduino UNO Code
void setup() {
  // put your setup code here, to run once:

}

void loop() {
  // put your main code here, to run repeatedly:

}
This code is a basic template for the Arduino UNO. The setup() function is where you initialize your variables and set up the environment. The loop() function runs continuously after the setup() function has completed. You can add your main code inside the loop() function to perform tasks repeatedly.
Additional Documentation
This section is reserved for any additional documentation or notes related to the circuit and its operation.