
Arduino Nano Battery-Powered Audio Player with SD Card and LM386 Amplifier
View and Edit Project In Cirkit Designer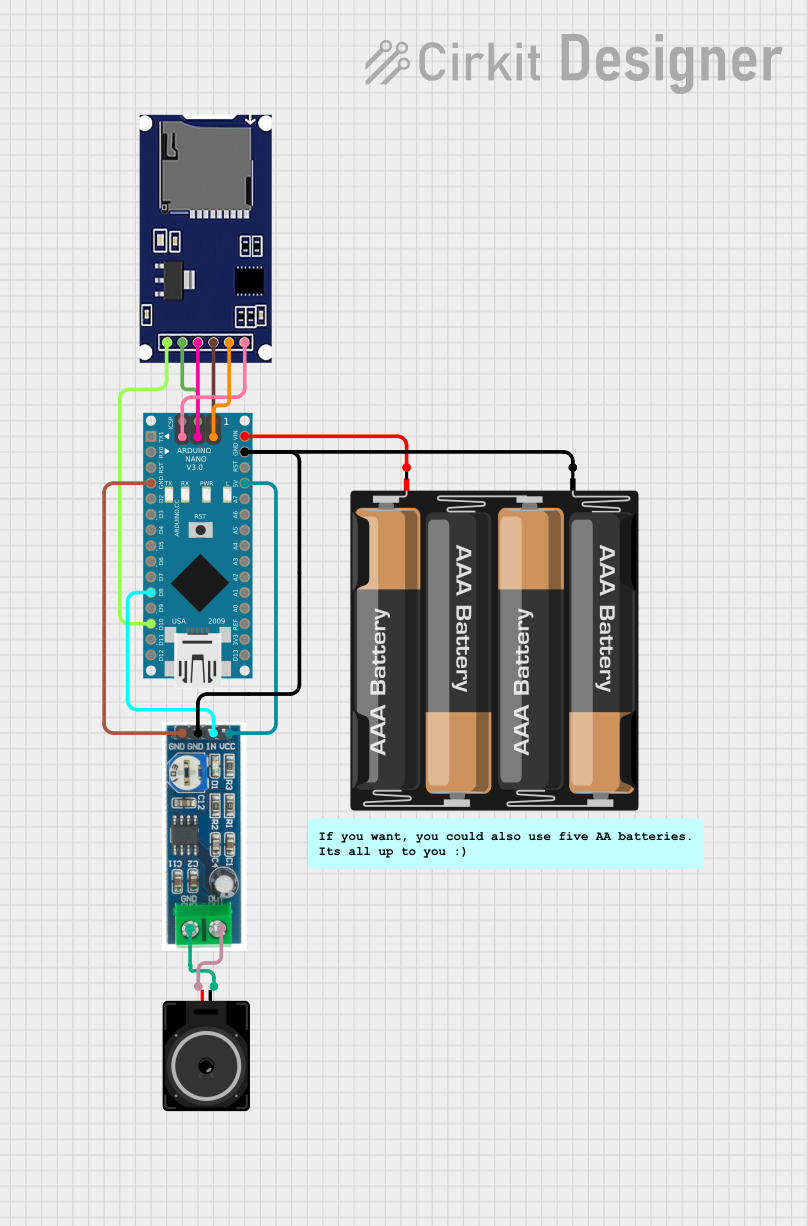
Circuit Documentation
Summary
This circuit is designed to read .wav audio files from an SD card and output the audio through a loudspeaker. The core of the circuit is an Arduino Nano, which interfaces with an SD card module to read the audio files. The audio signal is then sent to an LM386 audio amplifier module, which amplifies the signal and drives a loudspeaker. Power is supplied by a 4 x AAA battery mount.
Component List
Arduino Nano
- Description: A small, complete, and breadboard-friendly board based on the ATmega328P.
- Pins: D1/TX, D0/RX, RESET, GND, D2, D3, D4, D5, D6, D7, D8, D9, D10, D11/MOSI, D12/MISO, VIN, 5V, A7, A6, A5, A4, A3, A2, A1, A0, AREF, 3V3, D13/SCK
SD Module
- Description: A module used to interface with an SD card for reading and writing data.
- Pins: CS, SCK, MOSI, MISO, VCC, GND
Loudspeaker
- Description: A device that converts electrical signals into sound.
- Pins: pin1, pin2
LM386 Audio Amplifier Module
- Description: A low voltage audio power amplifier.
- Pins: VCC, IN, GND, OUT
4 x AAA Battery Mount
- Description: A battery holder for four AAA batteries.
- Pins: -, +
Wiring Details
Arduino Nano
GND is connected to:
- GND of the LM386 audio amplifier module
- GND of the SD module
- GND of the 4 x AAA battery mount
D8 is connected to:
- IN of the LM386 audio amplifier module
D10 is connected to:
- CS of the SD module
VIN is connected to:
-
- of the 4 x AAA battery mount
-
5V is connected to:
- VCC of the LM386 audio amplifier module
- VCC of the SD module
D12/MISO is connected to:
- MISO of the SD module
D13/SCK is connected to:
- SCK of the SD module
D11/MOSI is connected to:
- MOSI of the SD module
SD Module
CS is connected to:
- D10 of the Arduino Nano
SCK is connected to:
- D13/SCK of the Arduino Nano
MOSI is connected to:
- D11/MOSI of the Arduino Nano
MISO is connected to:
- D12/MISO of the Arduino Nano
VCC is connected to:
- 5V of the Arduino Nano
GND is connected to:
- GND of the Arduino Nano
Loudspeaker
pin1 is connected to:
- GND of the LM386 audio amplifier module
pin2 is connected to:
- OUT of the LM386 audio amplifier module
LM386 Audio Amplifier Module
GND is connected to:
- GND of the Arduino Nano
- GND of the 4 x AAA battery mount
- pin1 of the Loudspeaker
IN is connected to:
- D8 of the Arduino Nano
VCC is connected to:
- 5V of the Arduino Nano
OUT is connected to:
- pin2 of the Loudspeaker
4 x AAA Battery Mount
+ is connected to:
- VIN of the Arduino Nano
- is connected to:
- GND of the Arduino Nano
- GND of the LM386 audio amplifier module
Code Documentation
/*
 * This Arduino sketch reads .wav audio files from an SD card and outputs
 * the audio through pin D8, which is connected to an LM386 audio amplifier
 * module. The audio is then played through a loudspeaker connected to the
 * amplifier module.
 */

#include <SD.h>
#include <SPI.h>

#define SD_CS_PIN 10
#define AUDIO_PIN 8

File audioFile;

void setup() {
  // Initialize serial communication
  Serial.begin(9600);
  // Initialize the SD card
  if (!SD.begin(SD_CS_PIN)) {
    Serial.println("SD card initialization failed!");
    return;
  }
  Serial.println("SD card initialized.");
  // Open the audio file
  audioFile = SD.open("audio.wav");
  if (!audioFile) {
    Serial.println("Failed to open audio file!");
    return;
  }
  Serial.println("Audio file opened.");
  // Set the audio pin as output
  pinMode(AUDIO_PIN, OUTPUT);
}

void loop() {
  if (audioFile) {
    while (audioFile.available()) {
      int audioData = audioFile.read();
      analogWrite(AUDIO_PIN, audioData);
      delayMicroseconds(125); // Adjust for sample rate
    }
    audioFile.seek(0); // Loop the audio file
  }
}
This code initializes the SD card and reads an audio file named audio.wav. The audio data is then output through pin D8, which is connected to the LM386 audio amplifier module. The amplifier drives the loudspeaker to play the audio. The audio file is looped continuously.