
Arduino-Controlled Robotic Vehicle with Bluetooth Interface and Water Pump Activation
View and Edit Project In Cirkit Designer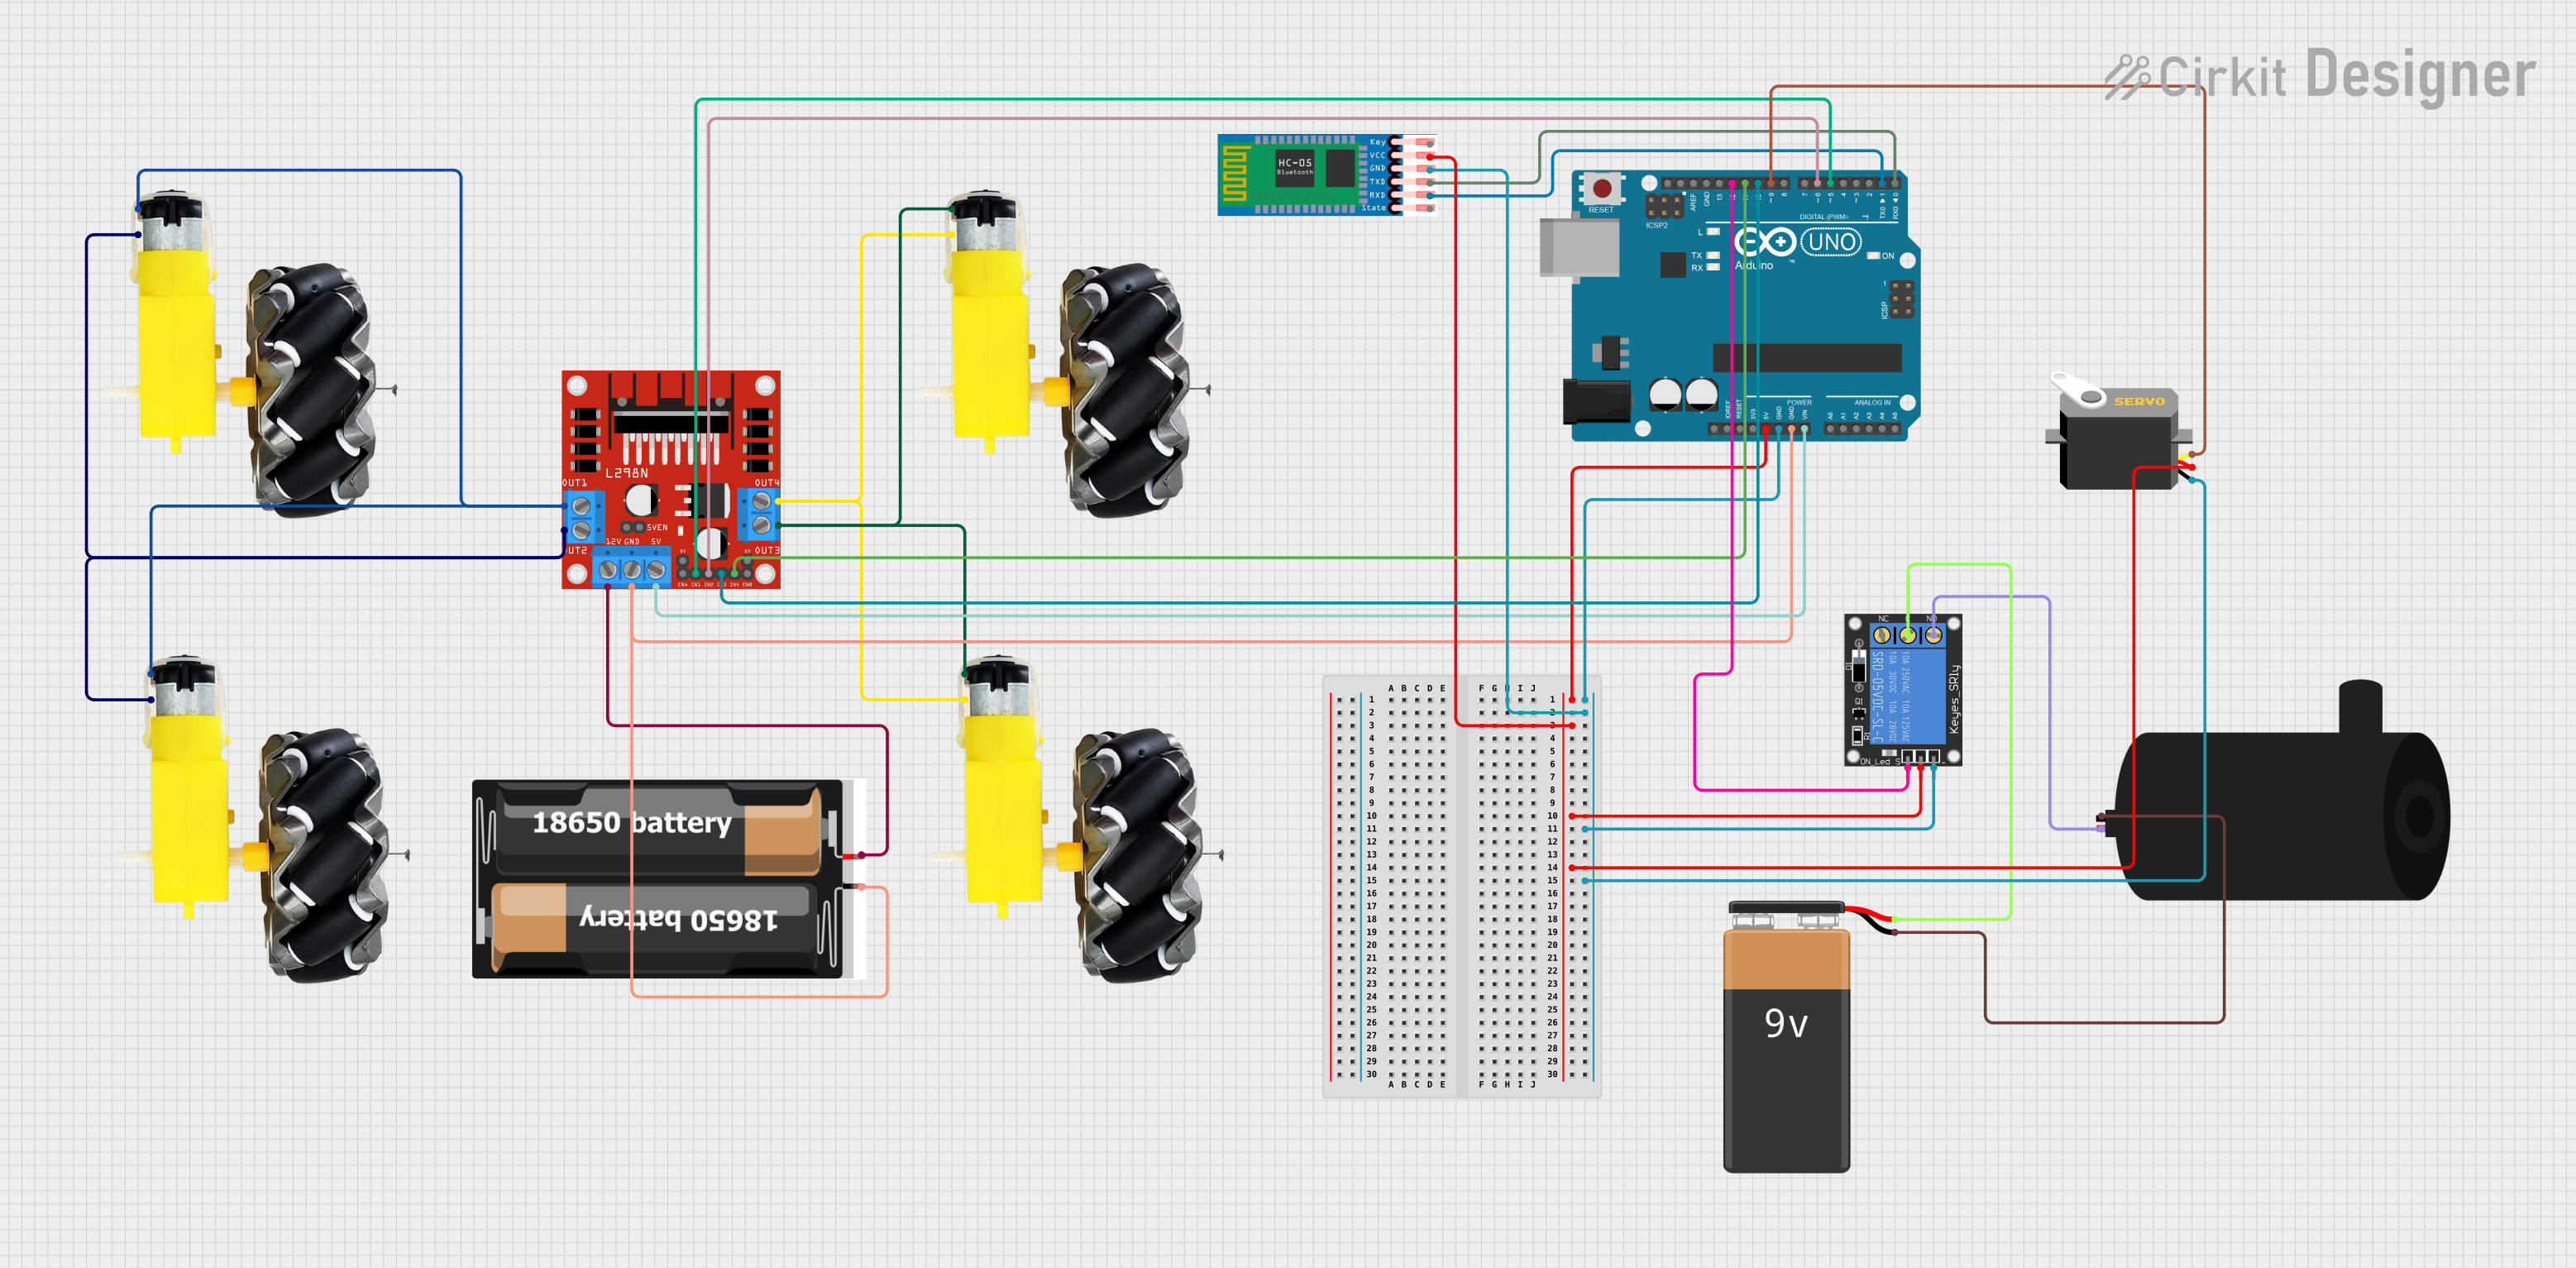
Circuit Documentation
Summary
This circuit is designed to control a set of motors with wheels, a servo, a water pump, and communicate via Bluetooth using an HC-05 module. The core controller of the circuit is an Arduino UNO, which interfaces with an L298N DC motor driver to control the motors, a 1-Channel Relay to control the water pump, and a servo motor. The power is supplied by a combination of 2x 18650 batteries and a 9V battery. The circuit is likely intended for a small robotic vehicle with wireless control and water pumping capability.
Component List
Motors and Wheels
- Description: These are the actuators for the vehicle's movement.
- Purpose: To provide locomotion to the vehicle.
L298N DC Motor Driver
- Description: An integrated circuit used for controlling DC motors.
- Purpose: To drive the motors and wheels with controlled voltage and current.
2x 18650 Batteries
- Description: Rechargeable lithium-ion cells.
- Purpose: To supply power to the motor driver and subsequently to the motors.
Arduino UNO
- Description: A microcontroller board based on the ATmega328P.
- Purpose: To control the overall operation of the circuit, including motor control, Bluetooth communication, and servo operation.
1-Channel Relay (5V 10A)
- Description: An electromechanical switch that can be controlled by the Arduino.
- Purpose: To control the power supply to the water pump.
9V Battery
- Description: A standard 9V battery.
- Purpose: To provide power to the relay and the water pump.
Servo
- Description: A rotary actuator that allows for precise control of angular position.
- Purpose: To provide controlled movement for a specific part of the vehicle, such as steering.
Water Pump
- Description: An electric pump for moving water.
- Purpose: To pump water when activated by the relay.
HC-05 Bluetooth Module
- Description: A commonly used Bluetooth module for wireless communication.
- Purpose: To enable wireless control of the vehicle via Bluetooth.
Wiring Details
Motors and Wheels
- Connected to the L298N DC motor driver's output pins (OUT1, OUT2, OUT3, OUT4).
L298N DC Motor Driver
- 12V connected to the 2x 18650 batteries.
- GND connected to the common ground.
- 5V connected to the Arduino UNO's Vin pin.
- IN1, IN2, IN3, IN4 controlled by Arduino UNO's digital pins D5, D6, D10, D11 respectively.
2x 18650 Batteries
- vcc connected to the L298N DC motor driver.
- gnd connected to the common ground.
Arduino UNO
- 5V output used to power the HC-05, relay, and servo.
- GND connected to the common ground.
- Vin connected to the L298N DC motor driver's 5V input.
- Digital pins D5, D6, D10, D11 used to control the L298N DC motor driver.
- Digital pin D12 used to control the relay signal.
- Digital pin D9 used to control the servo pulse.
- Digital pins D0 (RX) and D1 (TX) used for Bluetooth communication with the HC-05.
1-Channel Relay (5V 10A)
- power connected to the Arduino UNO's 5V.
- ground connected to the common ground.
- signal controlled by Arduino UNO's digital pin D12.
- C (Common) connected to the 9V battery's positive terminal.
- NO (Normally Open) connected to the water pump's positive terminal.
9V Battery
- + connected to the relay's common terminal.
- - connected to the water pump's negative terminal.
Servo
- vcc connected to the Arduino UNO's 5V.
- gnd connected to the common ground.
- pulse controlled by Arduino UNO's digital pin D9.
Water Pump
- positive connected to the relay's normally open terminal.
- negative connected to the 9V battery's negative terminal.
HC-05 Bluetooth Module
- VCC connected to the Arduino UNO's 5V.
- GND connected to the common ground.
- TXD connected to the Arduino UNO's digital pin D0 (RX).
- RXD connected to the Arduino UNO's digital pin D1 (TX).
Documented Code
Arduino UNO Code (sketch.ino)
void setup() {
  // put your setup code here, to run once:

}

void loop() {
  // put your main code here, to run repeatedly:

}
Note: The provided code is a template and does not contain any functional code. It needs to be filled in with the logic to control the motors, servo, relay, and Bluetooth communication based on the specific requirements of the vehicle's operation.