
Circuit Documentation
Summary
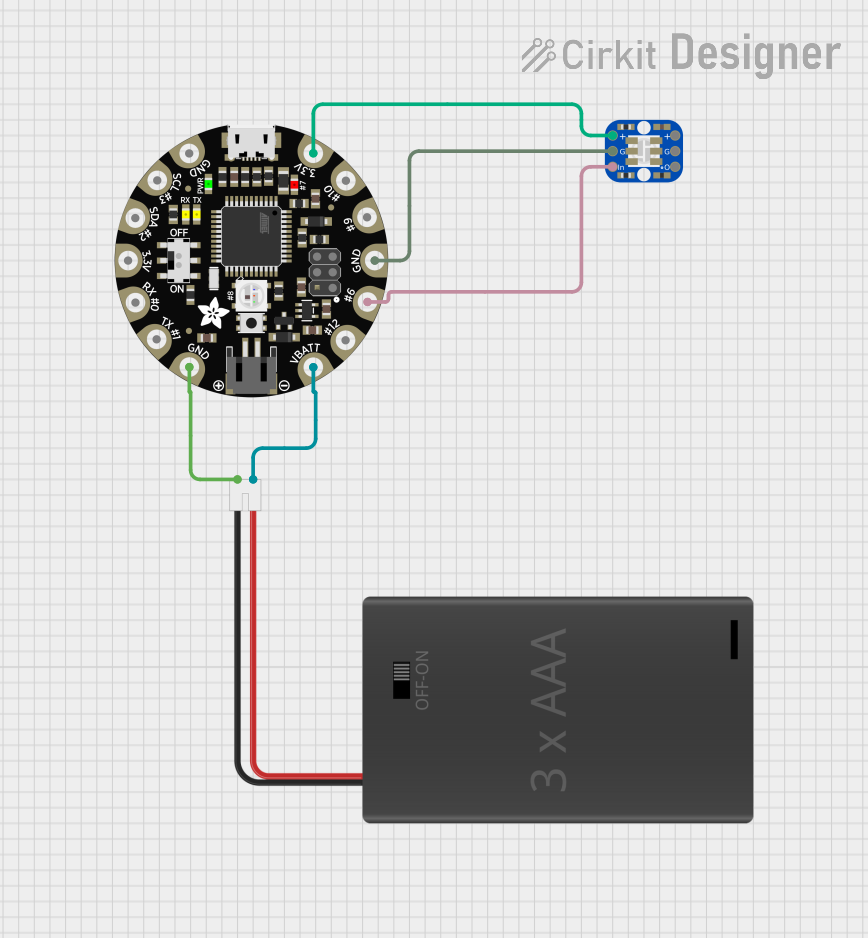
This circuit consists of an Adafruit Flora v3 microcontroller, a Breadboard-friendly RGB Smart NeoPixel, and a 3xAAA Battery Pack with Switch and JST. The circuit is designed to power and control the NeoPixel using the Flora v3, with the battery pack providing the necessary power. The Flora v3 runs a program to control the NeoPixel, displaying various colors and patterns.
Component List
Adafruit Flora v3
- Description: A wearable electronic platform based on the Atmega32u4 microcontroller.
- Pins: +3V3, IO6, GND, IO9, IO10, IO12, MISO, SCK, MOSI, RST, IO0/RX, IO2/SDA, IO3/SCL, IO1/TX, VBAT
Breadboard-friendly RGB Smart NeoPixel
- Description: A smart RGB LED with an integrated driver chip.
- Pins: IN, GND, VDD, OUT
3xAAA Battery Pack with Switch and JST
- Description: A battery pack that holds three AAA batteries and includes a switch and JST connector.
- Pins: POS, NEG
Wiring Details
Adafruit Flora v3
- +3V3: Connected to VDD of the Breadboard-friendly RGB Smart NeoPixel.
- IO6: Connected to IN of the Breadboard-friendly RGB Smart NeoPixel.
- GND: Connected to GND of the Breadboard-friendly RGB Smart NeoPixel and NEG of the 3xAAA Battery Pack with Switch and JST.
- VBAT: Connected to POS of the 3xAAA Battery Pack with Switch and JST.
Breadboard-friendly RGB Smart NeoPixel
- VDD: Connected to +3V3 of the Adafruit Flora v3.
- IN: Connected to IO6 of the Adafruit Flora v3.
- GND: Connected to GND of the Adafruit Flora v3.
3xAAA Battery Pack with Switch and JST
- POS: Connected to VBAT of the Adafruit Flora v3.
- NEG: Connected to GND of the Adafruit Flora v3.
Code Documentation
Code Overview
The code for the Adafruit Flora v3 initializes the NeoPixel and runs a loop to display various colors and patterns. The code includes functions to wipe the NeoPixel with a color and to display a rainbow cycle.
Code Listing
#include <Adafruit_NeoPixel.h>

#define PIN 6

// Neopixel Configuration (only 1 Neopixel on the Flora v3)
Adafruit_NeoPixel strip = Adafruit_NeoPixel(1, PIN, NEO_GRB + NEO_KHZ800);

void setup() {
  Serial.begin(9600); // Serial port connection
  strip.begin();
  strip.setBrightness(25);
  strip.show(); // Initialize all pixels to 'off'
}

void loop() {
  // Some example procedures showing how to display to the pixels:
  Serial.println(28); // added by Guntmar 23-11-2024 - just to test connection to TouchDesigner

  colorWipe(strip.Color(255, 0, 0), 500); // Red
  colorWipe(strip.Color(0, 255, 0), 500); // Green
  colorWipe(strip.Color(0, 0, 255), 500); // Blue
  rainbowCycle(20);
}

// Fill the dots one after the other with a color
void colorWipe(uint32_t c, uint8_t wait) {
  for(uint16_t i=0; i<strip.numPixels(); i++) {
      strip.setPixelColor(i, c);
      strip.show();
      delay(wait);
  }
}

// Slightly different, this makes the rainbow equally distributed throughout
void rainbowCycle(uint8_t wait) {
  uint16_t i, j;

  for(j=0; j<256*5; j++) { // 5 cycles of all colors on wheel
    for(i=0; i< strip.numPixels(); i++) {
      strip.setPixelColor(i, Wheel(((i * 256 / strip.numPixels()) + j) & 255));
    }
    strip.show();
    delay(wait);
  }
}

// Input a value 0 to 255 to get a color value.
// The colours are a transition r - g - b - back to r.
uint32_t Wheel(byte WheelPos) {
  WheelPos = 255 - WheelPos;
  if(WheelPos < 85) {
   return strip.Color(255 - WheelPos * 3, 0, WheelPos * 3);
  } else if(WheelPos < 170) {
    WheelPos -= 85;
   return strip.Color(0, WheelPos * 3, 255 - WheelPos * 3);
  } else {
   WheelPos -= 170;
   return strip.Color(WheelPos * 3, 255 - WheelPos * 3, 0);
  }
}
Code Explanation
- Initialization: The
Adafruit_NeoPixelobject is initialized with one pixel on pin 6. - Setup Function: Initializes the serial connection and the NeoPixel, sets the brightness, and turns off all pixels.
- Loop Function: Continuously runs, printing a test value to the serial monitor and displaying red, green, and blue colors on the NeoPixel, followed by a rainbow cycle.
- colorWipe Function: Lights up the NeoPixel with a specified color, one pixel at a time, with a delay.
- rainbowCycle Function: Displays a rainbow cycle on the NeoPixel.
- Wheel Function: Generates a color value based on a position input, transitioning through red, green, and blue.