
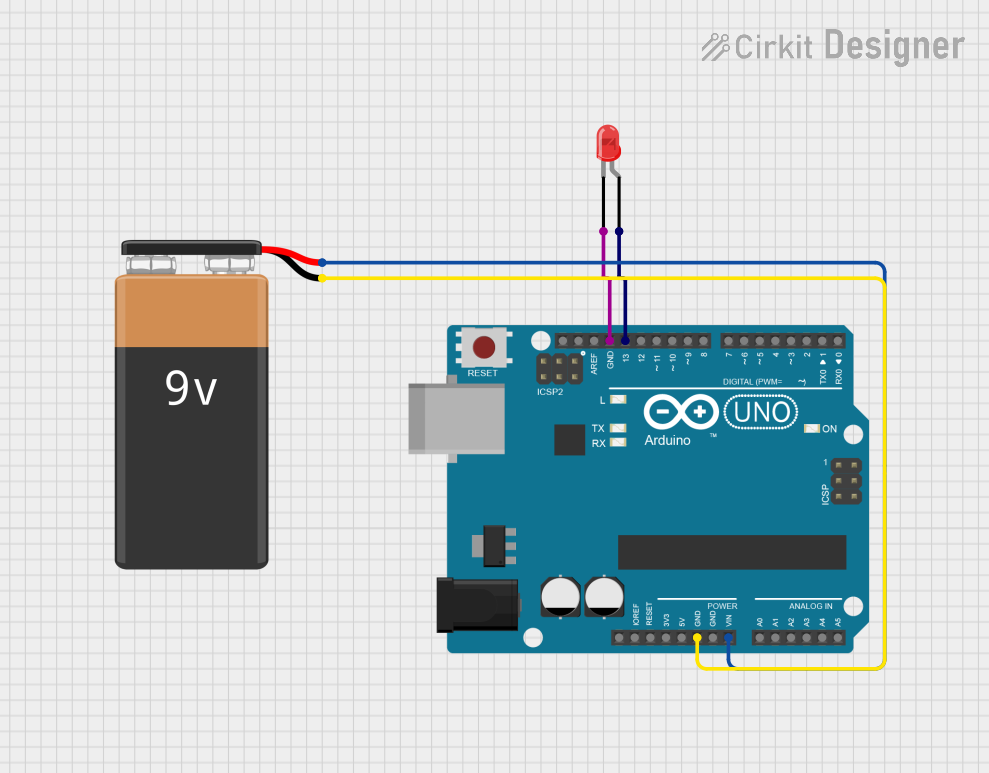
Circuit Documentation
Summary
This document provides a detailed overview of a simple circuit that consists of an Arduino UNO microcontroller, a red two-pin LED, and a 9V battery. The circuit is designed to power the Arduino UNO with the 9V battery and to control the LED using one of the digital pins on the Arduino. The LED is set to blink with a period of 2 seconds, alternating between on and off states.
Component List
Arduino UNO
- Description: A microcontroller board based on the ATmega328P.
- Purpose: Acts as the central control unit for the circuit, driving the LED and managing power distribution.
- Pins: UNUSED, IOREF, Reset, 3.3V, 5V, GND, Vin, A0-A5, SCL, SDA, AREF, D0-D13.
LED: Two Pin (red)
- Description: A basic red light-emitting diode.
- Purpose: Serves as an indicator light, showing the output state of the Arduino's digital pin.
- Pins: cathode, anode.
9V Battery
- Description: A standard 9-volt battery.
- Purpose: Provides power to the Arduino UNO and the entire circuit.
- Pins: -, +.
Wiring Details
Arduino UNO
- GND: Connected to the negative terminal (-) of the 9V battery and the cathode of the LED.
- Vin: Connected to the positive terminal (+) of the 9V battery.
- D13: Connected to the anode of the LED.
LED: Two Pin (red)
- Cathode: Connected to the GND pin on the Arduino UNO.
- Anode: Connected to the D13 pin on the Arduino UNO.
9V Battery
- - (Negative): Connected to the GND pin on the Arduino UNO.
- + (Positive): Connected to the Vin pin on the Arduino UNO.
Documented Code
The following code is written for the Arduino UNO microcontroller to control the blinking of the LED:
// The setup function runs once when you press reset or power the board
void setup() {
  // Initialize digital pin 13 as an output.
  pinMode(13, OUTPUT);
}

// The loop function runs over and over again forever
void loop() {
  digitalWrite(13, HIGH);   // Turn the LED on (HIGH is the voltage level)
  delay(1000);              // Wait for a second (1000 ms)
  digitalWrite(13, LOW);    // Turn the LED off by making the voltage LOW
  delay(1000);              // Wait for a second
}
- File Name: sketch.ino
- Description: This code configures pin 13 as an output and then toggles it between HIGH and LOW states with a 1-second delay between each state change, causing the connected LED to blink.