
Arduino UNO Controlled Multi-Color LED Array with Temperature Sensing and OLED Display
View and Edit Project In Cirkit Designer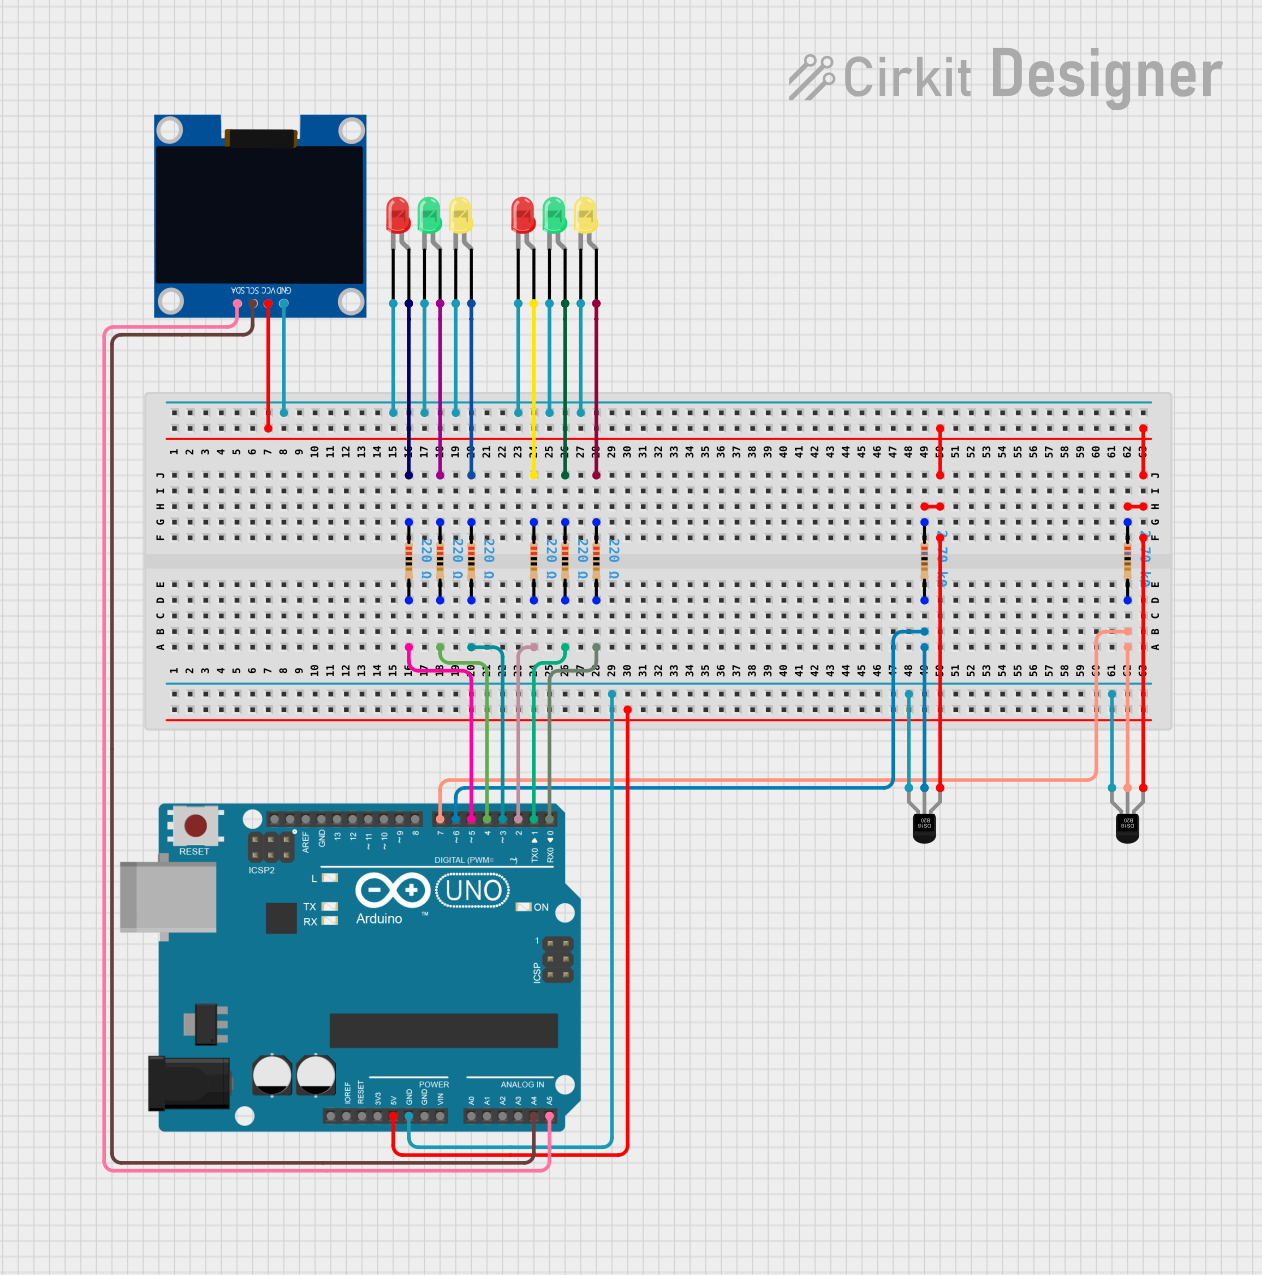
Circuit Documentation
Summary
The circuit in question is designed to interface an Arduino UNO microcontroller with a variety of components including a 128x64 OLED display, multiple LEDs (red, green, and yellow), DS18B20 temperature sensors, and resistors. The Arduino UNO controls the LEDs and reads data from the temperature sensors, while the OLED display is used for output. The circuit utilizes digital I/O pins for controlling the LEDs and one-wire communication for the temperature sensors. The I2C interface is used for the OLED display. Power distribution and ground connections are also appropriately managed.
Component List
128x64 OLED Display (I2C IIC SPI Serial)
- Description: A small display for visual output, interfaced via I2C.
- Pins: GND, SDA, SCL, VCC
LED: Two Pin (red)
- Description: A red light-emitting diode.
- Pins: cathode, anode
LED: Two Pin (green)
- Description: A green light-emitting diode.
- Pins: cathode, anode
LED: Two Pin (yellow)
- Description: A yellow light-emitting diode.
- Pins: cathode, anode
DS18B20
- Description: A digital temperature sensor for measuring temperature.
- Pins: VDD, DQ, GND
Arduino UNO
- Description: A microcontroller board based on the ATmega328P.
- Pins: UNUSED, IOREF, Reset, 3.3V, 5V, GND, Vin, A0-A5, SCL, SDA, AREF, D0-D13
Resistor (220 Ohms)
- Description: A resistor with a resistance of 220 Ohms, used for current limiting with LEDs.
Resistor (2700 Ohms)
- Description: A resistor with a resistance of 2700 Ohms, used for pull-up in one-wire communication.
Wiring Details
128x64 OLED Display (I2C IIC SPI Serial)
- GND: Connected to Arduino UNO GND
- SDA: Connected to Arduino UNO A5
- SCL: Connected to Arduino UNO A4
- VCC: Connected to Arduino UNO 5V through a 2700 Ohms resistor
LED: Two Pin (red)
- cathode: Connected to Arduino UNO GND
- anode: Connected to Arduino UNO digital pins (D5, D2) through 220 Ohms resistors
LED: Two Pin (green)
- cathode: Connected to Arduino UNO GND
- anode: Connected to Arduino UNO digital pins (D4, D1) through 220 Ohms resistors
LED: Two Pin (yellow)
- cathode: Connected to Arduino UNO GND
- anode: Connected to Arduino UNO digital pins (D3, D0) through 220 Ohms resistors
DS18B20
- VDD: Connected to Arduino UNO 5V through a 2700 Ohms resistor
- DQ: Connected to Arduino UNO digital pin D6 through a 2700 Ohms resistor
- GND: Connected to Arduino UNO GND
Arduino UNO
- GND: Common ground for the circuit
- 5V: Power supply for the OLED display and DS18B20 sensors
- Digital Pins (D0-D7): Control pins for LEDs and communication with DS18B20 sensors
- Analog Pins (A4, A5): I2C communication pins for the OLED display
Resistor (220 Ohms)
- pin1: Connected to the anode of LEDs
- pin2: Connected to the corresponding Arduino UNO digital pins (D0-D5)
Resistor (2700 Ohms)
- pin1: Connected to Arduino UNO 5V and VDD of DS18B20 sensors
- pin2: Connected to Arduino UNO digital pins (D6, D7) and DQ of DS18B20 sensors
Documented Code
void setup() {
  // put your setup code here, to run once:

}

void loop() {
  // put your main code here, to run repeatedly:

}
Filename: sketch.ino
The provided code is a template with empty setup() and loop() functions, which are the entry points for Arduino code. The setup() function is called once when the program starts and is used to initialize settings, while the loop() function runs repeatedly, allowing the microcontroller to perform operations based on the circuit's design. The actual implementation details would be added to these functions to control the LEDs, read from the temperature sensors, and update the OLED display.