
ESP32-Based Temperature Monitoring System with GC9A01 Display
View and Edit Project In Cirkit Designer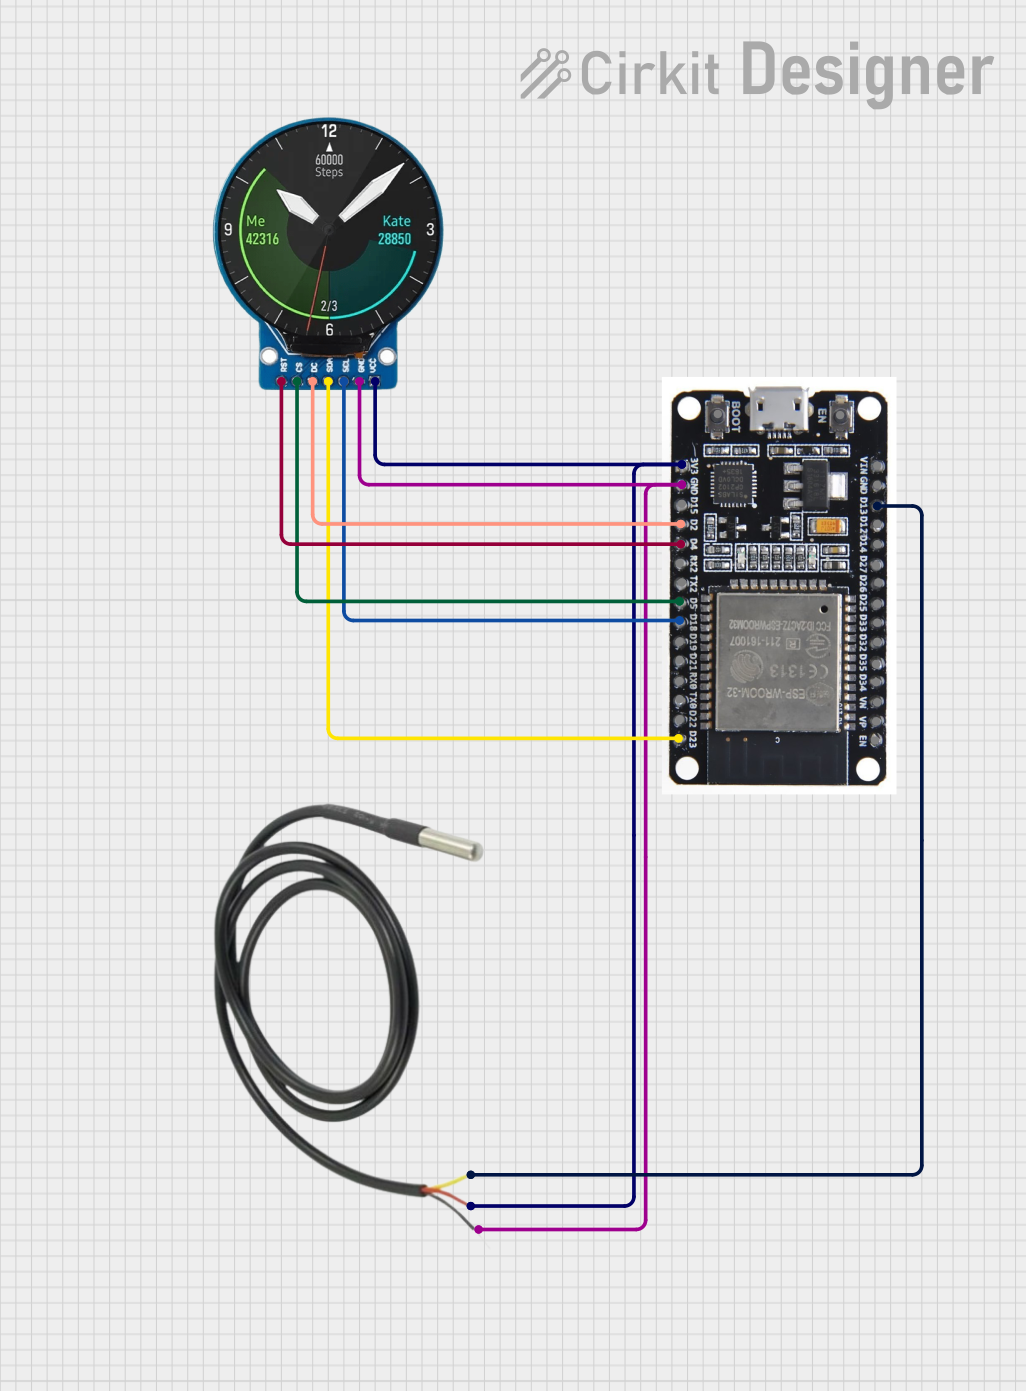
Circuit Documentation
Summary
This circuit involves an ESP32 microcontroller, a GC9A01 display, and a temperature sensor. The ESP32 reads temperature data from the temperature sensor and displays it on the GC9A01 display. The brightness of the display is controlled by a potentiometer.
Component List
ESP32
- Description: A powerful microcontroller with Wi-Fi and Bluetooth capabilities.
- Pins: EN, VP, VN, D34, D35, D32, D33, D25, D26, D27, D14, D12, D13, GND, VIN, 3V3, D15, D2, D4, RX2, TX2, D5, D18, D19, D21, RX0, TX0, D22, D23, BOOT
GC9A01
- Description: A display module used to show graphical data.
- Pins: RST, CS, DC, SDA, SCL, GND, VCC
Temperature Sensor
- Description: A sensor used to measure temperature.
- Pins: Temp GND Black, Temp VDD Red, Temp DQ Data Yellow
Wiring Details
ESP32
- D13: Connected to Temp DQ Data Yellow of the Temperature Sensor
- 3V3: Connected to VCC of GC9A01 and Temp VDD Red of the Temperature Sensor
- GND: Connected to GND of GC9A01 and Temp GND Black of the Temperature Sensor
- D2: Connected to DC of GC9A01
- D4: Connected to RST of GC9A01
- D5: Connected to CS of GC9A01
- D18: Connected to SCL of GC9A01
- D23: Connected to SDA of GC9A01
GC9A01
- VCC: Connected to 3V3 of ESP32
- GND: Connected to GND of ESP32
- DC: Connected to D2 of ESP32
- RST: Connected to D4 of ESP32
- CS: Connected to D5 of ESP32
- SCL: Connected to D18 of ESP32
- SDA: Connected to D23 of ESP32
Temperature Sensor
- Temp DQ Data Yellow: Connected to D13 of ESP32
- Temp VDD Red: Connected to 3V3 of ESP32
- Temp GND Black: Connected to GND of ESP32
Code Documentation
ESP32 Code
/*
 * This Arduino Sketch is for an ESP32 microcontroller that reads temperature
 * data from a temperature sensor and displays it on a GC9A01 display. The
 * brightness of the display is controlled by a potentiometer.
 */

#include <Wire.h>
#include <Adafruit_GFX.h>
#include <Adafruit_SSD1306.h>
#include <OneWire.h>
#include <DallasTemperature.h>

#define SCREEN_WIDTH 240
#define SCREEN_HEIGHT 240
#define OLED_RESET    -1
Adafruit_SSD1306 display(SCREEN_WIDTH, SCREEN_HEIGHT, &Wire, OLED_RESET);

#define ONE_WIRE_BUS 13
OneWire oneWire(ONE_WIRE_BUS);
DallasTemperature sensors(&oneWire);

#define POT_PIN 36

void setup() {
  Serial.begin(115200);
  if(!display.begin(SSD1306_I2C_ADDRESS, OLED_RESET)) {
    Serial.println(F("SSD1306 allocation failed"));
    for(;;);
  }
  display.display();
  delay(2000);
  display.clearDisplay();
  sensors.begin();
}

void loop() {
  sensors.requestTemperatures();
  float temperatureC = sensors.getTempCByIndex(0);
  int potValue = analogRead(POT_PIN);
  int brightness = map(potValue, 0, 4095, 0, 255);
  display.ssd1306_command(SSD1306_SETCONTRAST);
  display.ssd1306_command(brightness);
  display.clearDisplay();
  display.setTextSize(2);
  display.setTextColor(SSD1306_WHITE);
  display.setCursor(0, 10);
  display.print(F("Temp: "));
  display.print(temperatureC);
  display.print(F(" C"));
  display.display();
  delay(1000);
}
GC9A01 Code
#include <TFT_eSPI.h> // Include the graphics library (this includes the sprite functions)

#define ONE_WIRE_BUS 13
OneWire oneWire(ONE_WIRE_BUS);
DallasTemperature sensors(&oneWire);

#define POT_PIN 36

TFT_eSPI tft = TFT_eSPI();  // Invoke custom library

void setup() {
  Serial.begin(115200);
  tft.init();
  tft.setRotation(1);
  sensors.begin();
}

void loop() {
  sensors.requestTemperatures();
  float temperatureC = sensors.getTempCByIndex(0);
  int potValue = analogRead(POT_PIN);
  int brightness = map(potValue, 0, 4095, 0, 255);
  tft.fillScreen(TFT_BLACK);
  tft.setTextColor(TFT_WHITE, TFT_BLACK);
  tft.setTextSize(2);
  tft.setCursor(0, 10);
  tft.printf("Temp: %.2f C", temperatureC);
  tft.setBrightness(brightness); // Adjust brightness if supported by the library
  delay(1000);
}
This documentation provides a comprehensive overview of the circuit, including a summary, detailed component list, wiring details, and the code used for the microcontrollers.