
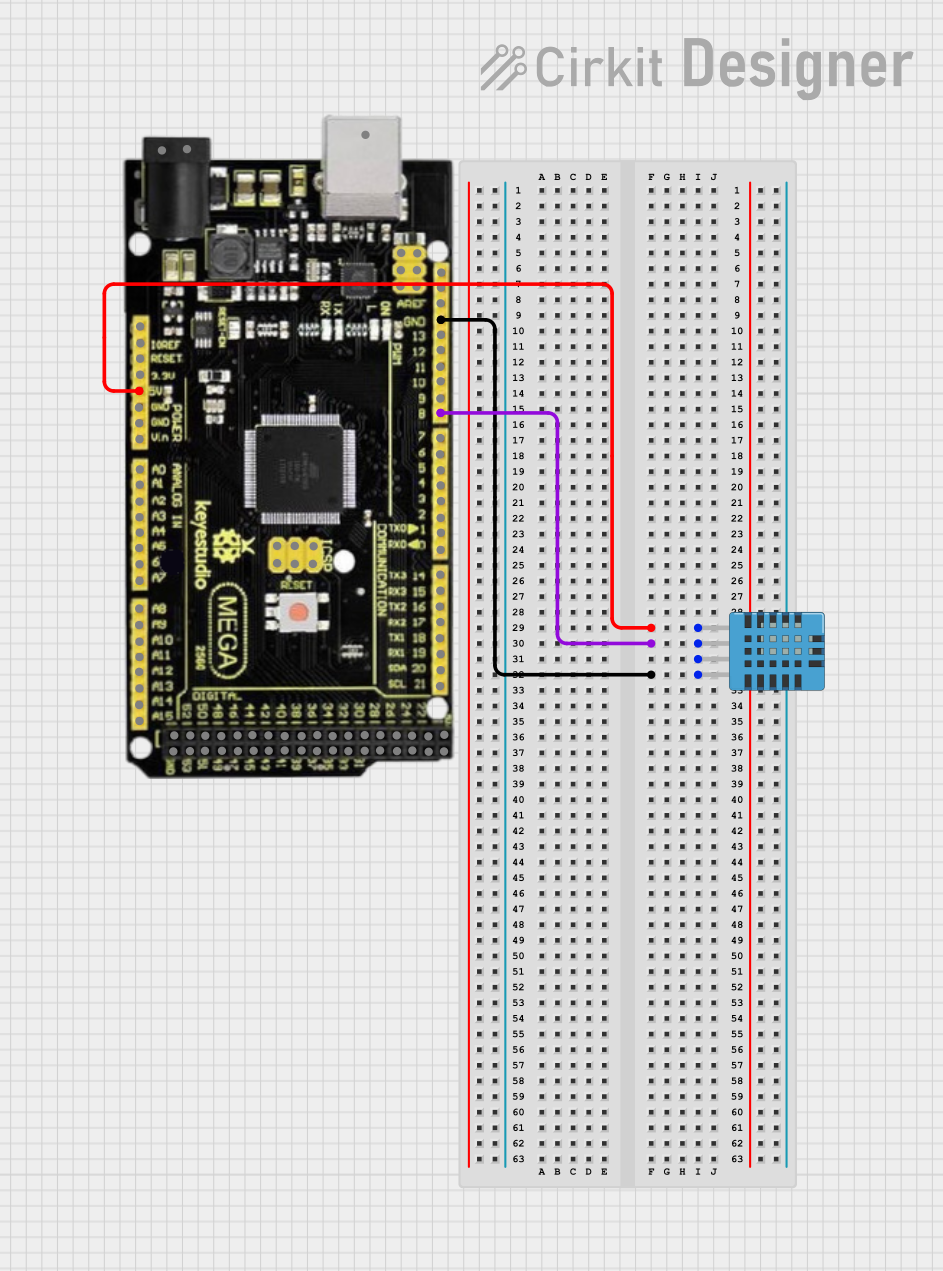
Circuit Documentation
Summary
This circuit involves an Arduino Mega 2560 R3 microcontroller connected to a DHT11 Humidity and Temperature Sensor. The Arduino reads temperature and humidity data from the DHT11 sensor and outputs the readings to the Serial Monitor.
Component List
Mega 2560 R3
- Description: A microcontroller board based on the ATmega2560.
- Pins: ICSP port GND, ICSP port Reset, ICSP port MOSI, ICSP port SCK, ICSP port +VCC, ICSP port MISO, SCL, SDA, AREF, GND, D13 (PWM), D12 (PWM), D11 (PWM), D10 (PWM), D9 (PWM), D8 (PWM), D7 (PWM), D6 (PWM), D5 (PWM), D4 (PWM), D3 (PWM), D2 (PWM), D1 (TX0), D0 (RX0), D14 (TX3), D15 (RX3), D16 (TX2), D17 (RX2), D18 (TX1), D19 (RX1), D20 (SDA), D21 (SCL), + 5VCC, D22, D23, D24, D25, D26, D27, D28, D29, D30, D31, D32, D33, D34, D35, D36, D37, D38, D39, D40, D41, D42, D43, D44, D45, D46, D47, D48, D49, D50, D51, D52, D53, NC, IOREF, Reset, +3V3, +VCC IN, A0, A1, A2, A3, A4, A5, A6, A7, A8, A9, A10, A11, A12, A13, A14, A15, USB port.
DHT11 Humidity and Temperature Sensor
- Description: A basic, low-cost digital temperature and humidity sensor.
- Pins: VDD, DATA, NULL, GND.
Wiring Details
Mega 2560 R3
- + 5VCC: Connected to VDD of the DHT11 sensor.
- D8 (PWM): Connected to DATA of the DHT11 sensor.
- GND: Connected to GND of the DHT11 sensor.
DHT11 Humidity and Temperature Sensor
- VDD: Connected to + 5VCC of the Mega 2560 R3.
- DATA: Connected to D8 (PWM) of the Mega 2560 R3.
- GND: Connected to GND of the Mega 2560 R3.
Code Documentation
Arduino Sketch
// Including the necessary libraries for DHT sensor
#include <DHT.h>
#include <Adafruit_Sensor.h>

// Defining the pin and sensor type
#define DHTPIN 8       // Pin where the DHT11 is connected
#define DHTTYPE DHT11  // DHT11 sensor type

// Initializing the DHT sensor
DHT dht(DHTPIN, DHTTYPE);

// Delaying time between sensor readings (milliseconds)
const int DELAY_TIME = 4000;

void setup() {
  // Initializing serial communication at 9600 baud
  Serial.begin(9600);
  Serial.println("DHT11 Sensor Test");

  // Starting the DHT sensor
  dht.begin();
}

void loop() {
  // Reading humidity and temperature values from the DHT11
  float humidity = dht.readHumidity();          // Humidity in percentage
  float temperatureC = dht.readTemperature();  // Temperature in Celsius
  float temperatureF = dht.readTemperature(true); // Temperature in Fahrenheit

  // Checking if any readings failed
  if (isnan(humidity) || isnan(temperatureC) || isnan(temperatureF)) {
    Serial.println("Error: Failed to read from DHT11 sensor!");
    return; // Skipping this loop iteration
  }

  // Printing the readings to the Serial Monitor vertically
  Serial.println("----------- DHT11 Readings -----------");
  Serial.print("Humidity: ");
  Serial.print(humidity);
  Serial.println(" %");

  Serial.print("Temperature (C): ");
  Serial.print(temperatureC);
  Serial.println(" °C");

  Serial.print("Temperature (F): ");
  Serial.print(temperatureF);
  Serial.println(" °F");
  Serial.println("--------------------------------------");
  Serial.println();  // Blank line for readability

  // Waiting before taking the next reading
  delay(DELAY_TIME);
}
This code initializes the DHT11 sensor and reads the humidity and temperature values. The readings are then printed to the Serial Monitor. If the sensor fails to read the values, an error message is displayed. The loop runs every 4000 milliseconds (4 seconds) to take new readings.