
Arduino UNO RFID Access Control System with LCD Display and Servo Lock
View and Edit Project In Cirkit Designer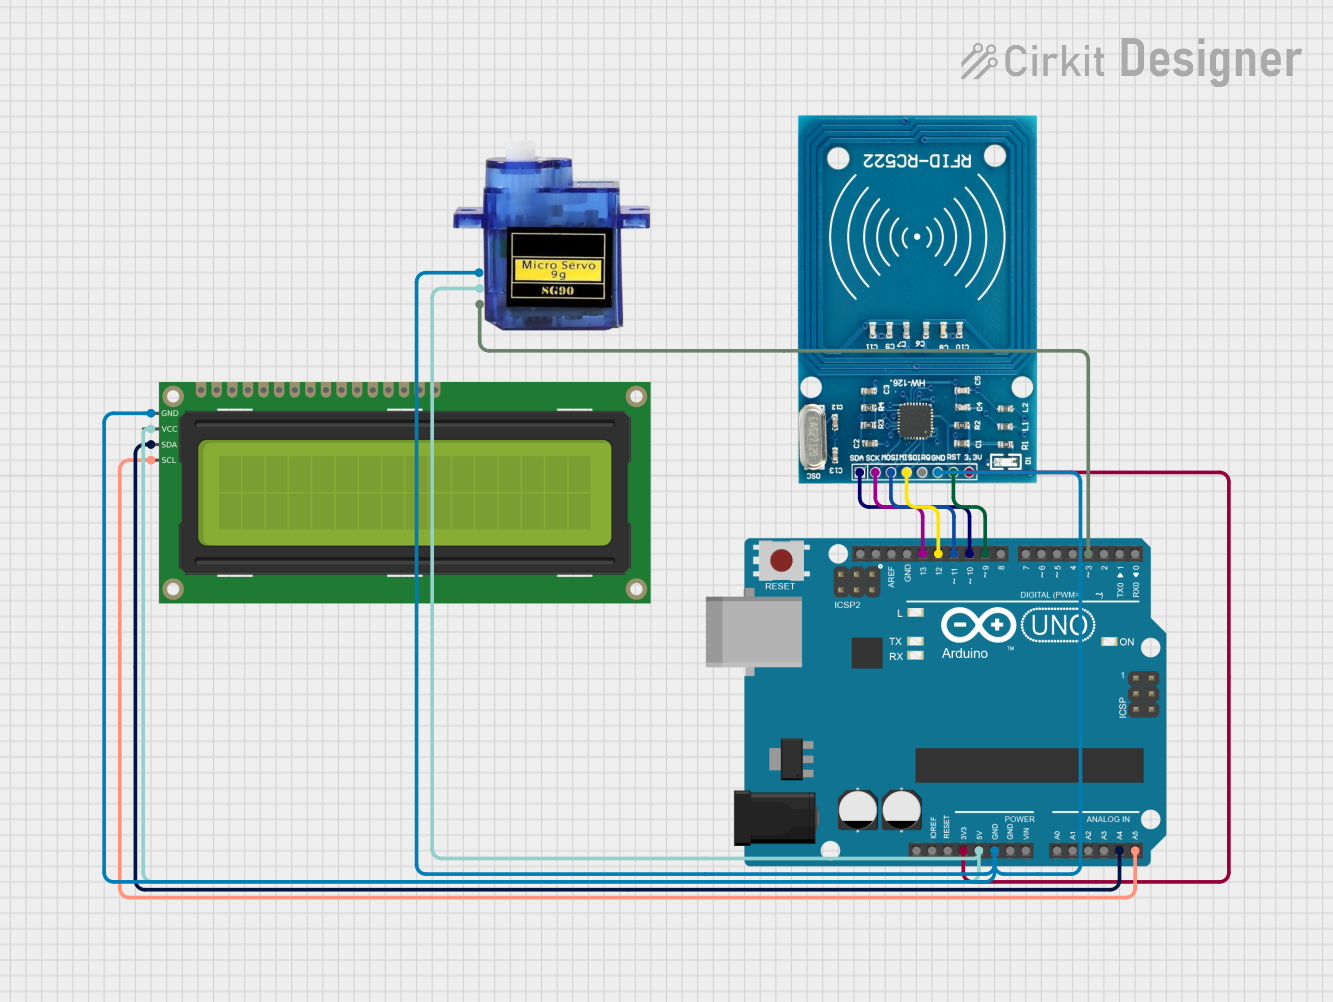
Circuit Documentation
Summary
This circuit is designed to interface an Arduino UNO with an RFID-RC522 module, a 16x2 I2C LCD, and a Micro servo 9G. The Arduino UNO serves as the central microcontroller, managing the RFID reader, displaying information on the LCD, and controlling the servo motor.
Component List
Arduino UNO
- Description: A microcontroller board based on the ATmega328P.
- Pins: UNUSED, IOREF, Reset, 3.3V, 5V, GND, Vin, A0, A1, A2, A3, A4, A5, SCL, SDA, AREF, D13, D12, D11, D10, D9, D8, D7, D6, D5, D4, D3, D2, D1, D0
RFID-RC522
- Description: A low-cost RFID reader module.
- Pins: VCC (3.3V), RST, GND, IRQ, MISO, MOSI, SCK, SDA
16x2 I2C LCD
- Description: A 16x2 character LCD with I2C interface.
- Pins: GND, VCC, SDA, SCL
Micro servo 9G
- Description: A small servo motor used for precise control of angular position.
- Pins: GND, +5V, PWM
Wiring Details
Arduino UNO
- 3.3V: Connected to VCC (3.3V) of RFID-RC522
- 5V: Connected to VCC of 16x2 I2C LCD and +5V of Micro servo 9G
- GND: Connected to GND of RFID-RC522, 16x2 I2C LCD, and Micro servo 9G
- A4: Connected to SDA of 16x2 I2C LCD
- A5: Connected to SCL of 16x2 I2C LCD
- D13: Connected to SCK of RFID-RC522
- D12: Connected to MISO of RFID-RC522
- D11: Connected to MOSI of RFID-RC522
- D10: Connected to SDA of RFID-RC522
- D9: Connected to RST of RFID-RC522
- D3: Connected to PWM of Micro servo 9G
RFID-RC522
- VCC (3.3V): Connected to 3.3V of Arduino UNO
- RST: Connected to D9 of Arduino UNO
- GND: Connected to GND of Arduino UNO
- SCK: Connected to D13 of Arduino UNO
- MISO: Connected to D12 of Arduino UNO
- MOSI: Connected to D11 of Arduino UNO
- SDA: Connected to D10 of Arduino UNO
16x2 I2C LCD
- VCC: Connected to 5V of Arduino UNO
- GND: Connected to GND of Arduino UNO
- SDA: Connected to A4 of Arduino UNO
- SCL: Connected to A5 of Arduino UNO
Micro servo 9G
- +5V: Connected to 5V of Arduino UNO
- GND: Connected to GND of Arduino UNO
- PWM: Connected to D3 of Arduino UNO
Code Documentation
RFID Tag Scan Code
/*RFID tag scan code
 * https://srituhobby.com
 */

#include <LiquidCrystal_I2C.h>
#include <SPI.h>
#include <MFRC522.h>

#define RST_PIN 9
#define SS_PIN  10
byte readCard[4];
byte a = 0;

LiquidCrystal_I2C lcd(0x27, 16, 2);
MFRC522 mfrc522(SS_PIN, RST_PIN);

void setup() {
  Serial.begin(9600);
  lcd.init();
  lcd.backlight();
  while (!Serial);
  SPI.begin();
  mfrc522.PCD_Init();
  delay(4);
  mfrc522.PCD_DumpVersionToSerial();
  lcd.setCursor(2, 0);
  lcd.print("Put your card");
}

void loop() {
  if ( ! mfrc522.PICC_IsNewCardPresent()) {
    return 0;
  }
  if ( ! mfrc522.PICC_ReadCardSerial()) {
    return 0;
  }

  lcd.clear();
  lcd.setCursor(0, 0);
  lcd.print("Scanned UID");
  a = 0;
  Serial.println(F("Scanned PICC's UID:"));
  for ( uint8_t i = 0; i < 4; i++) {  //
    readCard[i] = mfrc522.uid.uidByte[i];
    Serial.print(readCard[i], HEX);
    Serial.print(" ");
    lcd.setCursor(a, 1);
    lcd.print(readCard[i], HEX);
    lcd.print(" ");
    delay(500);
    a += 3;
  }
  Serial.println("");
  mfrc522.PICC_HaltA();
  return 1;
}
This code initializes the RFID reader and the LCD, and continuously checks for new RFID cards. When a card is detected, it reads the UID and displays it on the LCD and the serial monitor.