
Arduino Nano and NRF24L01 Wireless Joystick and Potentiometer Controller
View and Edit Project In Cirkit Designer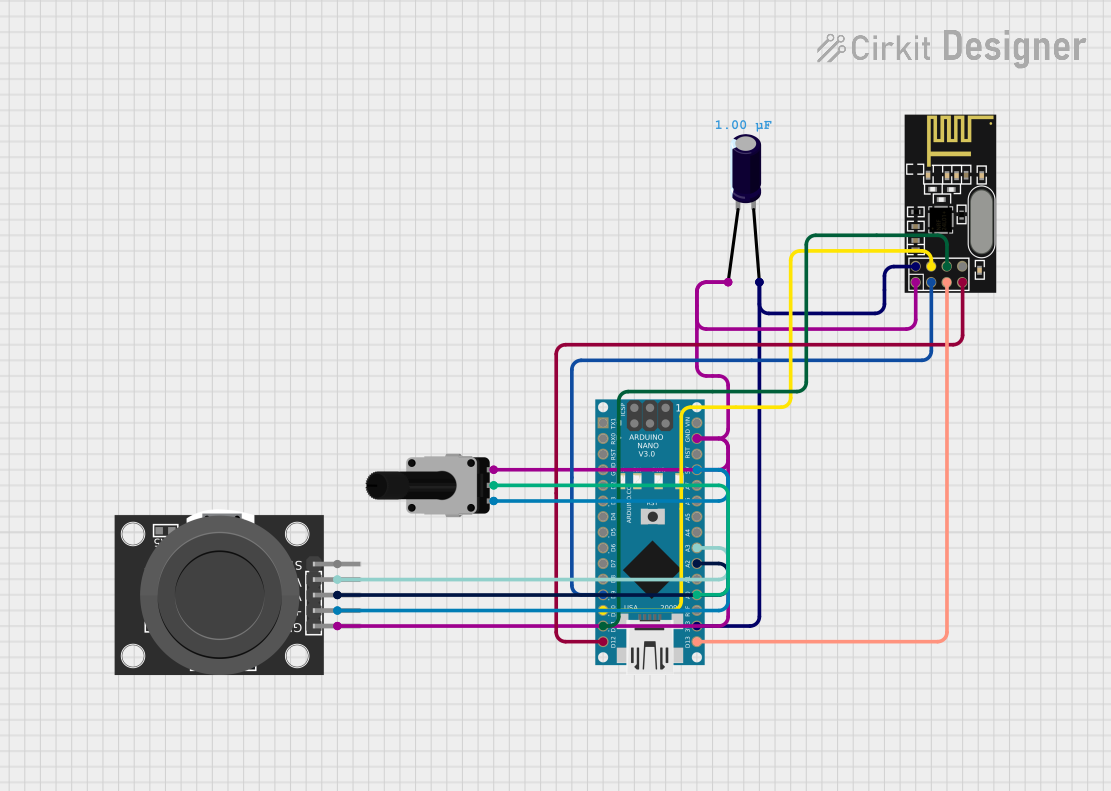
Circuit Documentation
Summary
This circuit involves an Arduino Nano microcontroller interfaced with an NRF24L01 wireless transceiver module, a KY-023 Dual Axis Joystick Module, a Rotary Potentiometer, and an Electrolytic Capacitor. The Arduino Nano reads analog values from the joystick and potentiometer, processes these values, and transmits them wirelessly using the NRF24L01 module.
Component List
Arduino Nano
- Description: A small, complete, and breadboard-friendly board based on the ATmega328P.
- Pins: D1/TX, D0/RX, RESET, GND, D2, D3, D4, D5, D6, D7, D8, D9, D10, D11/MOSI, D12/MISO, VIN, 5V, A7, A6, A5, A4, A3, A2, A1, A0, AREF, 3V3, D13/SCK
NRF24L01
- Description: A wireless transceiver module for low-power, high-speed communication.
- Pins: IRQ (not used), MOSI, CSN, VCC (3V), GND, CE, SCK, MISO
Electrolytic Capacitor
- Description: A capacitor used for filtering and smoothing power supply.
- Pins: -, +
- Properties:
- Capacitance: 0.000001 Farads
KY-023 Dual Axis Joystick Module
- Description: A joystick module that provides analog output for X and Y axes and a digital output for the switch.
- Pins: GND, +5V, VRx, VRy, SW
Rotary Potentiometer
- Description: A variable resistor used to adjust voltage levels.
- Pins: leg1, wiper, leg2
- Properties:
- Resistance: 10000 Ohms
Wiring Details
Arduino Nano
- D9: Connected to CE pin of NRF24L01
- D10: Connected to CSN pin of NRF24L01
- D11/MOSI: Connected to MOSI pin of NRF24L01
- D12/MISO: Connected to MISO pin of NRF24L01
- GND: Connected to GND pin of NRF24L01, leg2 of Rotary Potentiometer, GND pin of KY-023 Dual Axis Joystick Module, and - pin of Electrolytic Capacitor
- 5V: Connected to leg1 of Rotary Potentiometer and +5V pin of KY-023 Dual Axis Joystick Module
- A3: Connected to VRy pin of KY-023 Dual Axis Joystick Module
- A2: Connected to VRx pin of KY-023 Dual Axis Joystick Module
- A0: Connected to wiper of Rotary Potentiometer
- 3V3: Connected to VCC (3V) pin of NRF24L01 and + pin of Electrolytic Capacitor
- D13/SCK: Connected to SCK pin of NRF24L01
NRF24L01
- CE: Connected to D9 pin of Arduino Nano
- CSN: Connected to D10 pin of Arduino Nano
- MOSI: Connected to D11/MOSI pin of Arduino Nano
- MISO: Connected to D12/MISO pin of Arduino Nano
- GND: Connected to GND pin of Arduino Nano
- VCC (3V): Connected to 3V3 pin of Arduino Nano
- SCK: Connected to D13/SCK pin of Arduino Nano
Electrolytic Capacitor
- -: Connected to GND pin of Arduino Nano
- +: Connected to 3V3 pin of Arduino Nano
KY-023 Dual Axis Joystick Module
- GND: Connected to GND pin of Arduino Nano
- +5V: Connected to 5V pin of Arduino Nano
- VRx: Connected to A2 pin of Arduino Nano
- VRy: Connected to A3 pin of Arduino Nano
Rotary Potentiometer
- leg1: Connected to 5V pin of Arduino Nano
- wiper: Connected to A0 pin of Arduino Nano
- leg2: Connected to GND pin of Arduino Nano
Code Documentation
Arduino Nano Code
#include<SPI.h>
#include<nRF24L01.h>
#include<RF24.h>

RF24 radio(9,10);

const byte address[6] = "54321";

int xPin = A2;
int yPin = A3;
int potPin = A0;
int xVal;
int yVal;
int potVal;

void setup() {
  // put your setup code here, to run once:
  Serial.begin(9600);
  pinMode(xPin, INPUT);
  pinMode(yPin, INPUT);
  pinMode(potPin, INPUT);
  radio.begin();
  radio.openWritingPipe(address);
  radio.stopListening();
  radio.setDataRate(RF24_2MBPS); // Set the speed of the transmission to the quickest available
  radio.setChannel(124); // Use a channel unlikely to be used by Wifi, Microwave ovens etc
  radio.setPALevel(RF24_PA_MAX); // Set radio Tx power to MAX
}

void loop() {
  // put your main code here, to run repeatedly:
  xVal = analogRead(xPin);
  yVal = analogRead(yPin);
  potVal = analogRead(potPin);
  int servoAngle1 = map(xVal, 0, 1023, 0, 180);
  int servoAngle2 = map(yVal, 0, 1023, 0, 180);
  int motorSpeed = map(potVal, 0, 1023, 0, 255);
  radio.write(&servoAngle1, sizeof(servoAngle1));
  radio.write(&servoAngle2, sizeof(servoAngle2));
  radio.write(&motorSpeed, sizeof(motorSpeed));
  Serial.print("Servo1: ");
  Serial.print(servoAngle1);
  Serial.print(" | Servo2: ");
  Serial.print(servoAngle2);
  Serial.print(" | MotorSpeed: ");
  Serial.println(motorSpeed);
  delay(100);
}
This code initializes the Arduino Nano to read analog values from the joystick and potentiometer, maps these values to appropriate ranges for servo angles and motor speed, and transmits the data wirelessly using the NRF24L01 module. The values are also printed to the serial monitor for debugging purposes.