
Arduino Nano ESP32 and OV7670 Camera Module for Real-Time Image Capture
View and Edit Project In Cirkit Designer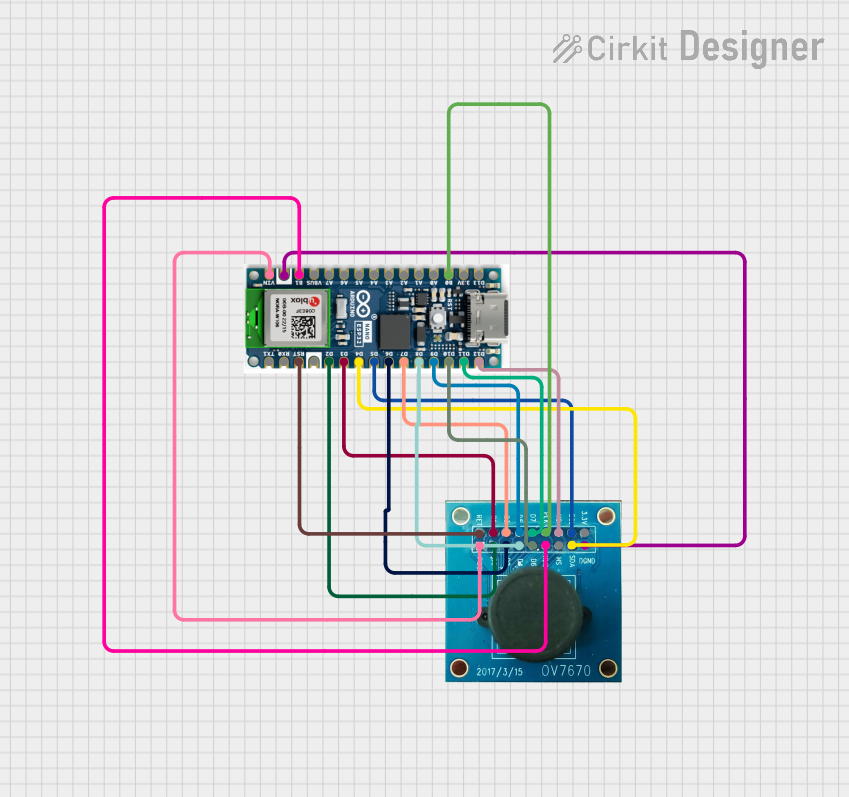
Circuit Documentation
Summary
This document provides a detailed overview of a circuit that integrates an Arduino Nano ESP32 microcontroller with an OV7670 camera module. The Arduino Nano ESP32 is used to control the OV7670 camera and capture images. The captured images are then processed and transmitted via serial communication for further use.
Component List
Arduino Nano ESP32
- Description: A compact microcontroller board based on the ESP32, featuring multiple GPIO pins, analog inputs, and communication interfaces.
- Pins: D12, D11, D10, D9, D8, D7, D6, D5, D4, D3, D2, GND, RST, RX0, TX1, D13, 3.3V, B0, A0, A1, A2, A3, A4, A5, A6, A7, VBUS, B1, VIN
OV7670
- Description: A camera module capable of capturing images and video, commonly used in embedded systems for image processing tasks.
- Pins: RET, PWDN, D1, D0, D3, D2, D4, D5, D6, PLK, XLK, D7, VS, HS, SCL, SDA, 3.3V, DGND
Wiring Details
Arduino Nano ESP32
- D12: Connected to OV7670 VS
- D11: Connected to OV7670 D7
- D10: Connected to OV7670 D6
- D9: Connected to OV7670 D5
- D8: Connected to OV7670 D4
- D7: Connected to OV7670 D3
- D6: Connected to OV7670 D2
- D5: Connected to OV7670 SCL
- D4: Connected to OV7670 SDA
- D3: Connected to OV7670 D1
- D2: Connected to OV7670 D0
- GND: Connected to OV7670 DGND
- RST: Connected to OV7670 RET
- B0: Connected to OV7670 PLK
- B1: Connected to OV7670 XLK
- VIN: Connected to OV7670 PWDN
OV7670
- VS: Connected to Arduino Nano ESP32 D12
- D7: Connected to Arduino Nano ESP32 D11
- D6: Connected to Arduino Nano ESP32 D10
- D5: Connected to Arduino Nano ESP32 D9
- D4: Connected to Arduino Nano ESP32 D8
- D3: Connected to Arduino Nano ESP32 D7
- D2: Connected to Arduino Nano ESP32 D6
- SCL: Connected to Arduino Nano ESP32 D5
- SDA: Connected to Arduino Nano ESP32 D4
- D1: Connected to Arduino Nano ESP32 D3
- D0: Connected to Arduino Nano ESP32 D2
- DGND: Connected to Arduino Nano ESP32 GND
- RET: Connected to Arduino Nano ESP32 RST
- PLK: Connected to Arduino Nano ESP32 B0
- XLK: Connected to Arduino Nano ESP32 B1
- PWDN: Connected to Arduino Nano ESP32 VIN
Code Documentation
Arduino Nano ESP32 Code
#include <Wire.h>
#include <ArduCAM.h>
#include <SPI.h>
#include "memorysaver.h"

// Define the I2C pins
#define SCL_PIN A5
#define SDA_PIN A4

// Define the control pins for the OV7670 with FIFO
#define VSYNC_PIN 2
#define HREF_PIN 3
#define PCLK_PIN 4
#define XCLK_PIN 5
#define WRST_PIN A0
#define RRST_PIN A1
#define STR_PIN A2
#define RCK_PIN A3
#define WR_PIN A4
#define OE_PIN A5

// Set the CS pin for the ArduCAM
#define CS_PIN 10

ArduCAM myCAM(OV7670, CS_PIN);

void setup() {
  // Initialize serial communication for debugging
  Serial.begin(115200);

  // Initialize I2C communication
  Wire.begin(SDA_PIN, SCL_PIN);

  // Initialize the camera
  pinMode(CS_PIN, OUTPUT);
  digitalWrite(CS_PIN, HIGH);
  SPI.begin();

  // Check if the camera is detected
  myCAM.write_reg(ARDUCHIP_TEST1, 0x55);
  uint8_t temp = myCAM.read_reg(ARDUCHIP_TEST1);
  if (temp != 0x55) {
    Serial.println("Failed to initialize OV7670 camera.");
    while (1); // Halt the program if initialization fails
  }

  // Initialize the camera
  myCAM.set_format(BMP);
  myCAM.InitCAM();
  myCAM.clear_fifo_flag();

  Serial.println("OV7670 camera initialized successfully.");
}

void loop() {
  // Capture a frame
  myCAM.flush_fifo();
  myCAM.clear_fifo_flag();
  myCAM.start_capture();

  while (!myCAM.get_bit(ARDUCHIP_TRIG, CAP_DONE_MASK));

  Serial.println("Frame captured successfully.");

  // Read the frame data
  uint8_t temp = 0;
  uint32_t length = myCAM.read_fifo_length();
  if (length >= MAX_FIFO_SIZE) {
    Serial.println("Over size.");
    return;
  }
  if (length == 0) {
    Serial.println("Size is 0.");
    return;
  }

  myCAM.CS_LOW();
  myCAM.set_fifo_burst();
  for (uint32_t i = 0; i < length; i++) {
    temp = SPI.transfer(0x00);
    if (i < 10) { // Print the first few bytes
      Serial.print(temp, HEX);
      Serial.print(" ");
    }
  }
  myCAM.CS_HIGH();
  Serial.println();

  // Add a delay to avoid flooding the serial output
  delay(1000);
}
This code initializes the OV7670 camera module, captures frames, and transmits the frame data via serial communication. The code uses the ArduCAM library to interface with the camera and the SPI library for communication.