
Arduino-Based Smart Lock System with RFID, Keypad, and Servo Motor
View and Edit Project In Cirkit Designer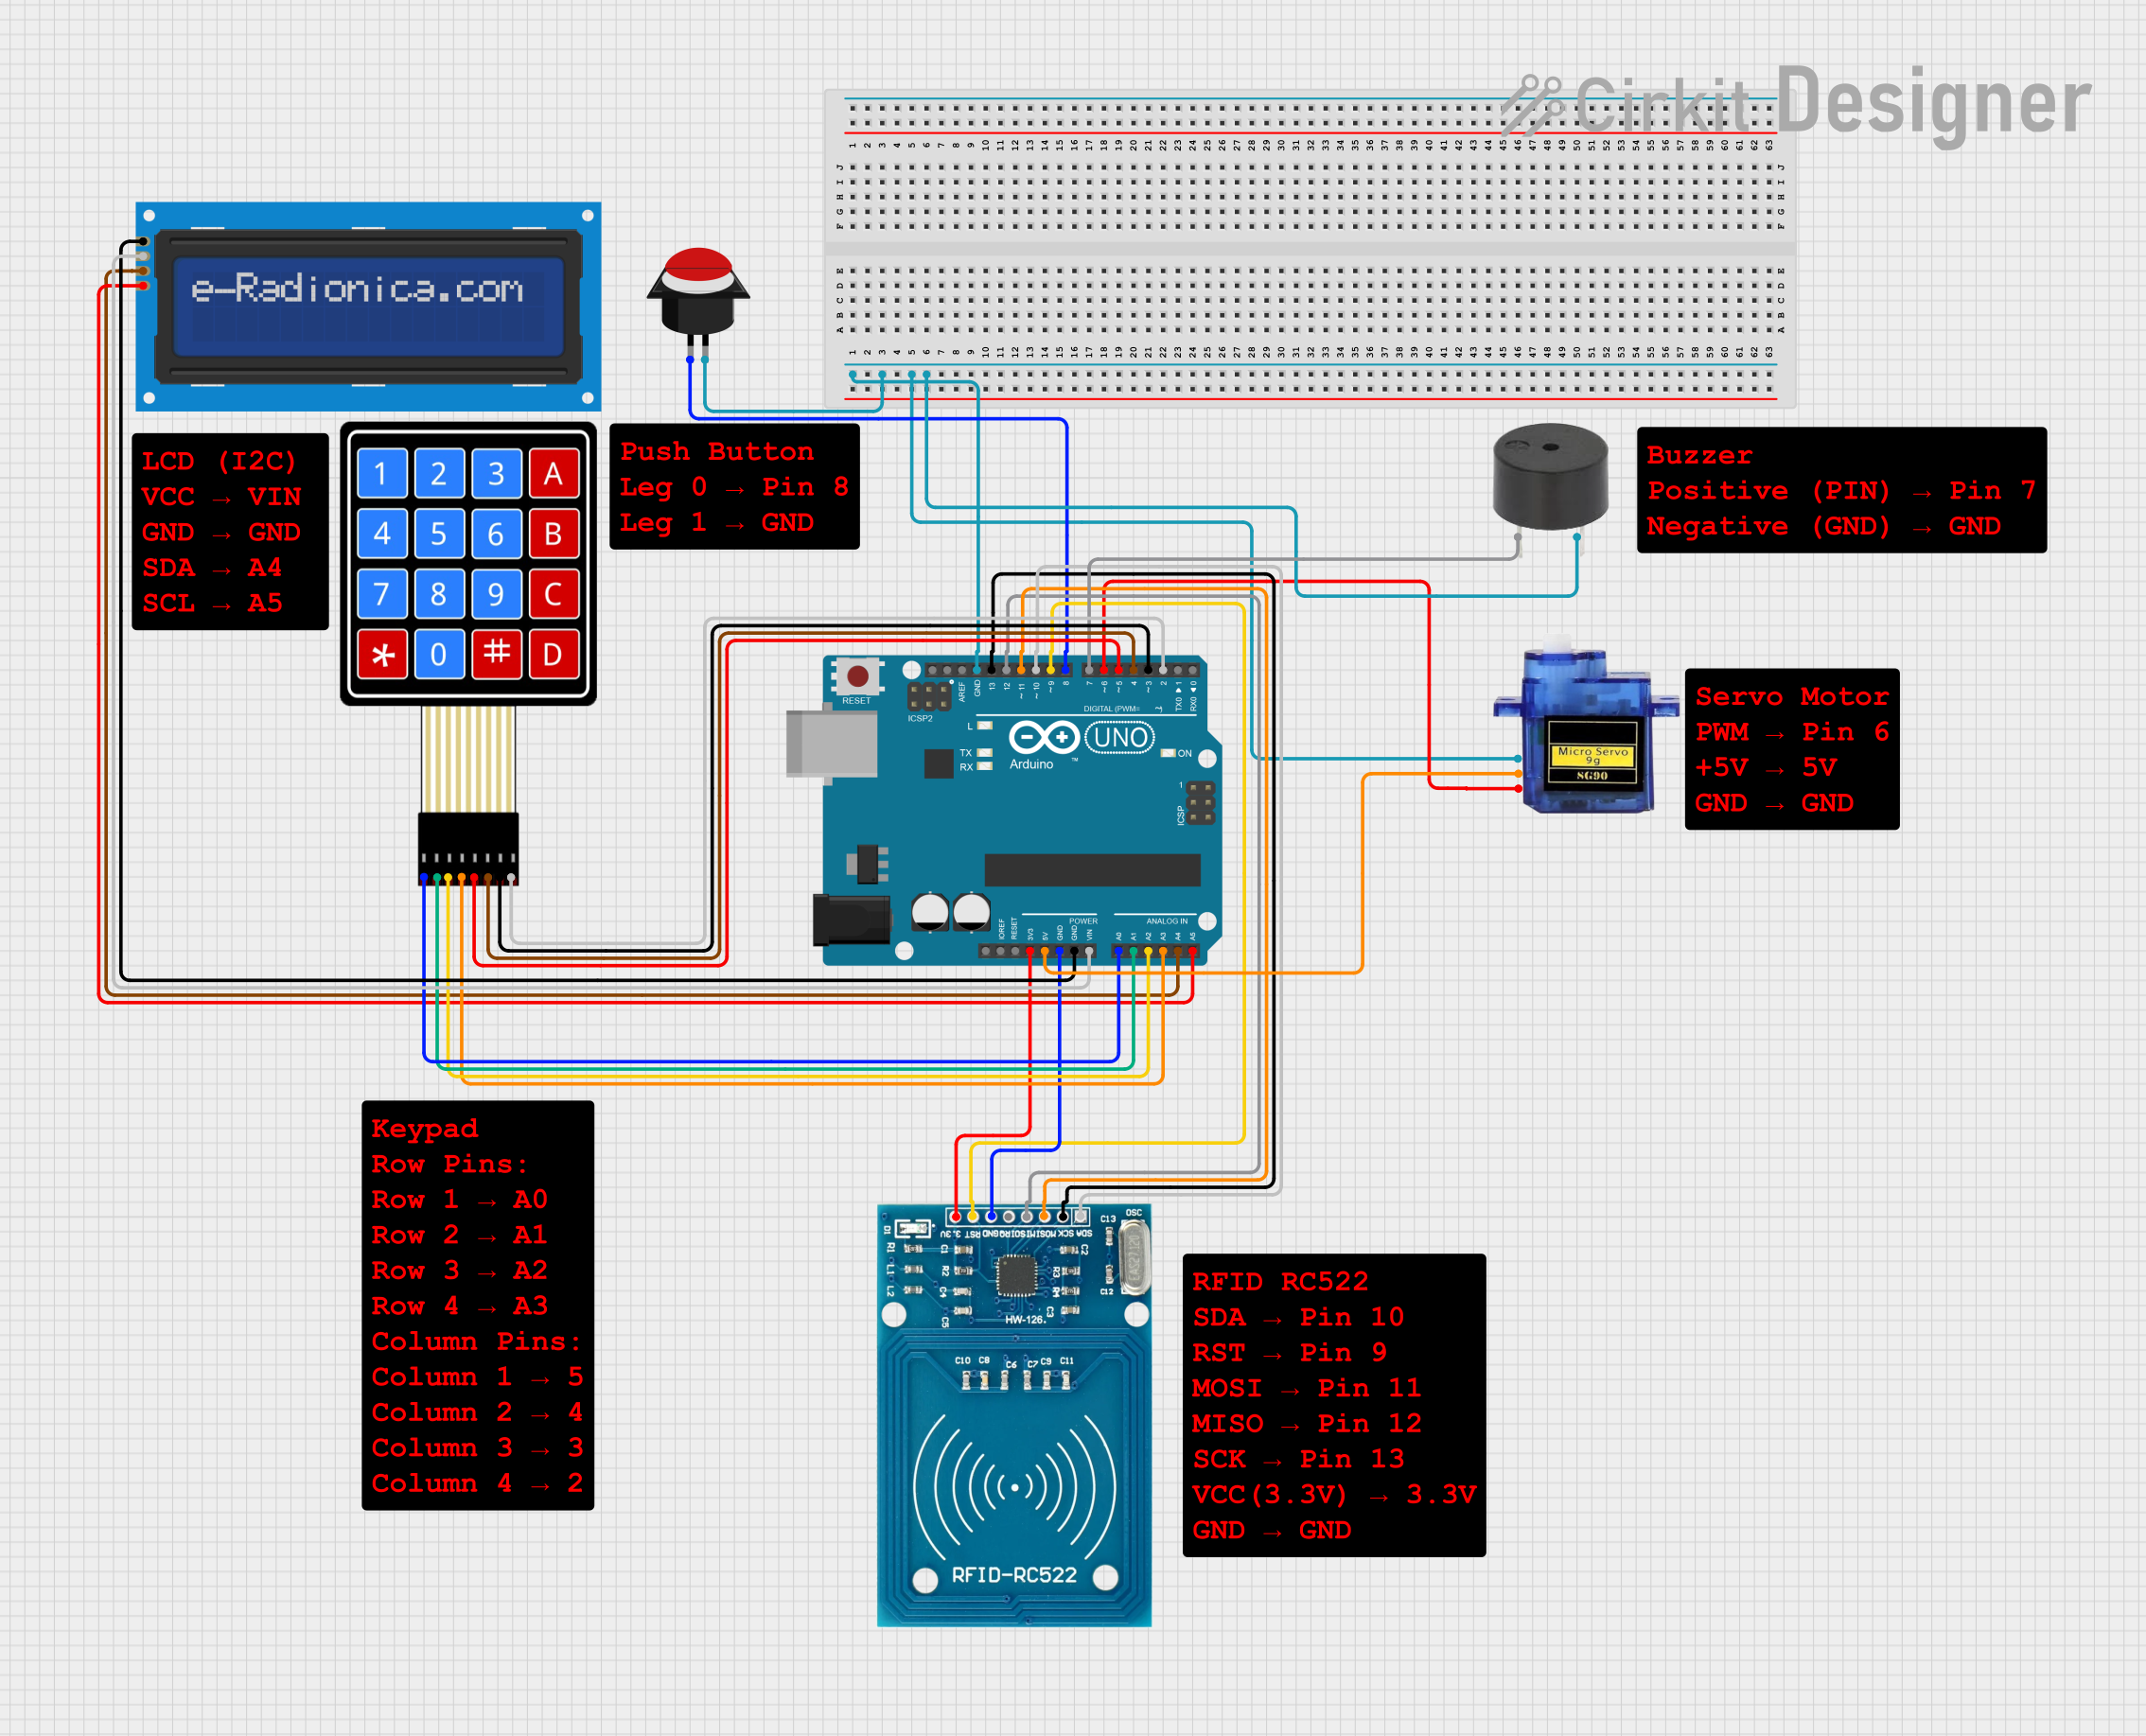
Circuit Documentation
Summary
This circuit is designed to control a locking mechanism using a combination of a 4x4 membrane keypad, an RFID reader, a push button, a micro servo, an LCD screen, and a buzzer. The system is managed by an Arduino UNO microcontroller. The user can unlock the mechanism by entering a correct password on the keypad, tapping an authorized RFID card, or pressing the push button. The LCD screen provides feedback to the user, and the buzzer emits sounds to indicate different states.
Component List
Arduino UNO
- Description: Microcontroller board based on the ATmega328P.
- Pins: UNUSED, IOREF, Reset, 3.3V, 5V, GND, Vin, A0, A1, A2, A3, A4, A5, SCL, SDA, AREF, D13, D12, D11, D10, D9, D8, D7, D6, D5, D4, D3, D2, D1, D0
Micro Servo 9G
- Description: Small servo motor for precise control of angular position.
- Pins: GND, +5V, PWM
4x4 Membrane Matrix Keypad
- Description: Keypad with 16 keys arranged in a 4x4 matrix.
- Pins: R1, R2, R3, R4, C1, C2, C3, C4
Buzzer
- Description: Simple piezoelectric buzzer for sound output.
- Pins: PIN, GND
Push Button Round
- Description: Simple push button for user input.
- Pins: leg0, leg1
LCD Screen 16x2 I2C
- Description: 16x2 character LCD display with I2C interface.
- Pins: SCL, SDA, VCC, GND
RFID-RC522
- Description: RFID reader module for reading RFID tags.
- Pins: VCC (3.3V), RST, GND, IRQ, MISO, MOSI, SCK, SDA
Wiring Details
Arduino UNO
- GND: Connected to GND of Push Button Round, Micro Servo 9G, Buzzer, RFID-RC522, and LCD Screen 16x2 I2C.
- 3.3V: Connected to VCC (3.3V) of RFID-RC522.
- 5V: Connected to +5V of Micro Servo 9G.
- Vin: Connected to VCC of LCD Screen 16x2 I2C.
- A0: Connected to R1 of 4x4 Membrane Matrix Keypad.
- A1: Connected to R2 of 4x4 Membrane Matrix Keypad.
- A2: Connected to R3 of 4x4 Membrane Matrix Keypad.
- A3: Connected to R4 of 4x4 Membrane Matrix Keypad.
- A4: Connected to SDA of LCD Screen 16x2 I2C.
- A5: Connected to SCL of LCD Screen 16x2 I2C.
- D13: Connected to SCK of RFID-RC522.
- D12: Connected to MISO of RFID-RC522.
- D11: Connected to MOSI of RFID-RC522.
- D10: Connected to SDA of RFID-RC522.
- D9: Connected to RST of RFID-RC522.
- D8: Connected to leg0 of Push Button Round.
- D7: Connected to PIN of Buzzer.
- D6: Connected to PWM of Micro Servo 9G.
- D5: Connected to C1 of 4x4 Membrane Matrix Keypad.
- D4: Connected to C2 of 4x4 Membrane Matrix Keypad.
- D3: Connected to C3 of 4x4 Membrane Matrix Keypad.
- D2: Connected to C4 of 4x4 Membrane Matrix Keypad.
Micro Servo 9G
- GND: Connected to GND of Arduino UNO.
- +5V: Connected to 5V of Arduino UNO.
- PWM: Connected to D6 of Arduino UNO.
4x4 Membrane Matrix Keypad
- R1: Connected to A0 of Arduino UNO.
- R2: Connected to A1 of Arduino UNO.
- R3: Connected to A2 of Arduino UNO.
- R4: Connected to A3 of Arduino UNO.
- C1: Connected to D5 of Arduino UNO.
- C2: Connected to D4 of Arduino UNO.
- C3: Connected to D3 of Arduino UNO.
- C4: Connected to D2 of Arduino UNO.
Buzzer
- PIN: Connected to D7 of Arduino UNO.
- GND: Connected to GND of Arduino UNO.
Push Button Round
- leg0: Connected to D8 of Arduino UNO.
- leg1: Connected to GND of Arduino UNO.
LCD Screen 16x2 I2C
- SCL: Connected to A5 of Arduino UNO.
- SDA: Connected to A4 of Arduino UNO.
- VCC: Connected to Vin of Arduino UNO.
- GND: Connected to GND of Arduino UNO.
RFID-RC522
- VCC (3.3V): Connected to 3.3V of Arduino UNO.
- RST: Connected to D9 of Arduino UNO.
- GND: Connected to GND of Arduino UNO.
- SCK: Connected to D13 of Arduino UNO.
- MISO: Connected to D12 of Arduino UNO.
- MOSI: Connected to D11 of Arduino UNO.
- SDA: Connected to D10 of Arduino UNO.
Code Documentation
#include <Wire.h>
#include <LiquidCrystal_I2C.h>
#include <Keypad.h>
#include <Servo.h>
#include <SPI.h>
#include <MFRC522.h>

#define buzzer_pin 7

// I2C LCD setup
LiquidCrystal_I2C lcd(0x27, 16, 2);

// Define keypad layout
const byte ROWS = 4;
const byte COLS = 4;
char keys[ROWS][COLS] = {
  { 'D', '#', '0', '*' },
  { 'C', '9', '8', '7' },
  { 'B', '6', '5', '4' },
  { 'A', '3', '2', '1' }
};
byte colPins[ROWS] = { 2, 3, 4, 5 };
byte rowPins[COLS] = { A3, A2, A1, A0 };

Keypad keypad = Keypad(makeKeymap(keys), rowPins, colPins, ROWS, COLS);  //deklarasi keypad manggil fungsi

// Password setup
String password = "1234";
String inputCode = "";  // buffer/ penyimpanan tiap kode yg diinput
String secret_key;

// Servo setup
Servo myServo; // deklarasi servo
int lockPosition = 90; //sudut servo saat mengunci
int unlockPosition = 0;

// Push button setup
const int buttonPin = 8;
bool buttonState = LOW; //variabel penyimpanan pembacaan tombol
bool lastButtonState = LOW; //variabel penyimpanan pembacaan terakhir tombol

// RFID setup
#define RST_PIN 9
#define SS_PIN 10
MFRC522 mfrc522(SS_PIN, RST_PIN);

// Authorized RFID UID
byte authorizedUID[] = { 0x31, 0x55, 0x60, 0x2E };
// 31 55 60 2E

void setup() {
  // Initialize serial communication
  Serial.begin(9600); //kecepatan baudrate
  pinMode(buzzer_pin, OUTPUT);// set buzzer sebagai output

  // Initialize LCD
  lcd.init();// inisialisasi lcd
  lcd.backlight();// menyalakan lampu lcd
  lcd.setCursor(0, 0);// cursor lcd
  lcd.print("Enter Password:");

  // Initialize servo
  myServo.attach(6); // pin servo
  myServo.write(lockPosition); // set sudut servo

  // Initialize push button
  pinMode(buttonPin, INPUT_PULLUP); //tombol sebagi input

  // Initialize RFID
  SPI.begin();
  mfrc522.PCD_Init();
  lcd.setCursor(0, 1);
  lcd.print("RFID Ready");
  lockAction(); // langsung kunci saat awal kali menyala
}

void lockAction() {
  myServo.write(lockPosition);
  lcd.setCursor(0, 1);
  lcd.print("Locked          ");
}

void unlockAction() {
  myServo.write