Cirkit Designer
Your all-in-one circuit design IDE
Home /
Project Documentation
Arduino UNO and A9G GSM/GPRS GPS-Based Air Quality Monitoring System

Circuit Documentation
Summary of the Circuit
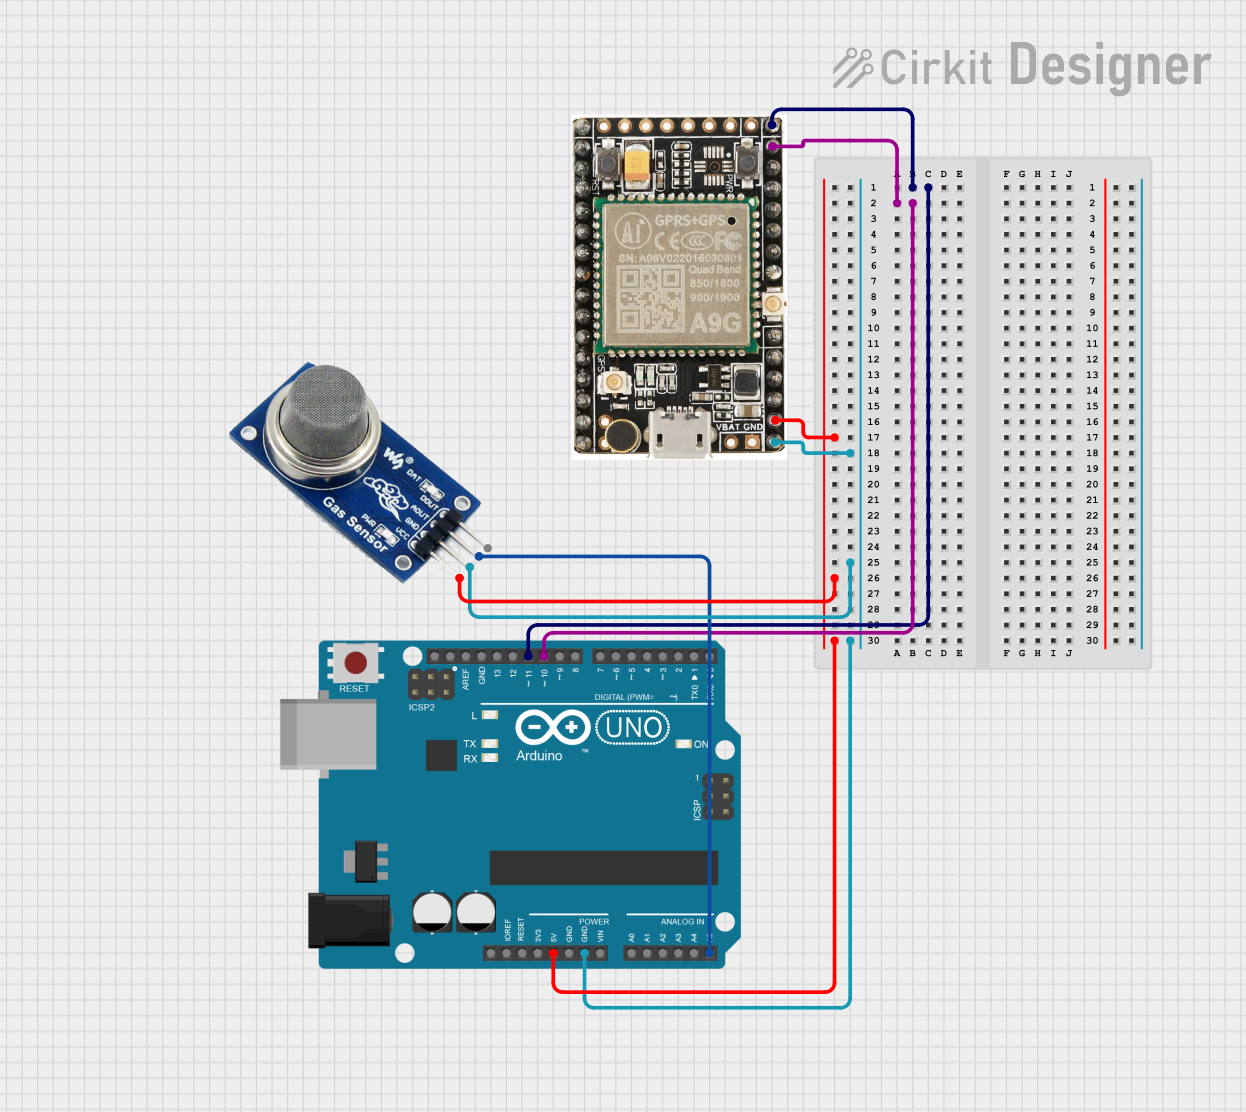
This circuit integrates an Arduino UNO microcontroller with an A9G GSM/GPRS+GPS module and an MQ2 gas sensor. The Arduino UNO serves as the central processing unit, controlling the data flow and sensor integration. The A9G module provides GSM/GPRS communication and GPS functionality, while the MQ2 sensor is used for detecting various gases such as LPG, propane, methane, hydrogen, and smoke.
Component List
Arduino UNO
- Description: A microcontroller board based on the ATmega328P.
- Pins: UNUSED, IOREF, Reset, 3.3V, 5V, GND, Vin, A0-A5, SCL, SDA, AREF, D0-D13.
- Purpose: Acts as the central controller for the circuit.
A9G
- Description: A GSM/GPRS+GPS module for cellular communication and location services.
- Pins: Data Pin 1, Data Pin 2, VCC, GND.
- Purpose: Provides GSM/GPRS communication and GPS functionality.
MQ2
- Description: A gas sensor module for detecting a variety of gases.
- Pins: VCC, GND, AOUT, DOUT.
- Purpose: Monitors gas levels and provides analog output.
Wiring Details
Arduino UNO
- 5V: Connected to the VCC pins of A9G and MQ2 for power supply.
- GND: Common ground with A9G and MQ2.
- D11: Connected to Data Pin 1 of A9G for data communication.
- D10: Connected to Data Pin 2 of A9G for data communication.
- A5: Connected to AOUT of MQ2 for analog gas level readings.
A9G
- Data Pin 1: Connected to D11 of Arduino UNO.
- Data Pin 2: Connected to D10 of Arduino UNO.
- VCC: Connected to 5V of Arduino UNO.
- GND: Common ground with Arduino UNO.
MQ2
- VCC: Connected to 5V of Arduino UNO.
- GND: Common ground with Arduino UNO.
- AOUT: Connected to A5 of Arduino UNO for analog readings.
Documented Code
Arduino UNO Code (sketch.ino)
void setup() {
  // put your setup code here, to run once:

}

void loop() {
  // put your main code here, to run repeatedly:

}
Note: The provided code is a template and does not contain any functional code. It is expected that the user will fill in the setup and loop functions with the necessary code to operate the A9G module and MQ2 sensor.