
Circuit Documentation
Summary of the Circuit
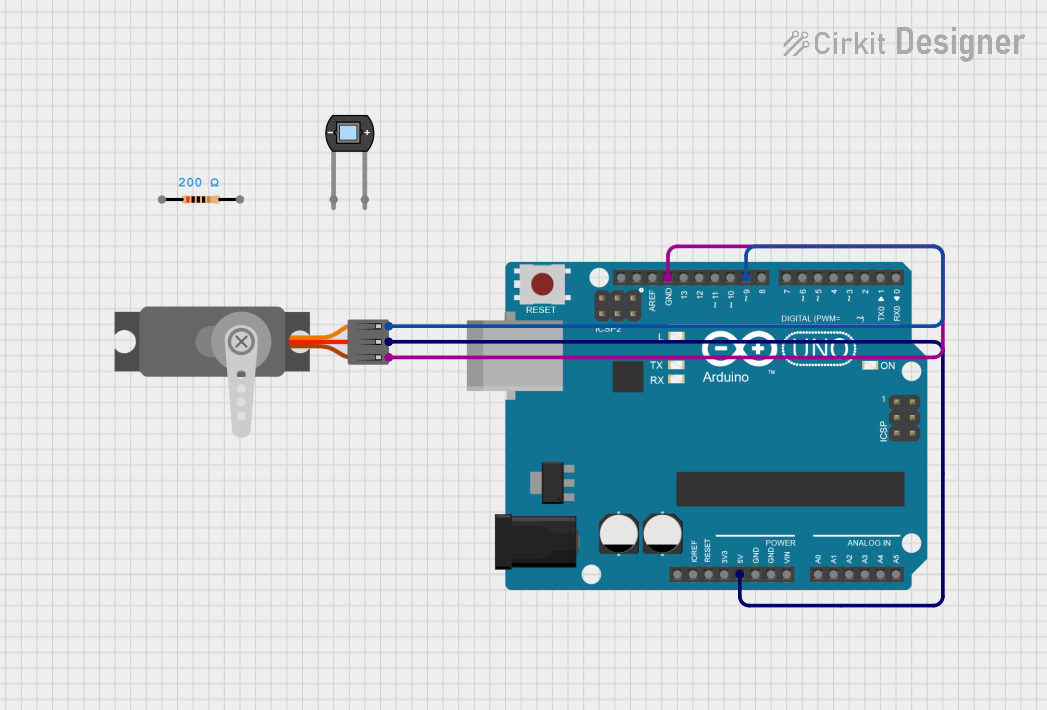
This circuit consists of an Arduino UNO microcontroller, a servo motor compatible with Wokwi, and a photodiode. The Arduino UNO is used as the central processing unit to control the servo motor based on the program loaded into it. The servo motor is powered by the 5V output from the Arduino and receives pulse-width modulation (PWM) signals on one of the digital pins (D9) to control its position. The photodiode is included in the parts list but is not connected in the current configuration of the circuit.
Component List
Arduino UNO
- Description: A microcontroller board based on the ATmega328P.
- Purpose: Acts as the central processing unit for controlling the servo motor.
- Pins: UNUSED, IOREF, Reset, 3.3V, 5V, GND, Vin, A0-A5, SCL, SDA, AREF, D13-D0.
Photodiode
- Description: A semiconductor device that converts light into an electrical current.
- Purpose: Not connected in the current circuit configuration.
- Pins: cathode, anode.
Servo (Wokwi Compatible)
- Description: An actuator that enables precise control of angular position.
- Purpose: Receives PWM signals from the Arduino to adjust its position.
- Pins: GND, V+, PWM.
Resistor
- Description: A passive two-terminal electrical component that implements electrical resistance.
- Purpose: Not connected in the current circuit configuration.
- Properties: 200 Ohms resistance.
- Pins: pin1, pin2.
Wiring Details
Arduino UNO
- 5V connected to Servo (V+)
- GND connected to Servo (GND)
- D9 connected to Servo (PWM)
Servo (Wokwi Compatible)
- GND connected to Arduino UNO (GND)
- V+ connected to Arduino UNO (5V)
- PWM connected to Arduino UNO (D9)
Documented Code
#include <Servo.h>  // Standard Arduino Servo library

Servo myservo;  // Servo object
int servopin = 9;  // Pin where the servo is connected
int servopos = 0;  // Initial servo position

void setup() {
    Serial.begin(9600);  // Initialize serial communication
    myservo.attach(servopin);  // Attach the servo to pin 9
}

void loop() {
    myservo.write(servopos);  // Move the servo to the position
    delay(1000);  // Delay for 1 second

    // Increment the servo position
    servopos += 10;  // Increase position by 10 degrees
    if (servopos > 180) {
        servopos = 0;  // Reset position to 0 if it exceeds 180
    }
}
File Name: sketch.ino
Description: This code initializes a servo motor on pin 9 of the Arduino UNO. It sets up the servo to start at position 0 and then moves it in increments of 10 degrees every second. Once the servo reaches a position greater than 180 degrees, it resets back to 0 degrees.