
Arduino UNO-Based Ultrasonic Distance Meter with Real-Time Clock and LCD Display
View and Edit Project In Cirkit Designer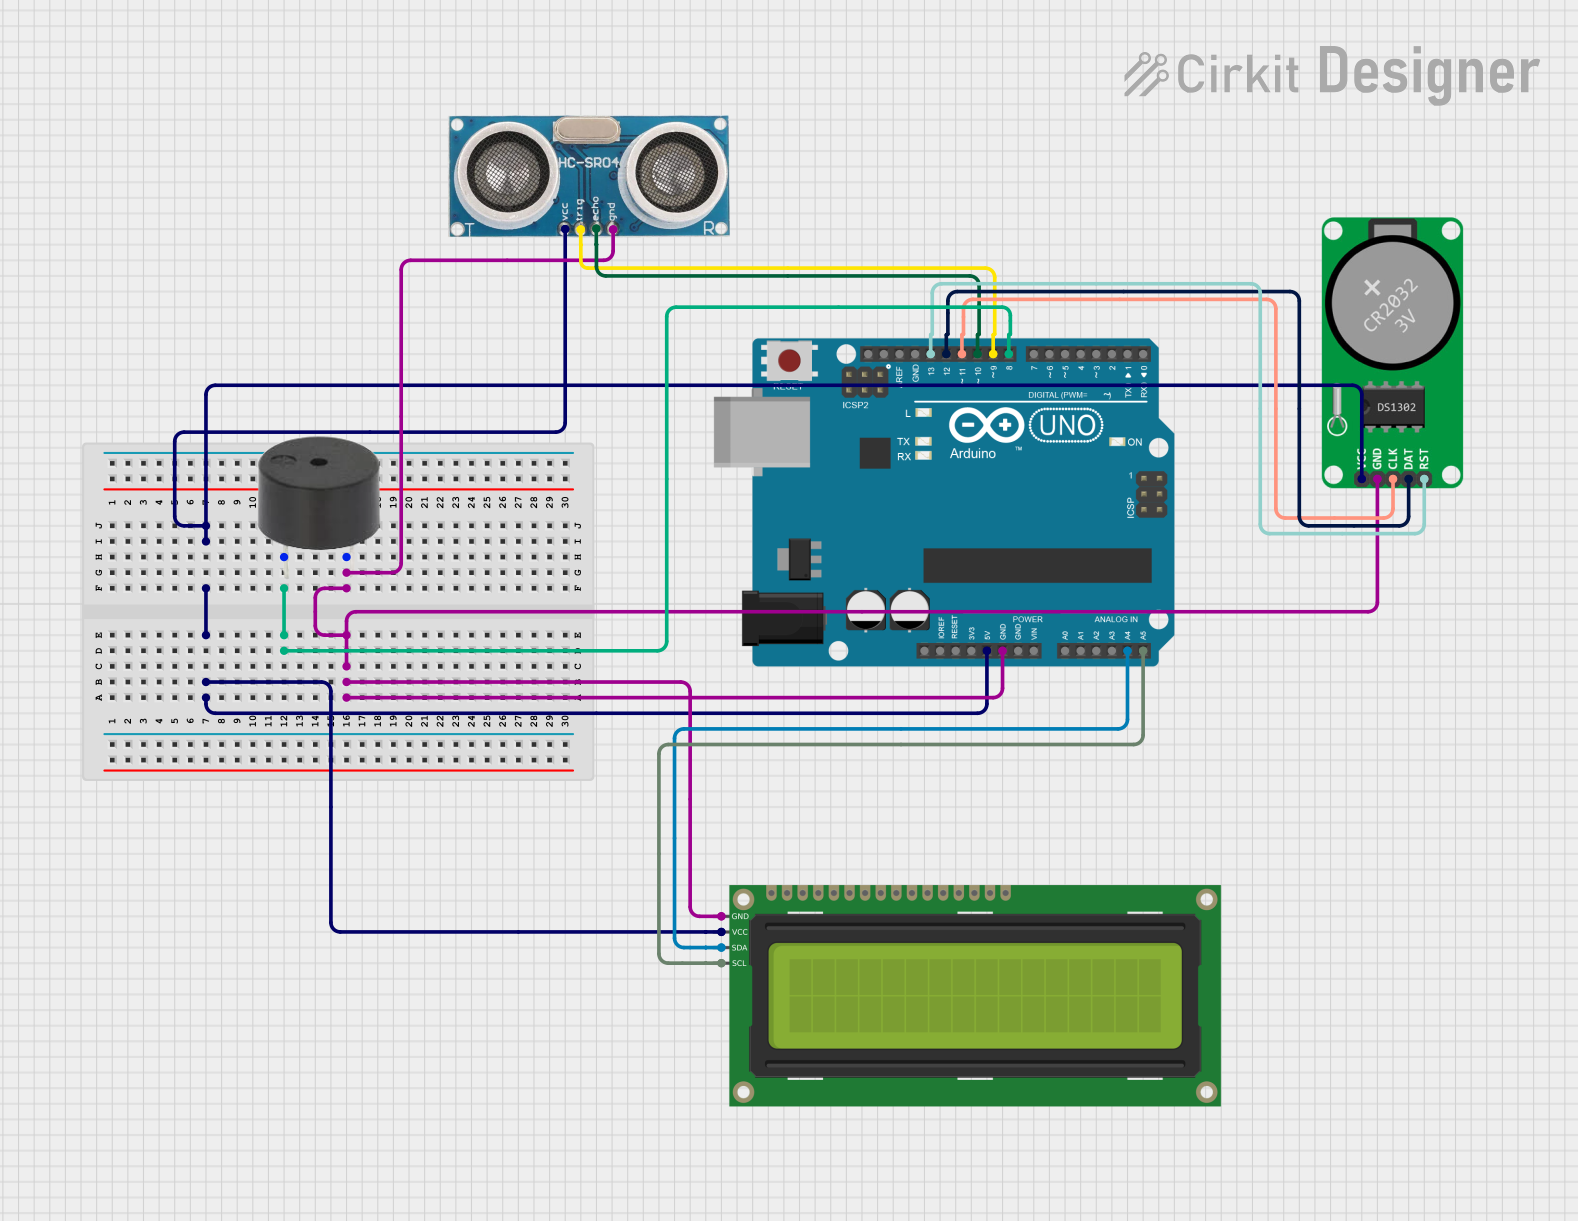
Circuit Documentation
Summary
This circuit is designed to measure distance using an ultrasonic sensor and display the distance on a 16x2 I2C LCD. Additionally, it includes a Real-Time Clock (RTC) module to display the current time when the measured distance is less than or equal to 1 meter. A buzzer is also included to provide audible feedback based on the measured distance.
Component List
Arduino UNO
- Description: Microcontroller board based on the ATmega328P.
- Pins: UNUSED, IOREF, Reset, 3.3V, 5V, GND, Vin, A0, A1, A2, A3, A4, A5, SCL, SDA, AREF, D13, D12, D11, D10, D9, D8, D7, D6, D5, D4, D3, D2, D1, D0
Ultrasonic Sensor
- Description: Sensor used to measure distance by using ultrasonic waves.
- Pins: +VCC, Trigger, Echo, GND
16x2 I2C LCD
- Description: 16x2 character LCD display with I2C interface.
- Pins: GND, VCC, SDA, SCL
RTC-DS1302
- Description: Real-Time Clock module to keep track of the current time.
- Pins: Vcc, GND, CLK, DAT, RST
Buzzer
- Description: Simple buzzer to provide audible feedback.
- Pins: PIN, GND
Wiring Details
Arduino UNO
5V connected to:
- Ultrasonic Sensor (+VCC)
- RTC-DS1302 (Vcc)
- 16x2 I2C LCD (VCC)
GND connected to:
- Buzzer (GND)
- Ultrasonic Sensor (GND)
- RTC-DS1302 (GND)
- 16x2 I2C LCD (GND)
A4 connected to:
- 16x2 I2C LCD (SDA)
A5 connected to:
- 16x2 I2C LCD (SCL)
D13 connected to:
- RTC-DS1302 (RST)
D12 connected to:
- RTC-DS1302 (DAT)
D11 connected to:
- RTC-DS1302 (CLK)
D10 connected to:
- Ultrasonic Sensor (Echo)
D9 connected to:
- Ultrasonic Sensor (Trigger)
D8 connected to:
- Buzzer (PIN)
Ultrasonic Sensor
+VCC connected to:
- Arduino UNO (5V)
Trigger connected to:
- Arduino UNO (D9)
Echo connected to:
- Arduino UNO (D10)
GND connected to:
- Arduino UNO (GND)
16x2 I2C LCD
GND connected to:
- Arduino UNO (GND)
VCC connected to:
- Arduino UNO (5V)
SDA connected to:
- Arduino UNO (A4)
SCL connected to:
- Arduino UNO (A5)
RTC-DS1302
Vcc connected to:
- Arduino UNO (5V)
GND connected to:
- Arduino UNO (GND)
CLK connected to:
- Arduino UNO (D11)
DAT connected to:
- Arduino UNO (D12)
RST connected to:
- Arduino UNO (D13)
Buzzer
PIN connected to:
- Arduino UNO (D8)
GND connected to:
- Arduino UNO (GND)
Code Documentation
#include <Wire.h>
#include <LiquidCrystal_I2C.h>
#include <DS1302.h>

// Pin definitions
const int trigPin = 9;
const int echoPin = 10;
const int buzzerPin = 8;

// Initialize the LCD
LiquidCrystal_I2C lcd(0x27, 16, 2);

// Initialize the RTC
const int RST_PIN = 13;
const int DAT_PIN = 12;
const int CLK_PIN = 11;
DS1302 rtc(11, 12, 13);

void setup() {
  // Initialize serial communication
  Serial.begin(9600);

  // Initialize the LCD
  lcd.begin();
  lcd.backlight();

  // Initialize the RTC
  rtc.halt(false);
  rtc.writeProtect(false);

  // Set the pin modes
  pinMode(trigPin, OUTPUT);
  pinMode(echoPin, INPUT);
  pinMode(buzzerPin, OUTPUT);

  // Set the RTC time (uncomment and set the correct time once)
  // rtc.setDOW(SUNDAY);        // Set Day-of-Week to SUNDAY
  // rtc.setTime(12, 0, 0);     // Set the time to 12:00:00 (24hr format)
  // rtc.setDate(1, 1, 2023);   // Set the date to January 1st, 2023
}

void loop() {
  // Read distance from Ultrasonic Sensor
  long duration, distance;
  digitalWrite(trigPin, LOW);
  delayMicroseconds(2);
  digitalWrite(trigPin, HIGH);
  delayMicroseconds(10);
  digitalWrite(trigPin, LOW);
  duration = pulseIn(echoPin, HIGH);
  distance = (duration / 2) / 29.1;

  // Convert distance to meters
  float distanceMeters = distance / 100.0;

  // Read time from RTC
  Time t = rtc.getTime();

  // Display distance and time on LCD
  lcd.clear();
  lcd.setCursor(0, 0);
  lcd.print("Dist: ");
  lcd.print(distanceMeters);
  lcd.print(" m");
  if (distanceMeters <= 1) {
    lcd.setCursor(0, 1);
    lcd.print(t.hour);
    lcd.print(":");
    lcd.print(t.min);
    lcd.print(":");
    lcd.print(t.sec);
  }

  // Activate buzzer based on distance
  if (distanceMeters <= 0.5) {
    digitalWrite(buzzerPin, HIGH);
  } else if (distanceMeters <= 2) {
    int beepInterval = map(distanceMeters * 100, 50, 200, 100, 1000);
    digitalWrite(buzzerPin, HIGH);
    delay(beepInterval / 2);
    digitalWrite(buzzerPin, LOW);
    delay(beepInterval / 2);
  } else {
    digitalWrite(buzzerPin, LOW);
  }

  // Delay before next loop
  delay(1000);
}
This code initializes the LCD and RTC, sets up the pin modes, and continuously measures the distance using the ultrasonic sensor. It displays the distance on the LCD and activates the buzzer based on the measured distance. If the distance is less than or equal to 1 meter, it also displays the current time on the LCD.