
Arduino UNO Controlled Smart Relay System with IR Sensor and LCD Feedback
View and Edit Project In Cirkit Designer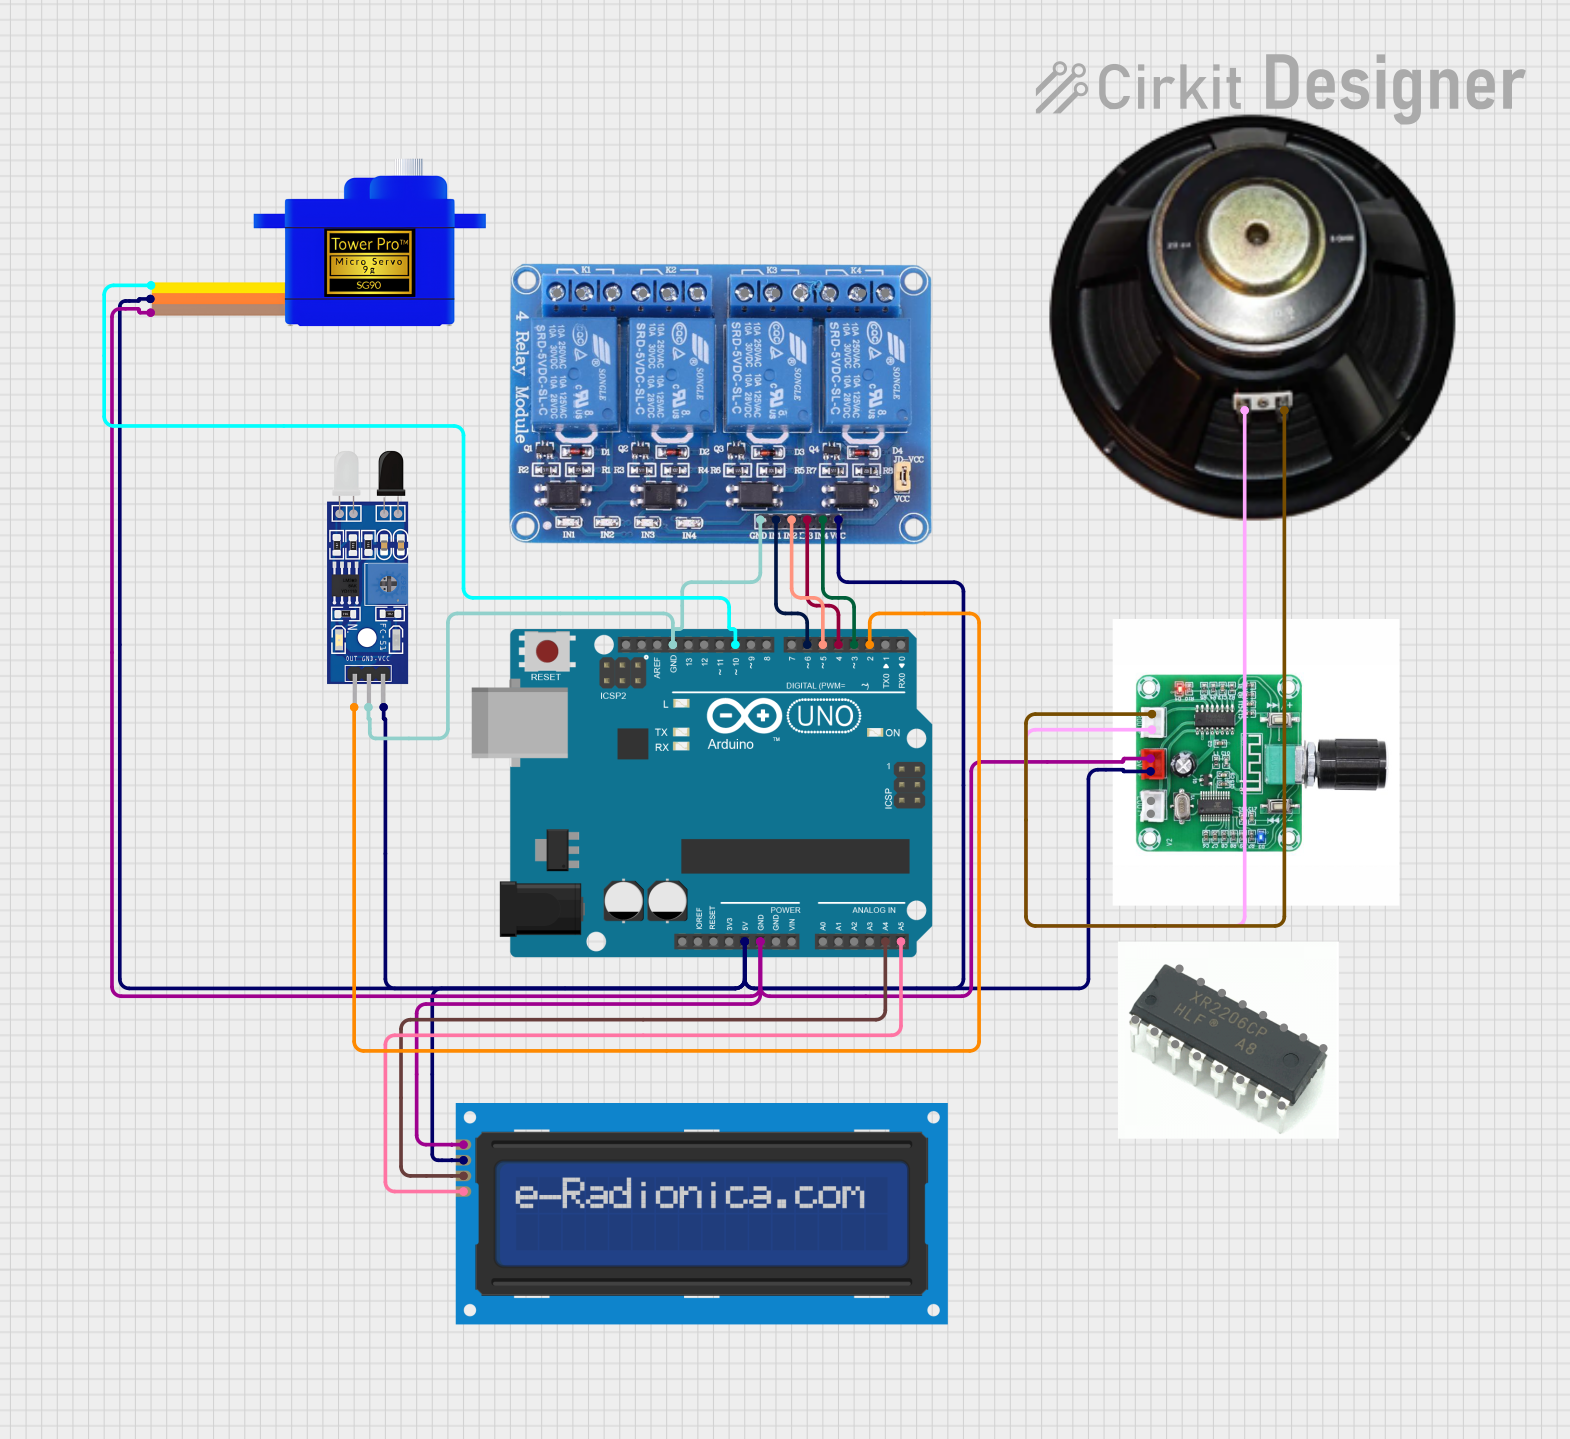
Circuit Documentation
Summary
The circuit in question is a microcontroller-based system that integrates various components to perform specific functions. The core of the circuit is an Arduino UNO, which controls a relay module, an LCD screen with I2C communication, a servomotor, an IR sensor, a speaker through a Bluetooth audio amplifier, and potentially other components not directly specified in the provided code. The Arduino UNO is responsible for managing the inputs and outputs, interfacing with the sensor, driving the servomotor, and communicating with the LCD screen and relay module. The relay module can switch higher power loads, and the speaker is driven by the PAM8403 audio amplifier. The IR sensor is used for detecting objects or movements.
Component List
Arduino UNO
- Microcontroller board based on the ATmega328P
- It has 14 digital input/output pins, 6 analog inputs, a 16 MHz quartz crystal, a USB connection, a power jack, an ICSP header, and a reset button.
Relay 4 Channel 5V
- A module with 4 relays that can control high voltage/high current devices.
- Each relay has a normally open (NO) and a normally closed (NC) contact.
LCD Screen 16x2 I2C
- An alphanumeric liquid crystal display capable of displaying 16 characters per line and 2 lines.
- It uses the I2C communication protocol for interfacing with the microcontroller.
Speaker
- An audio output device for sound playback.
Sensor FC-51 IR
- An infrared sensor module used for obstacle detection or line tracking.
Servomotor SG90
- A small and lightweight servo motor capable of precise position control.
PAM8403 5W Bluetooth 5.0 Digital Stereo Power Audio Amplifier
- A digital amplifier for driving speakers with Bluetooth connectivity.
XR2206CP
- A function generator IC capable of producing high-quality sine, square, triangle, ramp, and pulse waveforms.
Wiring Details
Arduino UNO
5Vconnected to VCC of Servomotor SG90, Relay 4 Channel 5V, Sensor FC-51 IR, and LCD Screen 16x2 I2C.GNDconnected to GND of Servomotor SG90, Relay 4 Channel 5V, Sensor FC-51 IR, and LCD Screen 16x2 I2C.A4connected to SDA of LCD Screen 16x2 I2C.A5connected to SCL of LCD Screen 16x2 I2C.D10connected to SIG of Servomotor SG90.D6,D5,D4,D3connected to IN1, IN2, IN3, IN4 of Relay 4 Channel 5V respectively.D2connected to OUT of Sensor FC-51 IR.
Relay 4 Channel 5V
VCCconnected to 5V of Arduino UNO.GNDconnected to GND of Arduino UNO.IN1,IN2,IN3,IN4connected to D6, D5, D4, D3 of Arduino UNO respectively.
LCD Screen 16x2 I2C
SDAconnected to A4 of Arduino UNO.SCLconnected to A5 of Arduino UNO.VCCconnected to 5V of Arduino UNO.GNDconnected to GND of Arduino UNO.
Servomotor SG90
SIGconnected to D10 of Arduino UNO.VCCconnected to 5V of Arduino UNO.GNDconnected to GND of Arduino UNO.
Sensor FC-51 IR
OUTconnected to D2 of Arduino UNO.VCCconnected to 5V of Arduino UNO.GNDconnected to GND of Arduino UNO.
PAM8403 5W Bluetooth 5.0 Digital Stereo Power Audio Amplifier
+connected to+of Speaker and 5V of Arduino UNO.-connected to-of Speaker and GND of Arduino UNO.
Speaker
+connected to+of PAM8403 Audio Amplifier.-connected to-of PAM8403 Audio Amplifier.
Documented Code
Arduino UNO Code
// The code for the Arduino UNO is not provided in the input.
Relay 4 Channel 5V Code
void setup() {
  // put your setup code here, to run once:

}

void loop() {
  // put your main code here, to run repeatedly:

}
LCD Screen 16x2 I2C Code
void setup() {
  // put your setup code here, to run once:

}

void loop() {
  // put your main code here, to run repeatedly:

}
(Note: The actual functionality of the code is not provided in the input. The above code snippets are placeholders and should be replaced with the actual code that performs the desired operations on the respective components.)