
Arduino Nano and ESP8266 Wi-Fi Grain Moisture Monitor with LCD Display
View and Edit Project In Cirkit Designer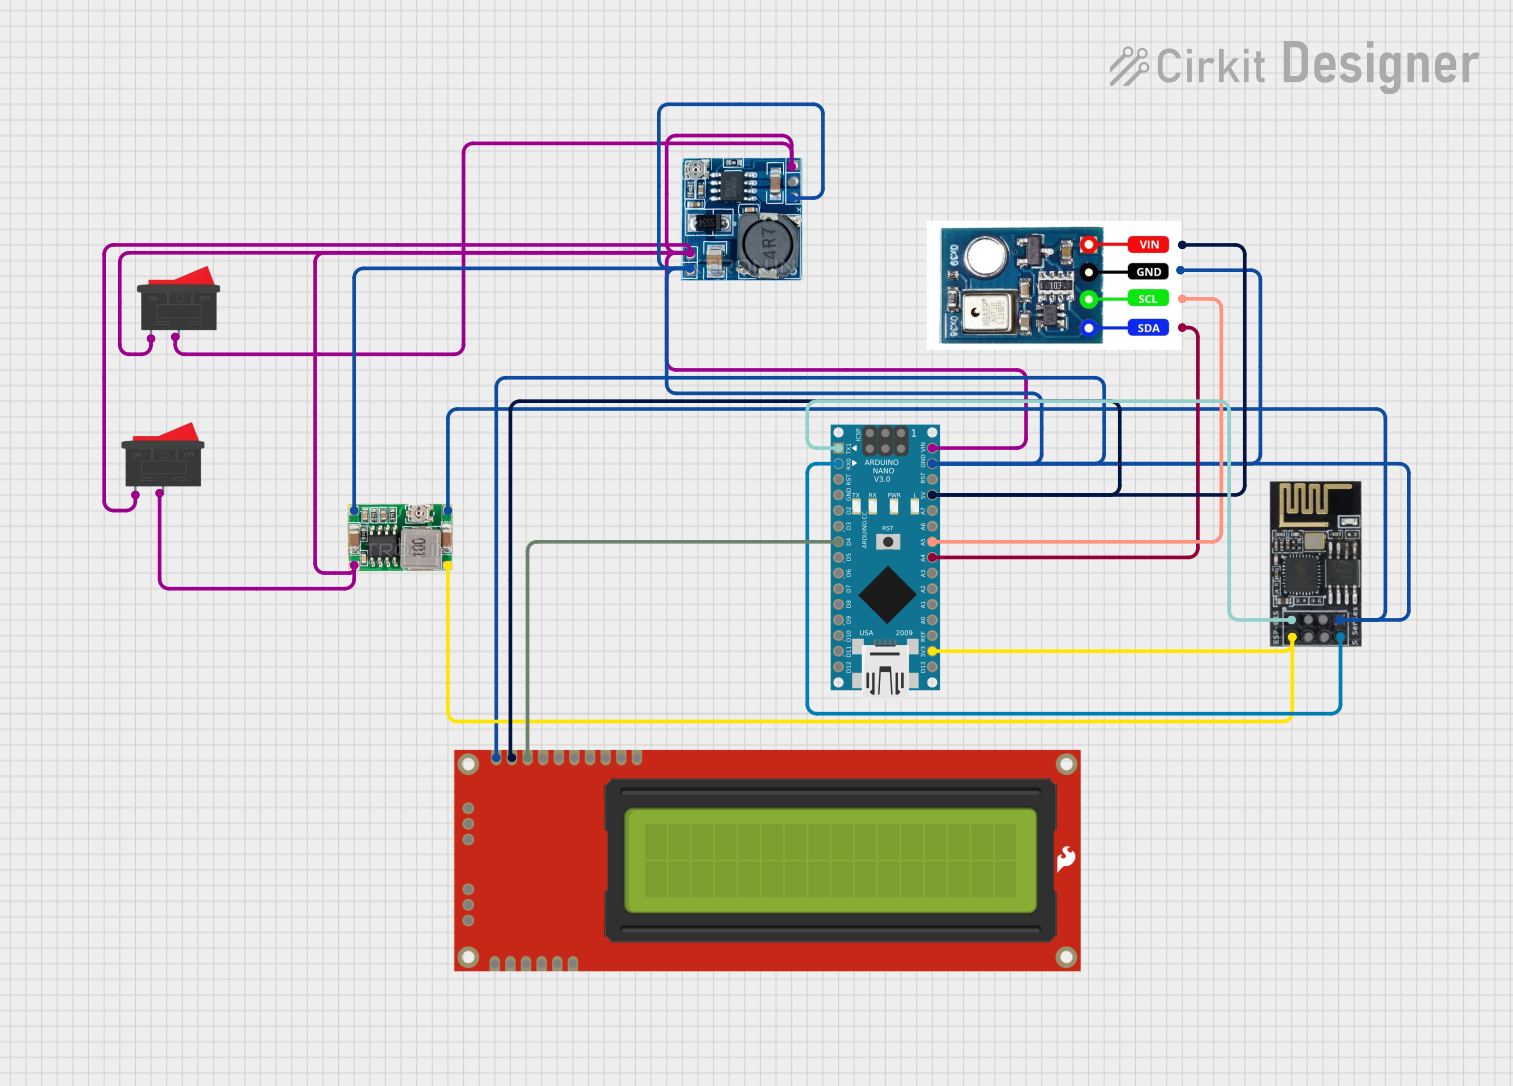
Circuit Documentation
Summary
This circuit is designed to monitor grain moisture using an AHT10 sensor and display the data on a 16x2 Serial Enabled LCD. Additionally, the data is sent to a remote server via an ESP8266-01 WiFi module. The circuit is powered by a Step Down Module and a Mini 360 Buck Converter, with control provided by an Arduino Nano.
Component List
Arduino Nano
- Description: A small, complete, and breadboard-friendly board based on the ATmega328P.
- Pins: D1/TX, D0/RX, RESET, GND, D2, D3, D4, D5, D6, D7, D8, D9, D10, D11/MOSI, D12/MISO, VIN, 5V, A7, A6, A5, A4, A3, A2, A1, A0, AREF, 3V3, D13/SCK
WiFi Module ESP8266-01
- Description: A self-contained SoC with integrated TCP/IP protocol stack that can give any microcontroller access to your WiFi network.
- Pins: RX, GPIO0, GPIO2, GND, +3V3, Reset, CH-PD Chip power down, TX
Serial Enabled 16x2 LCD - Black on Green 5V
- Description: A 16x2 character LCD with a serial interface.
- Pins: GND, RX, VDD, RS, R/W, E, DB4, DB5, DB6, DB7, BL+, PGM, PGC, PGD, VPP
Step Down Module
- Description: A module that steps down voltage from 24V to 5V.
- Pins: 24v IN+, GND, 12v IN+, 5v OUT+, 5v OUT-
Mini 360 Buck Converter
- Description: A small, efficient buck converter that steps down voltage.
- Pins: IN-, OUT-, OUT+, IN+
AHT10
- Description: A high-precision, fully-calibrated, digital temperature and humidity sensor.
- Pins: Vcc, Gnd, SCL, SDA
Rocker Switch
- Description: A simple on/off switch.
- Pins: 1, 2
Wiring Details
Arduino Nano
- D1/TX connected to RX of WiFi Module ESP8266-01
- D0/RX connected to TX of WiFi Module ESP8266-01
- D4 connected to RS of Serial Enabled 16x2 LCD
- VIN connected to 24v IN+ of Step Down Module
- GND connected to GND of Step Down Module
- 5V connected to VDD of Serial Enabled 16x2 LCD and Vcc of AHT10
- A5 connected to SCL of AHT10
- A4 connected to SDA of AHT10
- 3V3 connected to +3V3 of WiFi Module ESP8266-01 and OUT+ of Mini 360 Buck Converter
WiFi Module ESP8266-01
- RX connected to D1/TX of Arduino Nano
- TX connected to D0/RX of Arduino Nano
- GND connected to GND of Step Down Module
- +3V3 connected to 3V3 of Arduino Nano
Serial Enabled 16x2 LCD
- RS connected to D4 of Arduino Nano
- GND connected to GND of Step Down Module
- VDD connected to 5V of Arduino Nano
Step Down Module
- 24v IN+ connected to VIN of Arduino Nano
- GND connected to GND of Arduino Nano
- 5v OUT+ connected to 24v IN+ of Step Down Module
- 5v OUT- connected to GND of Step Down Module
Mini 360 Buck Converter
- IN+ connected to 24v IN+ of Step Down Module
- IN- connected to GND of Step Down Module
- OUT+ connected to 3V3 of Arduino Nano
- OUT- connected to GND of Step Down Module
AHT10
- Vcc connected to 5V of Arduino Nano
- Gnd connected to GND of Step Down Module
- SCL connected to A5 of Arduino Nano
- SDA connected to A4 of Arduino Nano
Rocker Switch
- 1 connected to 24v IN+ of Step Down Module
- 2 connected to 5v OUT+ of Step Down Module
Documented Code
Arduino Nano Code
void setup() {
  // put your setup code here, to run once:

}

void loop() {
  // put your main code here, to run repeatedly:

}
AHT10 Code
/*
 * Grain Moisture Monitor Circuit
 * Components: AHT10, Arduino Nano, Step Down Module, Rocker Switch,
 * ESP01, Mini 360 Buck, 16x2 Serial Enabled LCD
 * Function: Reads moisture data from AHT10 sensor and displays it on
 * the 16x2 LCD. Sends data to a remote server via ESP8266-01.
 */

#include <Wire.h>
#include <AHT10.h>
#include <SoftwareSerial.h>

AHT10 aht10;
SoftwareSerial espSerial(2, 3); // RX, TX for ESP8266

void setup() {
  Serial.begin(9600);
  espSerial.begin(9600);
  Wire.begin();
  if (!aht10.begin()) {
    Serial.println("AHT10 not detected. Check wiring.");
    while (1);
  }
  Serial.println("AHT10 detected.");
  espSerial.println("AT");
  delay(1000);
  espSerial.println("AT+CWMODE=1");
  delay(1000);
  espSerial.println("AT+CWJAP=\"SSID\",\"PASSWORD\"");
  delay(5000);
}

void loop() {
  float humidity = aht10.readHumidity();
  float temperature = aht10.readTemperature();
  Serial.print("Humidity: ");
  Serial.print(humidity);
  Serial.print(" %\t");
  Serial.print("Temperature: ");
  Serial.print(temperature);
  Serial.println(" C");
  espSerial.print("AT+CIPSTART=\"TCP\",\"<server_ip>\",<port>");
  delay(2000);
  String httpRequest = "GET /update?humidity=" + String(humidity) +
                      "&temperature=" + String(temperature) + " HTTP/1.1\r\n" +
                      "Host: <server_ip>\r\n\r\n";
  espSerial.print("AT+CIPSEND=");
  espSerial.println(httpRequest.length());
  delay(1000);
  espSerial.print(httpRequest);
  delay(2000);
  espSerial.println("AT+CIPCLOSE");
  delay(1000);
  delay(10000); // Delay between readings
}