
Circuit Documentation
Summary
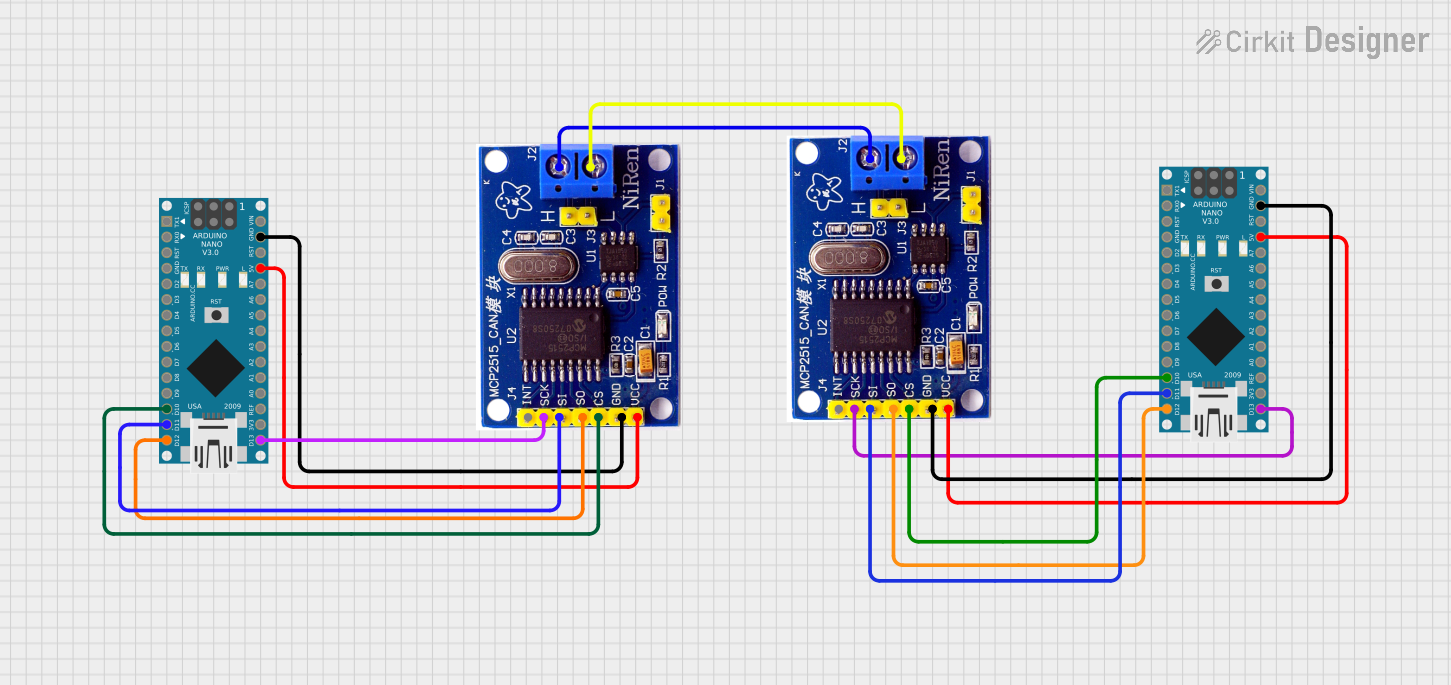
This circuit involves two Arduino Nano microcontrollers interfacing with two MCP2515 CAN controllers. The Arduinos are responsible for controlling the MCP2515 modules, which are used for CAN communication. Each Arduino Nano is connected to an MCP2515 module, and the two MCP2515 modules are interconnected for CAN communication.
Component List
Arduino Nano
- Description: A small, complete, and breadboard-friendly board based on the ATmega328P.
- Pins: D1/TX, D0/RX, RESET, GND, D2, D3, D4, D5, D6, D7, D8, D9, D10, D11/MOSI, D12/MISO, VIN, 5V, A7, A6, A5, A4, A3, A2, A1, A0, AREF, 3V3, D13/SCK
MCP2515
- Description: A CAN controller with SPI interface.
- Pins: INT, SCK, SI, SO, CS, GND, VCC, H, L
Wiring Details
Arduino Nano (1)
- D10 connected to MCP2515 (1) CS
- D11/MOSI connected to MCP2515 (1) SI
- D12/MISO connected to MCP2515 (1) SO
- GND connected to MCP2515 (1) GND
- 5V connected to MCP2515 (1) VCC
- D13/SCK connected to MCP2515 (1) SCK
MCP2515 (1)
- CS connected to Arduino Nano (1) D10
- SI connected to Arduino Nano (1) D11/MOSI
- SO connected to Arduino Nano (1) D12/MISO
- GND connected to Arduino Nano (1) GND
- VCC connected to Arduino Nano (1) 5V
- SCK connected to Arduino Nano (1) D13/SCK
- H connected to MCP2515 (2) H
- L connected to MCP2515 (2) L
Arduino Nano (2)
- D10 connected to MCP2515 (2) CS
- D11/MOSI connected to MCP2515 (2) SI
- D12/MISO connected to MCP2515 (2) SO
- GND connected to MCP2515 (2) GND
- 5V connected to MCP2515 (2) VCC
- D13/SCK connected to MCP2515 (2) SCK
MCP2515 (2)
- CS connected to Arduino Nano (2) D10
- SI connected to Arduino Nano (2) D11/MOSI
- SO connected to Arduino Nano (2) D12/MISO
- GND connected to Arduino Nano (2) GND
- VCC connected to Arduino Nano (2) 5V
- SCK connected to Arduino Nano (2) D13/SCK
- H connected to MCP2515 (1) H
- L connected to MCP2515 (1) L
Documented Code
Arduino Nano (1) Code
void setup() {
  // put your setup code here, to run once:

}

void loop() {
  // put your main code here, to run repeatedly:

}
Arduino Nano (2) Code
void setup() {
  // put your setup code here, to run once:

}

void loop() {
  // put your main code here, to run repeatedly:

}
This documentation provides a comprehensive overview of the circuit, including a summary, detailed component list, wiring details, and the code for the microcontrollers.