
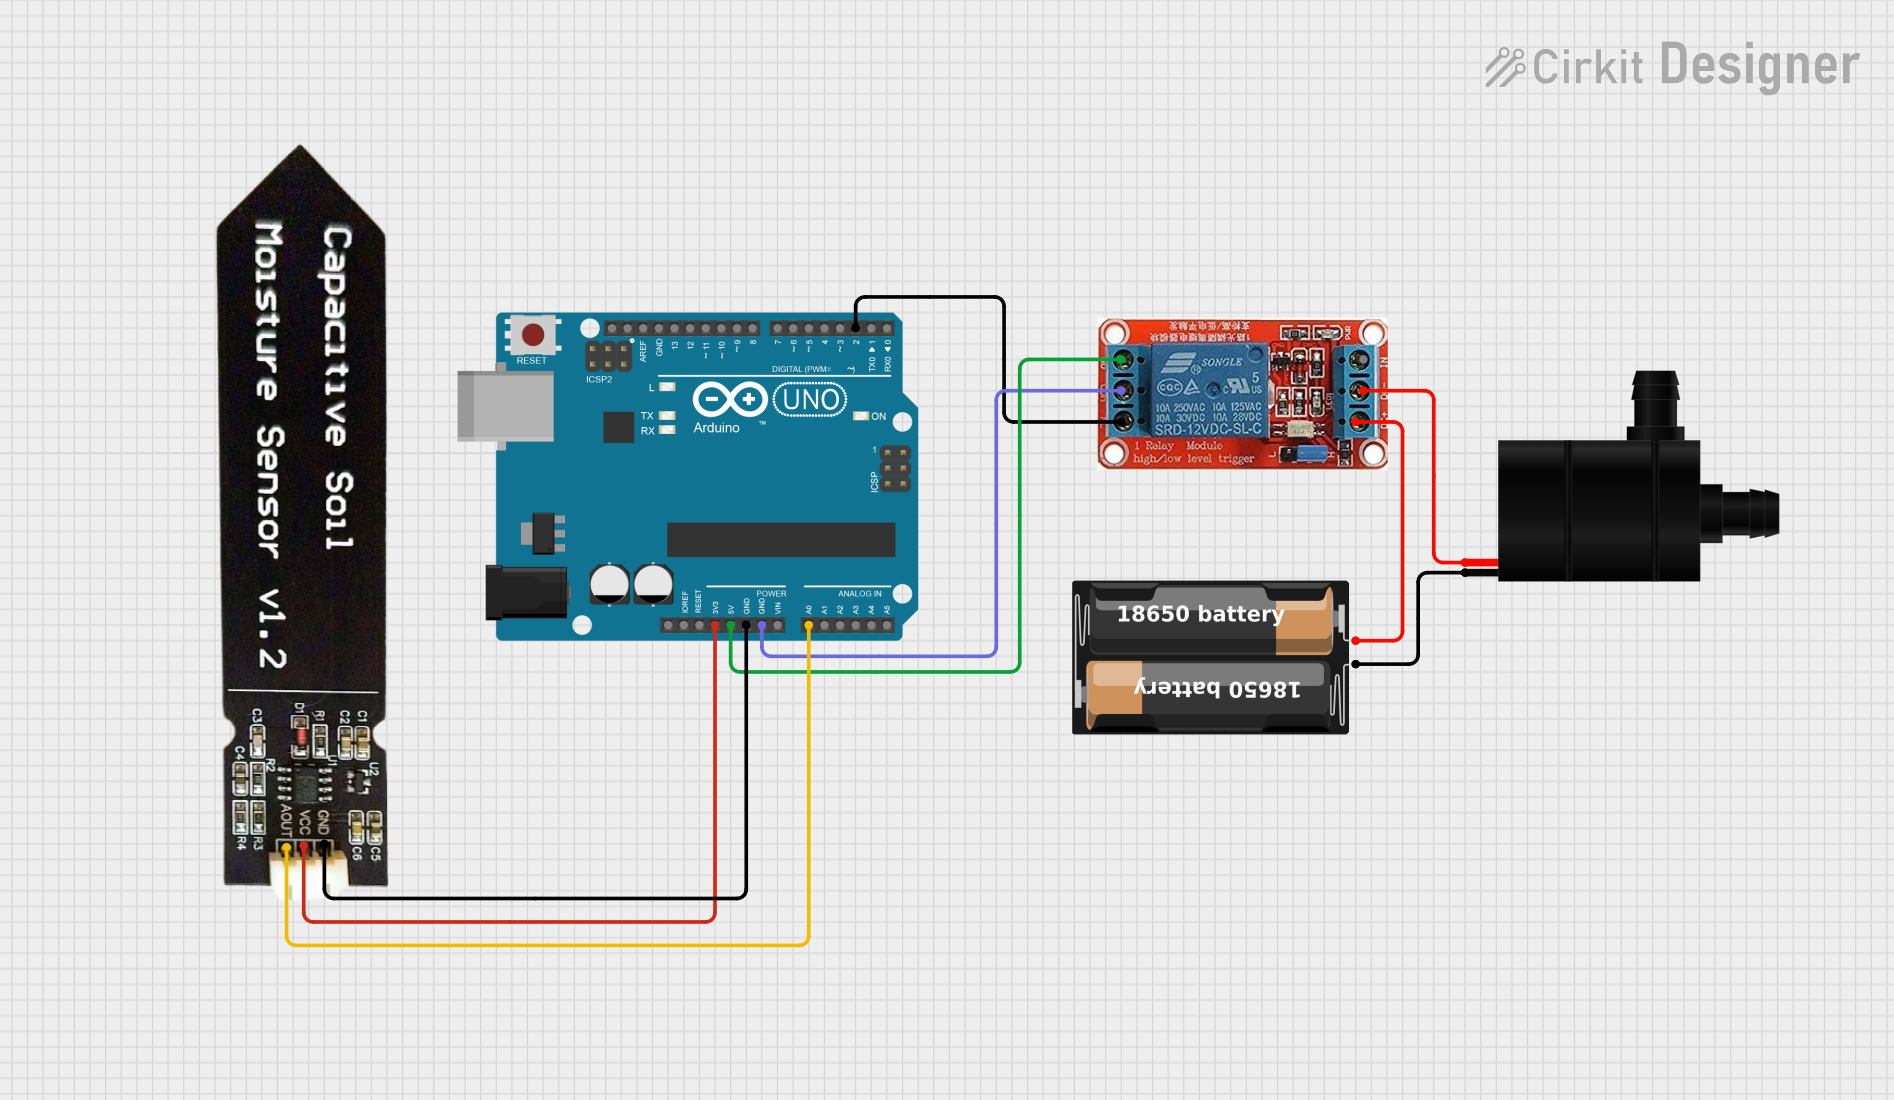
Circuit Documentation
Summary
This circuit is designed to control a water pump based on soil moisture levels detected by a capacitive soil moisture sensor. An Arduino UNO microcontroller reads the moisture level and controls a 12v relay, which in turn powers the water pump. The relay ensures that the pump is turned on when the soil is dry and turned off when the soil is wet. The system is powered by a battery case.
Component List
12v Relay
- Description: A relay is an electrically operated switch that allows the control of a high-power circuit with a low-power signal.
- Pins: NO (Normally Open), COM (Common), NC (Normally Closed), IN (Input), DC- (DC Power -), DC+ (DC Power +)
Arduino UNO
- Description: A microcontroller board based on the ATmega328P. It has digital input/output pins, analog inputs, and various power outputs.
- Pins: UNUSED, IOREF, Reset, 3.3V, 5V, GND, Vin, A0-A5, SCL, SDA, AREF, D13-D0
Water Pump
- Description: An electric pump that moves water.
- Pins: VCC (Power), GND (Ground)
My Battery Case
- Description: A case that holds batteries to provide power to the circuit.
- Pins: + (Positive), - (Negative)
Capacitive Soil Moisture Sensor V1.2
- Description: A sensor that measures the moisture content in the soil using capacitive sensing.
- Pins: GND (Ground), VCC (Power), AOUT (Analog Output)
Wiring Details
12v Relay
- NO connected to Arduino UNO 5V
- COM connected to Arduino UNO GND
- NC connected to Arduino UNO D2
- DC- connected to Water Pump VCC
- DC+ connected to My Battery Case +
Arduino UNO
- 5V connected to 12v Relay NO
- GND connected to 12v Relay COM and Capacitive Soil Moisture Sensor GND
- D2 connected to 12v Relay NC
- 3.3V connected to Capacitive Soil Moisture Sensor VCC
- A0 connected to Capacitive Soil Moisture Sensor AOUT
Water Pump
- VCC connected to 12v Relay DC-
- GND connected to My Battery Case -
My Battery Case
-
- connected to 12v Relay DC+
-
- connected to Water Pump GND
Capacitive Soil Moisture Sensor V1.2
- GND connected to Arduino UNO GND
- VCC connected to Arduino UNO 3.3V
- AOUT connected to Arduino UNO A0
Documented Code
#define RELAY_PIN    2  // Arduino pin that connects to relay
#define MOISTURE_PIN A0 // Arduino pin that connects to AOUT pin of moisture sensor

#define THRESHOLD 530 // CHANGE YOUR THRESHOLD HERE

void setup() {
  Serial.begin(9600);
  pinMode(RELAY_PIN, OUTPUT);
}

void loop() {
  int value = analogRead(MOISTURE_PIN); // read the analog value from sensor

  if (value > THRESHOLD) {
    Serial.print("The soil is DRY => turn pump ON");
    digitalWrite(RELAY_PIN, HIGH);
  } else {
    Serial.print("The soil is WET => turn pump OFF");
    digitalWrite(RELAY_PIN, LOW);
  }

  Serial.print(" (");
  Serial.print(value);
  Serial.println(")");

  delay(500);
}
Code Description
RELAY_PINis defined as pin 2, which controls the relay.MOISTURE_PINis defined as pin A0, which reads the analog value from the moisture sensor.THRESHOLDis the moisture level threshold to control the pump.- In
setup(), the serial communication is started and the relay pin is set as an output. - In
loop(), the moisture level is read and compared to the threshold. If the soil is dry, the relay is activated to turn the pump on. If the soil is wet, the relay is deactivated to turn the pump off. The moisture level is printed to the serial monitor every 500 milliseconds.