
Circuit Documentation
Summary
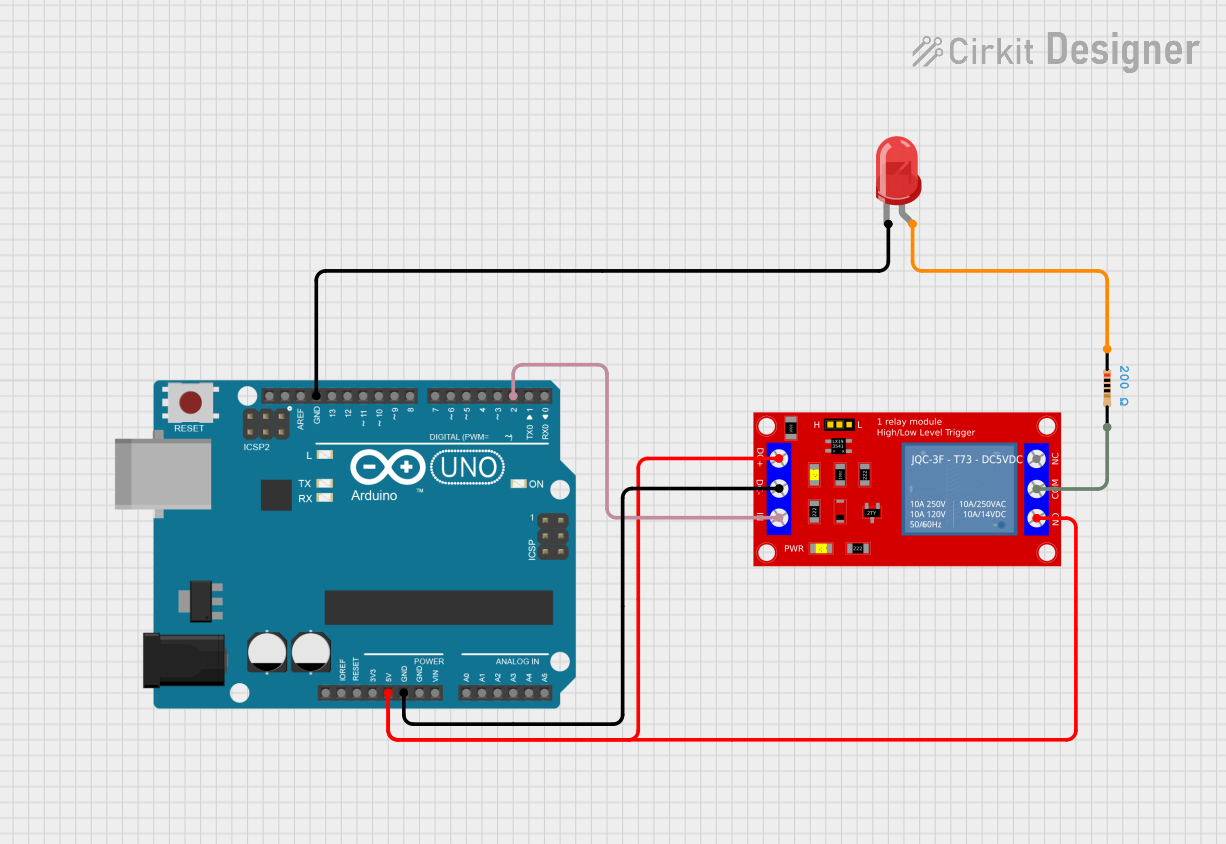
This circuit is designed to control a relay module using an Arduino UNO. The relay module can be used to switch on and off a connected load, such as a light or other electrical device. The circuit includes an LED indicator that lights up when the relay is activated. A resistor is used to limit the current flowing through the LED.
Component List
Arduino UNO
- Description: A microcontroller board based on the ATmega328P.
- Purpose: Acts as the main control unit for the circuit, managing the relay and LED.
1 Channel 5V Relay Module
- Description: A relay module that allows a low voltage signal to control a higher voltage load.
- Purpose: Switches the connected load on and off based on the signal from the Arduino.
LED Two Pin (Red)
- Description: A standard red LED with two pins (anode and cathode).
- Purpose: Provides a visual indication of the relay's status (on/off).
Resistor
- Description: A passive electrical component that limits current flow.
- Purpose: Protects the LED by limiting the current flowing through it.
Wiring Details
Arduino UNO
5V: Connected to the VCC+ pin of the 1 Channel 5V Relay Module.
GND: Connected to the VCC- (GND) pin of the 1 Channel 5V Relay Module.
GND: Connected to the Cathode pin of the LED Two Pin (Red).
D2: Connected to the IN pin of the 1 Channel 5V Relay Module.
1 Channel 5V Relay Module
VCC+: Connected to the 5V pin of the Arduino UNO.
VCC- (GND): Connected to the GND pin of the Arduino UNO.
N.O.: Connected to the load (not specified in the circuit).
IN: Connected to the D2 pin of the Arduino UNO.
COM: Connected to pin2 of the Resistor.
LED Two Pin (Red)
Anode: Connected to pin1 of the Resistor.
Cathode: Connected to the GND pin of the Arduino UNO.
Resistor
pin1: Connected to the Anode pin of the LED Two Pin (Red).
pin2: Connected to the COM pin of the 1 Channel 5V Relay Module.
Documented Code
void setup() {
  pinMode(2, OUTPUT); // Set pin 2 as an output for the relay control
}

void loop() {
  digitalWrite(2, HIGH); // Turn the relay on
  delay(1000);           // Wait for 1 second
  digitalWrite(2, LOW);  // Turn the relay off
  delay(1000);           // Wait for 1 second
}
This code initializes pin D2 as an output and toggles the relay on and off every second, providing a simple control mechanism for the relay module.