
Arduino UNO-Based Gas Detection and Monitoring System with Battery Power
View and Edit Project In Cirkit Designer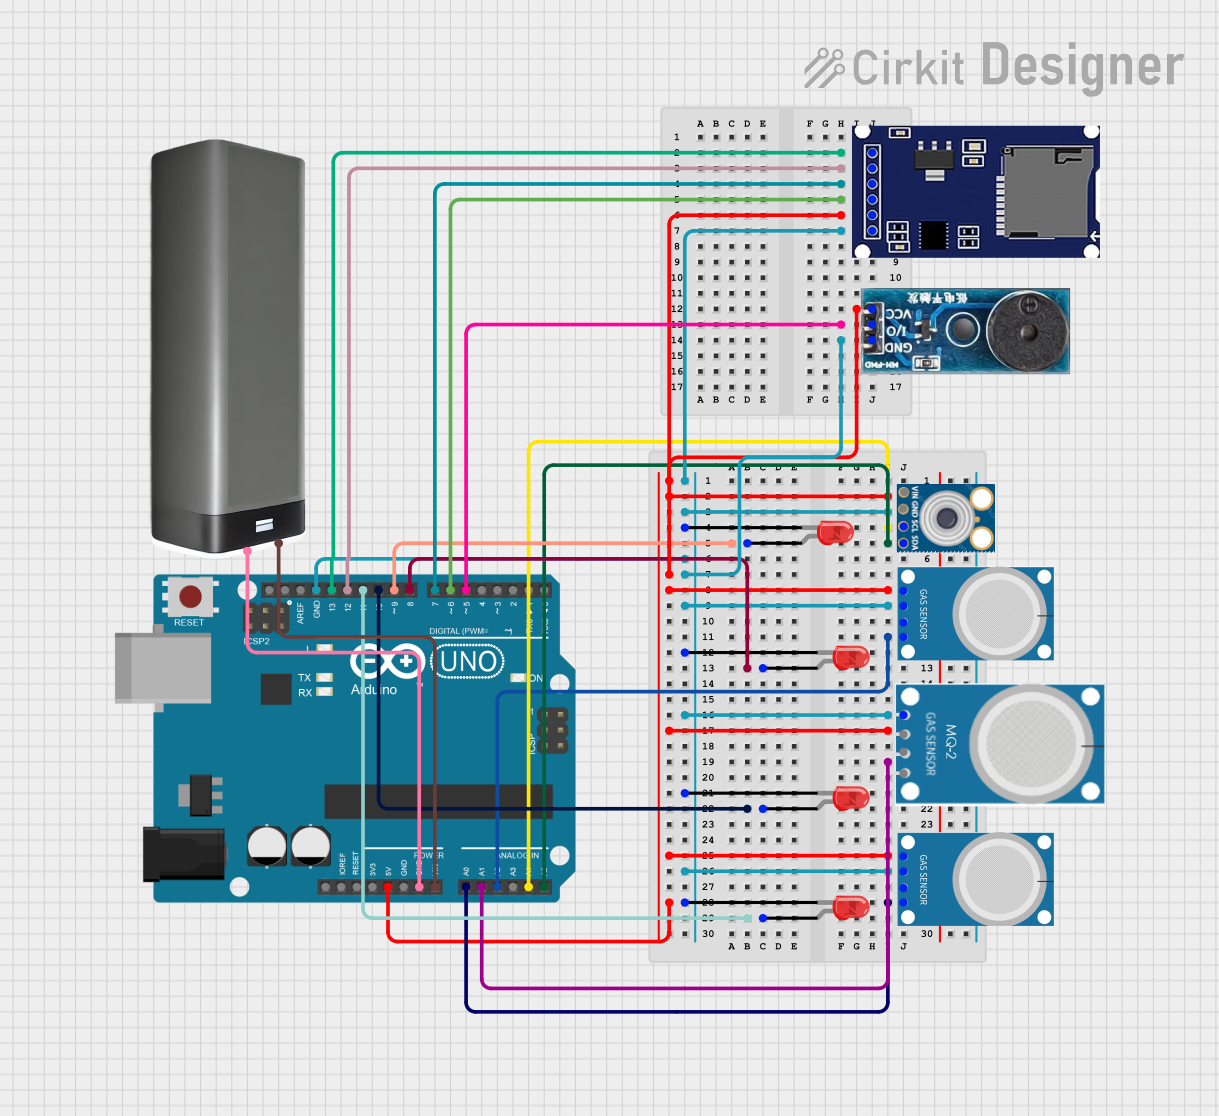
Circuit Documentation
Summary
This circuit involves an Arduino UNO microcontroller interfacing with various sensors, LEDs, a buzzer module, and an SD card module. The sensors include two MQ-4 gas sensors, an MQ-2 gas sensor, and an MLX90614 infrared temperature sensor. The circuit also includes a battery pack for power supply. The Arduino UNO is programmed to read sensor data, control LEDs, and interact with the SD card module.
Component List
Arduino UNO
- Description: Microcontroller board based on the ATmega328P.
- Pins: UNUSED, IOREF, Reset, 3.3V, 5V, GND, Vin, A0, A1, A2, A3, A4, A5, SCL, SDA, AREF, D13, D12, D11, D10, D9, D8, D7, D6, D5, D4, D3, D2, D1, D0
MQ-2
- Description: Gas sensor for detecting LPG, i-butane, propane, methane, alcohol, hydrogen, and smoke.
- Pins: GND, VCC, ANALOG, Digital
MLX90614
- Description: Infrared temperature sensor.
- Pins: SDA, SCL, GND, VIN
MQ-4
- Description: Methane gas sensor.
- Pins: A0, D0, GND, VCC
LED: Two Pin (red)
- Description: Red LED with two pins.
- Pins: cathode, anode
Buzzer Module
- Description: Module for generating sound.
- Pins: GND, Vcc, I/O
SD Module
- Description: SD card module for data storage.
- Pins: CS, SCK, MOSI, MISO, VCC, GND
Battery Pack
- Description: Power supply for the circuit.
- Pins: +, -
Wiring Details
Arduino UNO
- 5V: Connected to VCC of MQ-4 (both instances), SD Module, Buzzer Module
- GND: Connected to GND of LED (all instances), MQ-4 (both instances), MQ-2, SD Module, Buzzer Module, Battery Pack
- A0: Connected to A0 of MQ-4 (second instance)
- A1: Not connected
- A2: Connected to A0 of MQ-4 (first instance)
- A4: Connected to SCL of MLX90614
- A5: Connected to SDA of MLX90614
- D5: Connected to I/O of Buzzer Module
- D6: Connected to MISO of SD Module
- D7: Connected to MOSI of SD Module
- D8: Connected to anode of LED (fourth instance)
- D9: Connected to anode of LED (first instance)
- D10: Connected to anode of LED (third instance)
- D11: Connected to anode of LED (second instance)
- D12: Connected to SCK of SD Module
- D13: Connected to CS of SD Module
- Vin: Connected to + of Battery Pack
MQ-2
- GND: Connected to GND of Arduino UNO
- VCC: Connected to 5V of Arduino UNO
- ANALOG: Not connected
- Digital: Not connected
MLX90614
- SDA: Connected to A5 of Arduino UNO
- SCL: Connected to A4 of Arduino UNO
- GND: Connected to GND of Arduino UNO
- VIN: Connected to 5V of Arduino UNO
MQ-4 (First Instance)
- A0: Connected to A2 of Arduino UNO
- D0: Not connected
- GND: Connected to GND of Arduino UNO
- VCC: Connected to 5V of Arduino UNO
MQ-4 (Second Instance)
- A0: Connected to A0 of Arduino UNO
- D0: Not connected
- GND: Connected to GND of Arduino UNO
- VCC: Connected to 5V of Arduino UNO
LED: Two Pin (red) (First Instance)
- cathode: Connected to GND of Arduino UNO
- anode: Connected to D9 of Arduino UNO
LED: Two Pin (red) (Second Instance)
- cathode: Connected to GND of Arduino UNO
- anode: Connected to D11 of Arduino UNO
LED: Two Pin (red) (Third Instance)
- cathode: Connected to GND of Arduino UNO
- anode: Connected to D10 of Arduino UNO
LED: Two Pin (red) (Fourth Instance)
- cathode: Connected to GND of Arduino UNO
- anode: Connected to D8 of Arduino UNO
Buzzer Module
- GND: Connected to GND of Arduino UNO
- Vcc: Connected to 5V of Arduino UNO
- I/O: Connected to D5 of Arduino UNO
SD Module
- CS: Connected to D13 of Arduino UNO
- SCK: Connected to D12 of Arduino UNO
- MOSI: Connected to D7 of Arduino UNO
- MISO: Connected to D6 of Arduino UNO
- VCC: Connected to 5V of Arduino UNO
- GND: Connected to GND of Arduino UNO
Battery Pack
- +: Connected to Vin of Arduino UNO
- -: Connected to GND of Arduino UNO
Documented Code
Arduino UNO Code (sketch.ino)
void setup() {
  // put your setup code here, to run once:

}

void loop() {
  // put your main code here, to run repeatedly:

}
This code is a basic template for the Arduino UNO. The setup() function is where you initialize your components and settings, and the loop() function is where the main logic of your program runs repeatedly.