
Arduino-Based Alcohol Detection System with GSM Alert and LCD Display
View and Edit Project In Cirkit Designer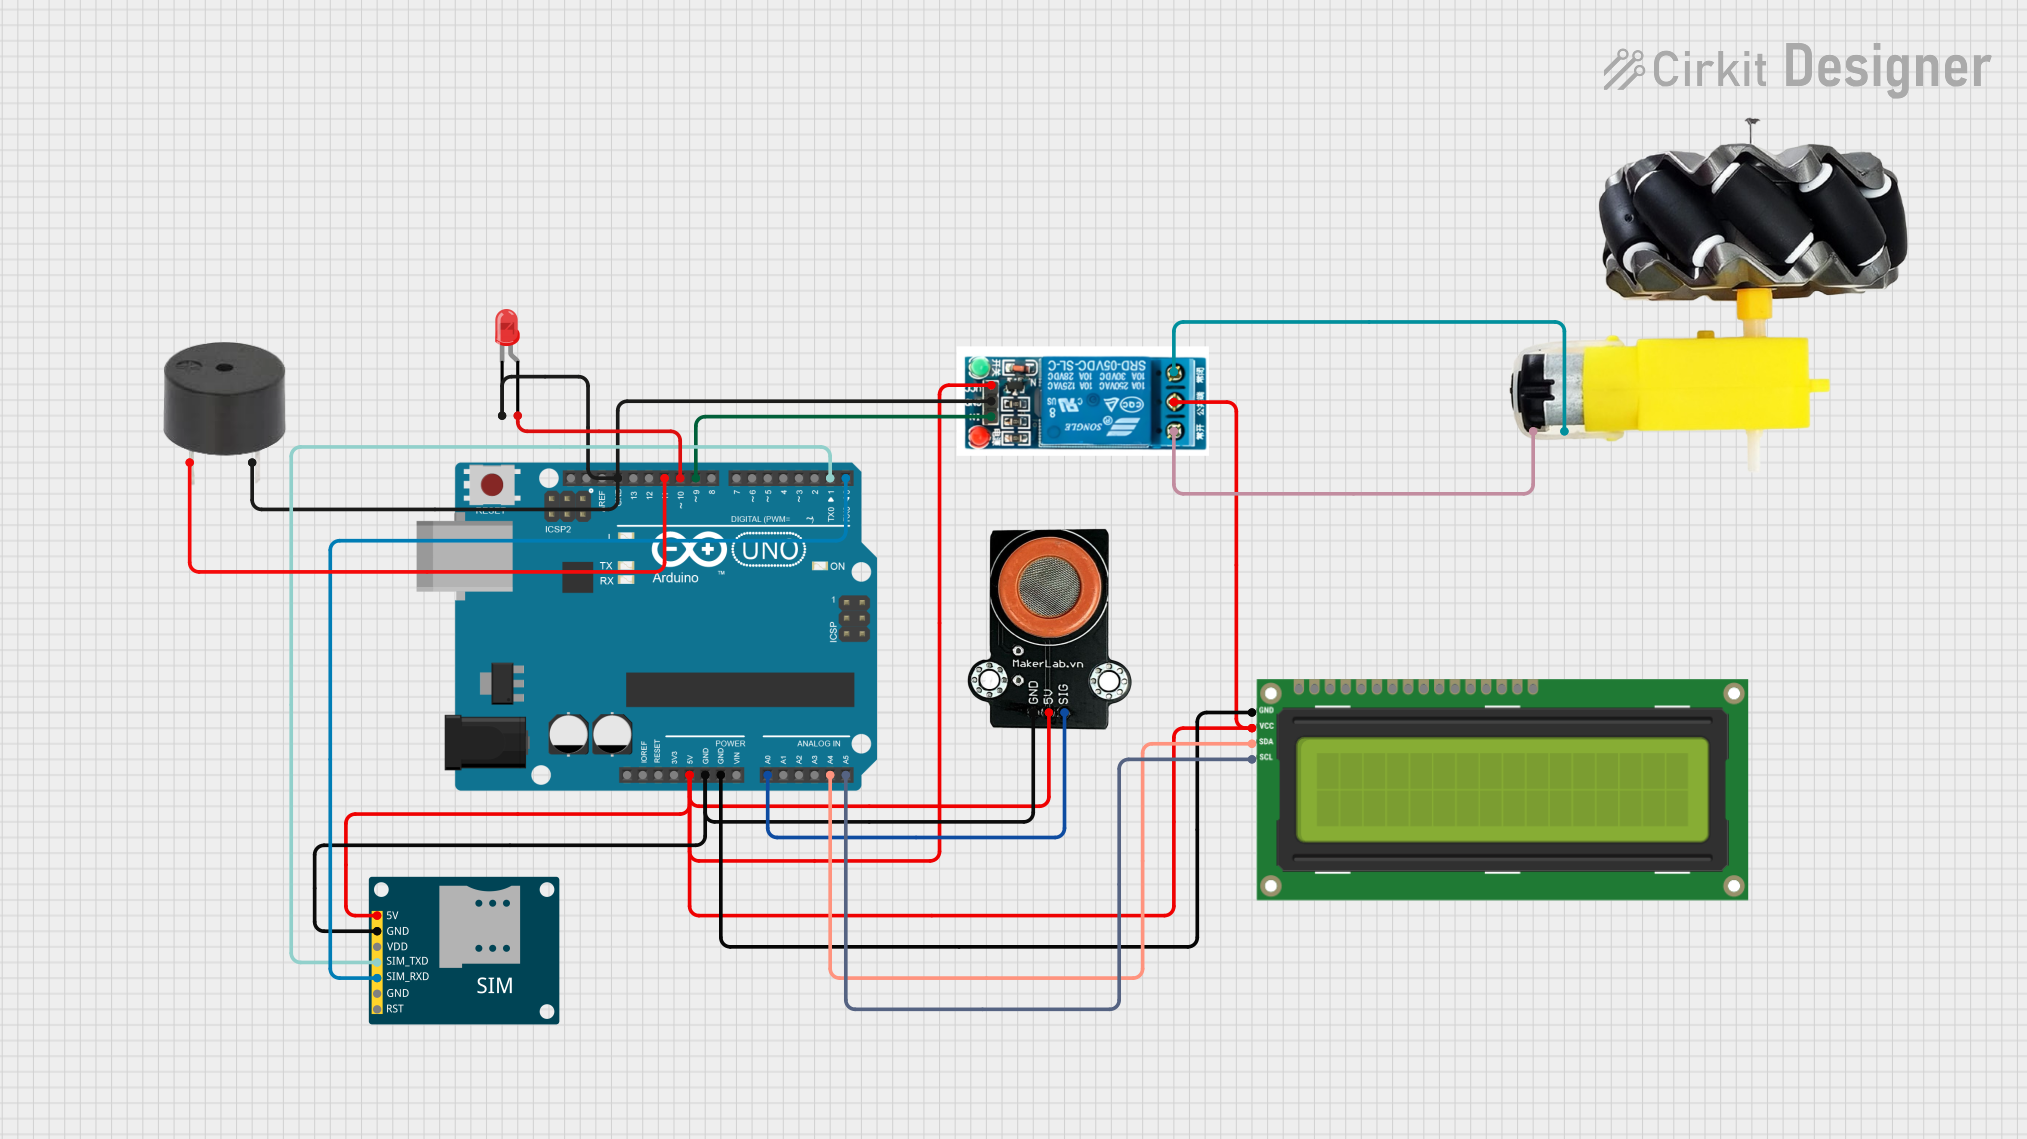
Circuit Documentation
Summary
This document provides a detailed overview of a circuit that includes an Arduino UNO microcontroller, an alcohol sensor, a relay, an LCD screen, a GSM module, a buzzer, an LED, and a motor with wheels. The circuit is designed to detect alcohol levels, display information on an LCD screen, and control a motor and other peripherals based on the sensor readings.
Component List
Arduino UNO
- Description: A microcontroller board based on the ATmega328P.
- Pins: UNUSED, IOREF, Reset, 3.3V, 5V, GND, Vin, A0, A1, A2, A3, A4, A5, SCL, SDA, AREF, D13, D12, D11, D10, D9, D8, D7, D6, D5, D4, D3, D2, D1, D0
MKE-S07 MQ-3 Alcohol Sensor
- Description: A sensor used to detect alcohol levels.
- Pins: GND, 5V, SIG
5V Relay
- Description: A relay module used to control high voltage devices.
- Pins: Normally Open, Common terminal, Normally Closed, In, GND, VCC
I2C LCD 16x2 Screen
- Description: A 16x2 character LCD screen with I2C interface.
- Pins: SCL, SDA, VCC (5V), GND, VDD, VO, RS, RW, E, D0, D1, D2, D3, D4, D5, D6, D7, BLA, BLK
SIM800L GSM Module
- Description: A GSM module used for communication over cellular networks.
- Pins: 5V, GND, VDD, SIM_TXD, SIM_RXD, RST
Buzzer
- Description: A simple buzzer for audio alerts.
- Pins: PIN, GND
LED: Two Pin (red)
- Description: A red LED.
- Pins: cathode, anode
Motor and Wheels
- Description: A motor with attached wheels.
- Pins: vcc, GND
Wiring Details
Arduino UNO
- 5V: Connected to 5V pins of SIM800L GSM Module, I2C LCD 16x2 Screen, 5V Relay, and MKE-S07 MQ-3 Alcohol Sensor.
- GND: Connected to GND pins of SIM800L GSM Module, MKE-S07 MQ-3 Alcohol Sensor, I2C LCD 16x2 Screen, 5V Relay, LED, and Buzzer.
- A0: Connected to SIG pin of MKE-S07 MQ-3 Alcohol Sensor.
- A4: Connected to SDA pin of I2C LCD 16x2 Screen.
- A5: Connected to SCL pin of I2C LCD 16x2 Screen.
- D0: Connected to SIM_RXD pin of SIM800L GSM Module.
- D1: Connected to SIM_TXD pin of SIM800L GSM Module.
- D9: Connected to In pin of 5V Relay.
- D10: Connected to anode pin of LED.
- D11: Connected to PIN of Buzzer.
MKE-S07 MQ-3 Alcohol Sensor
- 5V: Connected to 5V pin of Arduino UNO.
- GND: Connected to GND pin of Arduino UNO.
- SIG: Connected to A0 pin of Arduino UNO.
5V Relay
- Common terminal: Connected to 5V pin of Arduino UNO.
- VCC: Connected to 5V pin of Arduino UNO.
- GND: Connected to GND pin of Arduino UNO.
- In: Connected to D9 pin of Arduino UNO.
- Normally Open: Connected to vcc pin of Motor and Wheels.
- Normally Closed: Connected to GND pin of Motor and Wheels.
I2C LCD 16x2 Screen
- VCC (5V): Connected to 5V pin of Arduino UNO.
- GND: Connected to GND pin of Arduino UNO.
- SDA: Connected to A4 pin of Arduino UNO.
- SCL: Connected to A5 pin of Arduino UNO.
SIM800L GSM Module
- 5V: Connected to 5V pin of Arduino UNO.
- GND: Connected to GND pin of Arduino UNO.
- SIM_TXD: Connected to D1 pin of Arduino UNO.
- SIM_RXD: Connected to D0 pin of Arduino UNO.
Buzzer
- PIN: Connected to D11 pin of Arduino UNO.
- GND: Connected to GND pin of Arduino UNO.
LED: Two Pin (red)
- anode: Connected to D10 pin of Arduino UNO.
- cathode: Connected to GND pin of Arduino UNO.
Motor and Wheels
- vcc: Connected to Normally Open pin of 5V Relay.
- GND: Connected to Normally Closed pin of 5V Relay.
Documented Code
Arduino UNO Code
void setup() {
  // put your setup code here, to run once:

}

void loop() {
  // put your main code here, to run repeatedly:

}
This code is a basic template for the Arduino UNO. The setup function is used to initialize any settings or configurations, and the loop function contains the main logic that runs repeatedly. You can add your specific logic to interact with the connected components in these functions.