
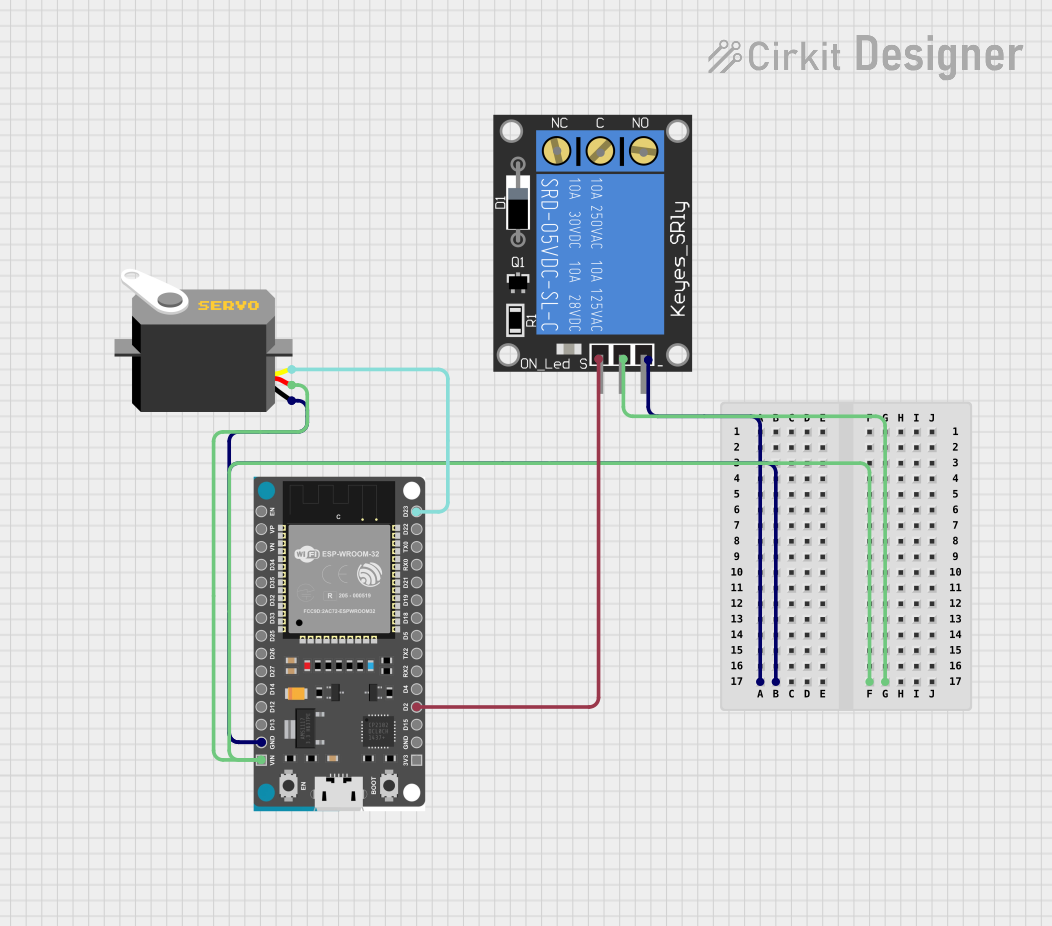
Circuit Documentation
Summary
This circuit integrates a servo motor, a single-channel 5V 10A relay, and an ESP32 Devkit V1 microcontroller. The ESP32 controls the servo motor and the relay based on serial input commands. The servo can rotate to specific angles, and the relay can switch a connected load on or off. This setup could be used for applications such as remote-controlled locking mechanisms or automation systems where both position control and power switching are required.
Component List
Servo Motor
- Name: Servo
- Pins: gnd, vcc, pulse
- Description: A servo motor capable of precise position control, typically used in remote control applications, robotics, and automation.
ESP32 Devkit V1
- Name: ESP32 Devkit V1
- Pins: 3V3, GND, D15, D2, D4, RX2, TX2, D5, D18, D19, D21, RX0, TX0, D22, D23, EN, VP, VN, D34, D35, D32, D33, D25, D26, D27, D14, D12, D13, VIN
- Description: A powerful microcontroller with Wi-Fi and Bluetooth capabilities, suitable for a wide range of IoT applications.
1-Channel Relay (5V 10A)
- Name: 1-Channel Relay (5V 10A)
- Pins: NC, signal, C, power, NO, ground
- Description: An electromechanical switch that allows the ESP32 to control high-power devices, isolating the microcontroller from the high-power circuit.
Wiring Details
Servo Motor
- Ground: Connected to ESP32 GND and Relay ground
- VCC: Connected to ESP32 VIN and Relay power
- Pulse: Controlled by ESP32 pin D23
ESP32 Devkit V1
- GND: Common ground for the circuit
- VIN: Provides power to the Servo and Relay
- D23: Outputs PWM signal to control the Servo
- D2: Controls the Relay signal
1-Channel Relay (5V 10A)
- Ground: Connected to ESP32 GND and Servo ground
- Power: Connected to ESP32 VIN and Servo VCC
- Signal: Controlled by ESP32 pin D2
Documented Code
//Sun 21 sept 2024 810pm
//ESP32 with servo and relay
#include <ESP32Servo.h>
int choice = 0;
int incomingByte = 0; // for incoming serial data

Servo myservo;  // create servo object to control a servo
// twelve servo objects can be created on most boards
int servoPin = 23;
int pos = 0;    // variable to store the servo position
// Recommended PWM GPIO pins on the ESP32 include 2,4,12-19,21-23,25-27,32-33

// ESP32 pin GPIO16, which connects to the solenoid lock via the relay
#define RELAY_PIN 2

void setup() {
  // initialize digital pin as an output.
  pinMode(RELAY_PIN, OUTPUT);

  // Allow allocation of all timers
  ESP32PWM::allocateTimer(0);
  ESP32PWM::allocateTimer(1);
  ESP32PWM::allocateTimer(2);
  ESP32PWM::allocateTimer(3);
  myservo.setPeriodHertz(50);    // standard 50 hz servo
  myservo.attach(servoPin, 1000, 2000);
  Serial.begin(9600); // opens serial port, sets data rate to 9600 bps
  myservo.write(0);   // set servo to 0 degree

  Serial.println("Key in 0 - to rotate 90 degree, 1 to rotate 180 degree");
}

void loop() {
  if (Serial.available() > 0) {
    // read the incoming byte:
    incomingByte = Serial.read();
    choice = incomingByte - '0'; // convert from decimal to integer value 1 = 49, 2 = 50

    // say what you got:
    Serial.print("I received: ");
    Serial.print(choice);

    if (choice == 0) {
      Serial.println(" 90 degree");
      for (pos = 0; pos <= 90; pos += 1) {
        myservo.write(pos);              // tell servo to go to position in variable 'pos'
        delay(15);                       // waits 15 ms for the servo to reach the position
      }
      digitalWrite(RELAY_PIN, HIGH); // unlock the door
      delay(5000); // open for 5 seconds
      Serial.println(" UNLOCK");

      for (pos = 90; pos >= 0; pos -= 1) {
        myservo.write(pos);              // tell servo to go to position in variable 'pos'
        delay(15);                       // waits 15 ms for the servo to reach the position
      }

      digitalWrite(RELAY_PIN, LOW);  // lock the door
      Serial.println(" LOCK");

    } else if (choice == 1) {
      Serial.println(" 180 degree");
      for (pos = 0; pos <= 180; pos += 1) {
        myservo.write(pos);              // tell servo to go to position in variable 'pos'
        delay(15);                       // waits 15 ms for the servo to reach the position
      }
      digitalWrite(RELAY_PIN, HIGH); // unlock the door
      delay(5000); // open for 5 seconds
      Serial.println(" UNLOCK");
      for (pos = 180; pos >= 0; pos -= 1) {
        myservo.write(pos);              // tell servo to go to position in variable 'pos'
        delay(15);                       // waits 15 ms for the servo to reach the position
      }

      digitalWrite(RELAY_PIN, LOW);  // lock the door
      Serial.println(" LOCK");
    }
  }
}
This code is designed to run on an ESP32 microcontroller. It initializes a servo motor and a relay, and listens for serial input to control the servo's position and the relay's state. The servo can be set to rotate to either 90 or 180 degrees, and the relay can be toggled to simulate a locking mechanism.