
Arduino and ESP8266-Based Smart Environmental Monitoring System with Battery Power
View and Edit Project In Cirkit Designer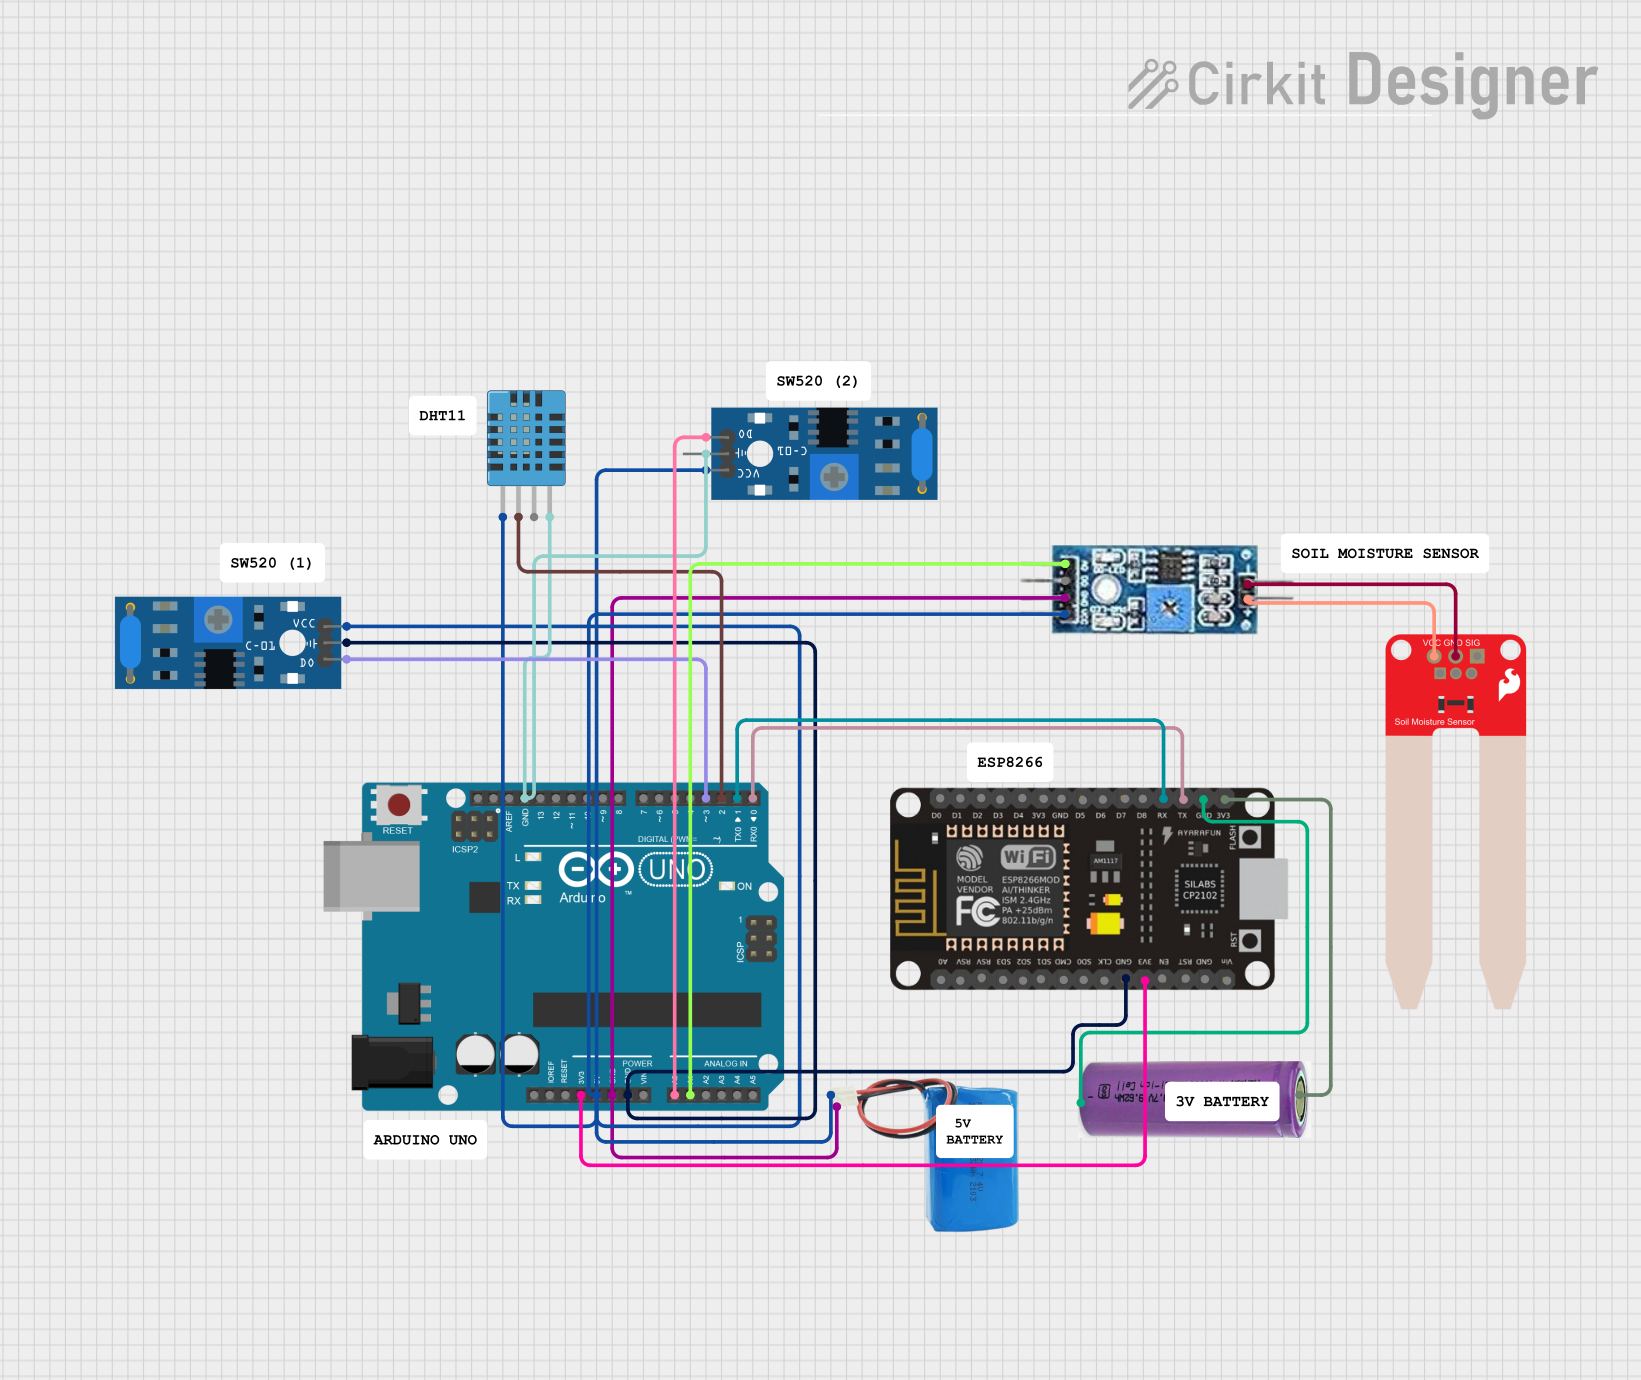
Circuit Documentation
Summary
This circuit integrates an Arduino UNO microcontroller with various sensors and an ESP8266 NodeMCU for wireless communication. The sensors include vibration sensors, a humidity and temperature sensor, and soil moisture sensors. The circuit is powered by a combination of 5V and 3.3V batteries.
Component List
Arduino UNO
- Description: A microcontroller board based on the ATmega328P.
- Pins: UNUSED, IOREF, Reset, 3.3V, 5V, GND, Vin, A0, A1, A2, A3, A4, A5, SCL, SDA, AREF, D13, D12, D11, D10, D9, D8, D7, D6, D5, D4, D3, D2, D1, D0
SW-420 Vibration Sensor
- Description: A sensor module used to detect vibrations.
- Pins: vcc, Ground, Digital output
DHT11 Humidity and Temperature Sensor
- Description: A sensor module used to measure humidity and temperature.
- Pins: VDD, DATA, NULL, GND
Soil Moisture Interceptor
- Description: A sensor module used to measure soil moisture levels.
- Pins: AO, DO, GND, VCC
SparkFun Soil Moisture Sensor
- Description: A sensor module used to measure soil moisture levels.
- Pins: VCC, GND, SIG
5V Battery
- Description: A power source providing 5V.
- Pins: positive, negative
3.3V Battery
- Description: A power source providing 3.3V.
- Pins: +, -
ESP8266 NodeMCU
- Description: A low-cost Wi-Fi microchip with full TCP/IP stack and microcontroller capability.
- Pins: D0, D1, D2, D3, D4, 3V3, GND, D5, D6, D7, D8, RX, TX, A0, RSV, SD3, SD2, SD1, CMD, SD0, CLK, EN, RST, VIN
Wiring Details
Arduino UNO
- 3.3V connected to ESP8266 NodeMCU 3V3
- 5V connected to:
- DHT11 Humidity and Temperature Sensor VDD
- Soil Moisture Interceptor VCC
- SW-420 Vibration Sensor vcc (both sensors)
- 5V Battery positive
- GND connected to:
- Soil Moisture Interceptor GND
- 5V Battery negative
- ESP8266 NodeMCU GND
- SW-420 Vibration Sensor Ground (both sensors)
- DHT11 Humidity and Temperature Sensor GND
- A0 connected to SW-420 Vibration Sensor Digital output
- A1 connected to Soil Moisture Interceptor AO
- D3 connected to SW-420 Vibration Sensor Digital output
- D2 connected to DHT11 Humidity and Temperature Sensor DATA
- D1 connected to ESP8266 NodeMCU RX
- D0 connected to ESP8266 NodeMCU TX
SW-420 Vibration Sensor
- vcc connected to Arduino UNO 5V
- Ground connected to Arduino UNO GND
- Digital output connected to Arduino UNO A0 and D3
DHT11 Humidity and Temperature Sensor
- VDD connected to Arduino UNO 5V
- DATA connected to Arduino UNO D2
- GND connected to Arduino UNO GND
Soil Moisture Interceptor
- AO connected to Arduino UNO A1
- DO not connected
- GND connected to Arduino UNO GND
- VCC connected to Arduino UNO 5V
SparkFun Soil Moisture Sensor
- VCC connected to Soil Moisture Interceptor VCC
- GND connected to Soil Moisture Interceptor GND
- SIG not connected
5V Battery
- positive connected to Arduino UNO 5V
- negative connected to Arduino UNO GND
3.3V Battery
- + connected to ESP8266 NodeMCU 3V3
- - connected to ESP8266 NodeMCU GND
ESP8266 NodeMCU
- 3V3 connected to Arduino UNO 3.3V and 3.3V Battery +
- GND connected to Arduino UNO GND and 3.3V Battery -
- RX connected to Arduino UNO D1
- TX connected to Arduino UNO D0
Documented Code
Arduino UNO Code (sketch.ino)
void setup() {
  // put your setup code here, to run once:

}

void loop() {
  // put your main code here, to run repeatedly:

}
Documentation (documentation.txt)
This documentation provides a comprehensive overview of the circuit, including a summary, detailed component list, wiring details, and the code used in the microcontroller.