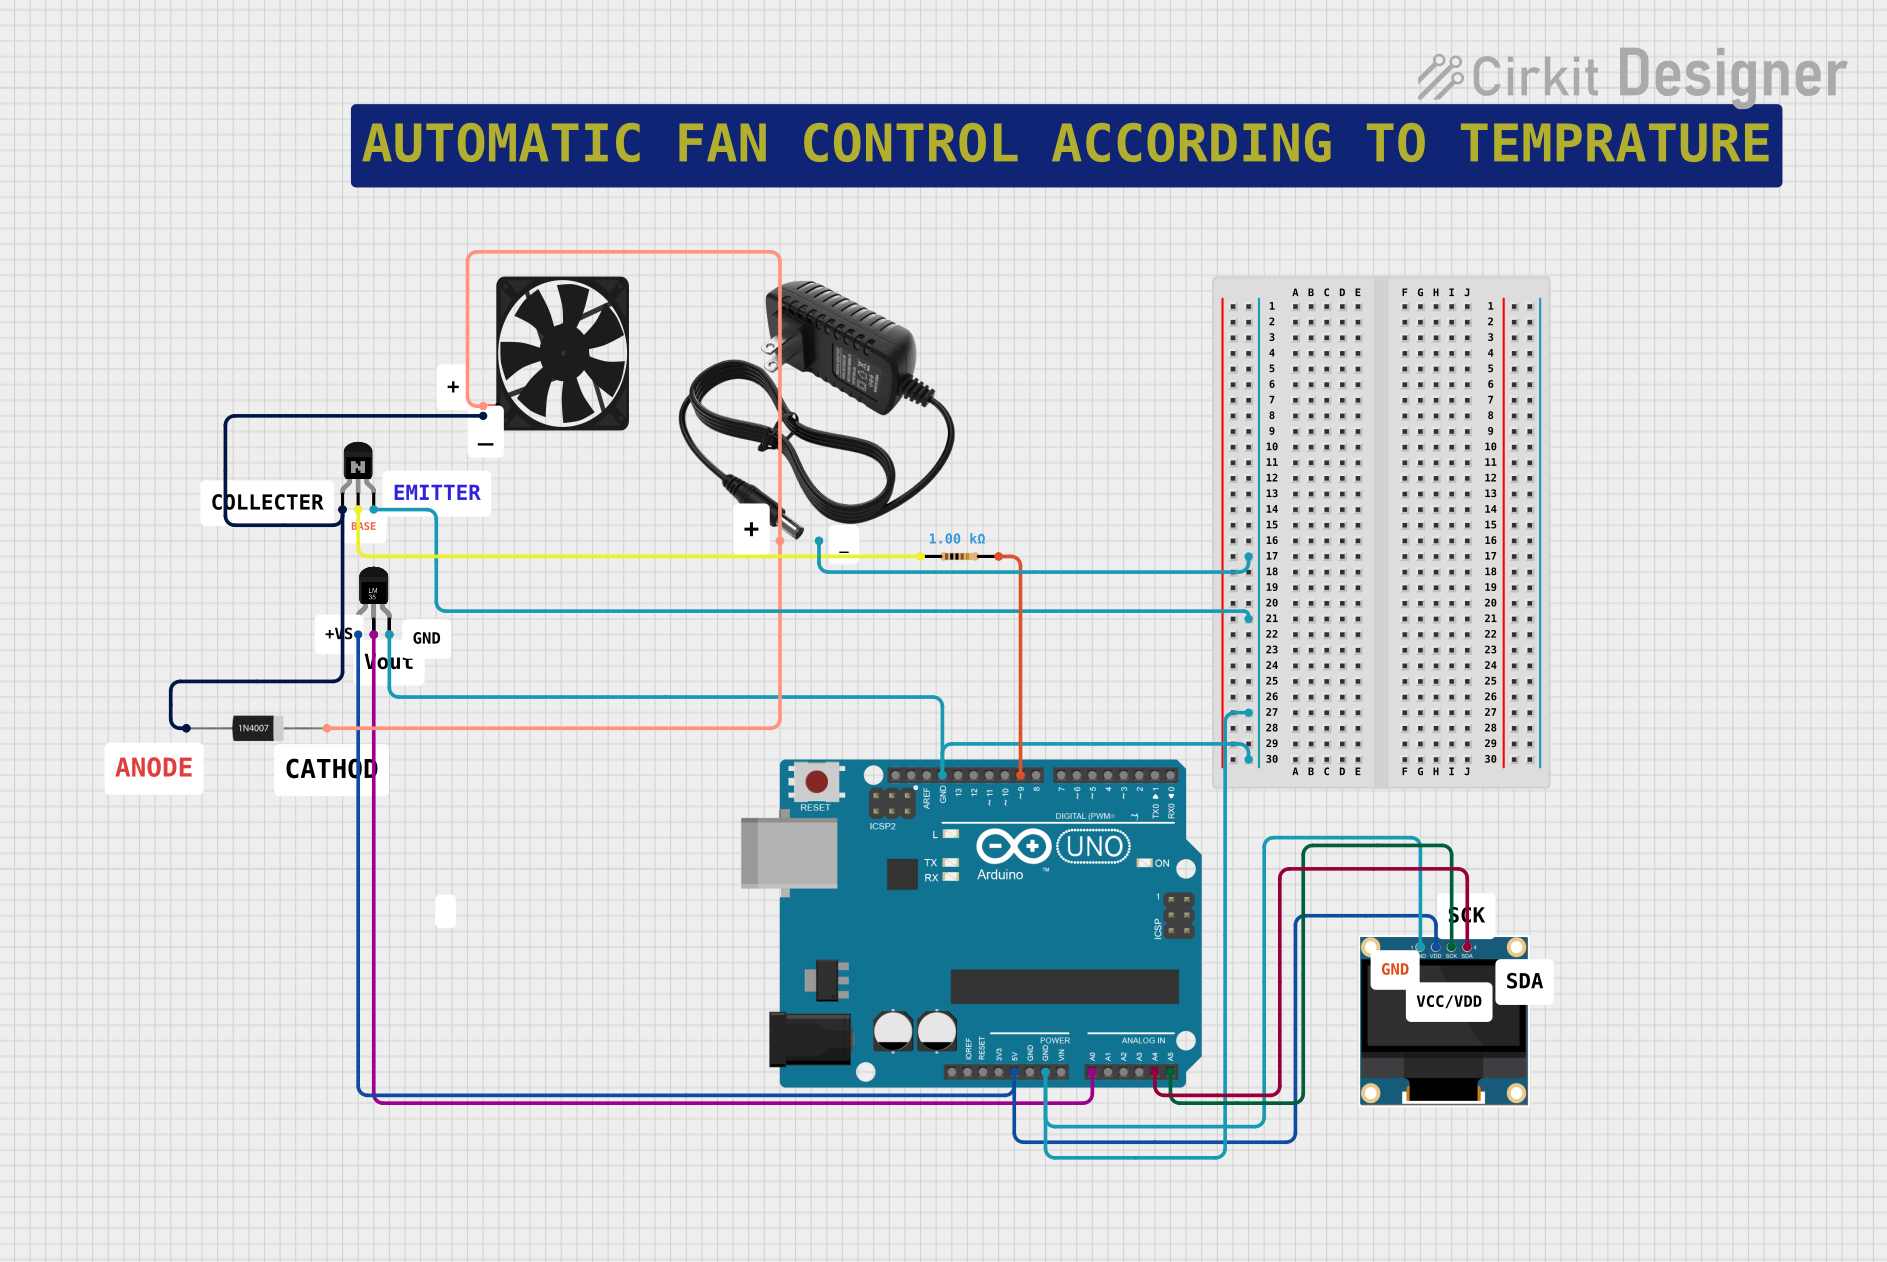
Arduino UNO Based Automatic Fan Speed Controller with OLED Display

Automatic Fan Speed Control Circuit Documentation
Summary
The circuit is designed to automatically control the speed of a fan based on the ambient temperature measured by an LM35 temperature sensor. The temperature is displayed on a 0.96" OLED screen. The fan speed is controlled through a transistor acting as a switch, with a diode providing protection against back EMF. The Arduino UNO serves as the central processing unit, reading the temperature and adjusting the fan speed accordingly.
Component List
Arduino UNO
- Microcontroller board based on the ATmega328P
- It has 14 digital input/output pins, 6 analog inputs, a 16 MHz quartz crystal, a USB connection, a power jack, an ICSP header, and a reset button.
Temperature Sensor (LM35)
- Precision Centigrade temperature sensors
- Linear +10 mV/°C scale factor
- 5VDC operating voltage
0.96" OLED
- Small OLED display for visual output
- I2C interface for communication
NPN Transistor (CBE)
- General-purpose NPN transistor for switching
- Used to control the fan operation
Fan
- 5V operated cooling fan
- Used for temperature regulation by air circulation
12v Power Supply
- Provides power to the fan
- Voltage stepped down and rectified for the fan
Resistor
- 1k Ohm resistor
- Used for current limiting to the base of the transistor
1N4007 Rectifier Diode
- Standard rectifier diode
- Used for protecting the transistor from back EMF generated by the fan motor
Comment
- Used for annotations and notes within the circuit design (not a physical component)
Wiring Details
Arduino UNO
GNDconnected to the ground of the power supply, OLED GND, and LM35 GND5Vconnected to OLED VDD and LM35 +VsA0connected to LM35 VoutA4(SDA) connected to OLED SDAA5(SCL) connected to OLED SCKD9connected to one end of the 1k Ohm resistor
Temperature Sensor (LM35)
+Vsconnected to Arduino 5VVoutconnected to Arduino A0GNDconnected to Arduino GND
0.96" OLED
GNDconnected to Arduino GNDVDDconnected to Arduino 5VSCKconnected to Arduino A5SDAconnected to Arduino A4
NPN Transistor (CBE)
collectorconnected to the fan GND and diode Anodebaseconnected to the other end of the 1k Ohm resistoremitterconnected to the ground of the power supply
Fan
GNDconnected to the transistor collector and diode Anode5Vconnected to the positive of the power supply and diode Cathode
12v Power Supply
+connected to the fan 5V and diode Cathode-connected to the transistor emitter
Resistor (1k Ohm)
pin1connected to Arduino D9pin2connected to the transistor base
1N4007 Rectifier Diode
Anodeconnected to the transistor collector and fan GNDCathodeconnected to the fan 5V and power supply +
Documented Code
/*
 * Automatic Fan Speed Control
 *
 * This Arduino sketch reads temperature from an LM35 sensor and adjusts
 * the speed of a fan accordingly. The temperature is displayed on an OLED
 * screen. The fan is controlled via a transistor, with a diode for protection.
 *
 * Fan Speed Control:
 * - < 25°C: Fan OFF
 * - 26-29°C: Fan 50%
 * - 30-35°C: Fan 75%
 * - 36-40°C: Fan 100%
 * - 41-45°C: Fan 125%
 * - 46-50°C: Fan 150%
 */

#include <Wire.h>
#include <Adafruit_GFX.h>
#include <Adafruit_SSD1306.h>

#define SCREEN_WIDTH 128
#define SCREEN_HEIGHT 64
#define OLED_RESET -1
Adafruit_SSD1306 display(SCREEN_WIDTH, SCREEN_HEIGHT, &Wire, OLED_RESET);

const int tempPin1 = A0; // LM35 Vout connected to A0
const int fanPin = 9;    // Transistor base connected to D9

void setup() {
  pinMode(fanPin, OUTPUT);
  analogReference(INTERNAL);
  display.begin(SSD1306_SWITCHCAPVCC, 0x3C);
  display.display();
  delay(2000);
  display.clearDisplay();
}

void loop() {
  int tempReading1 = analogRead(tempPin1);
  float voltage1 = tempReading1 * (1.1 / 1023.0);
  float temperatureC1 = voltage1 * 100.0;

  int fanSpeed;
  if (temperatureC1 < 25) {
    fanSpeed = 0;
  } else if (temperatureC1 <= 29) {
    fanSpeed = 128;
  } else if (temperatureC1 <= 35) {
    fanSpeed = 192;
  } else if (temperatureC1 <= 40) {
    fanSpeed = 255;
  } else if (temperatureC1 <= 45) {
    fanSpeed = 318;
  } else if (temperatureC1 <= 50) {
    fanSpeed = 382;
  } else {
    fanSpeed = 0;
  }

  analogWrite(fanPin, fanSpeed);

  display.clearDisplay();
  display.setTextSize(1);
  display.setTextColor(SSD1306_WHITE);
  display.setCursor(0, 0);
  display.print("Temp1: ");
  display.print(temperatureC1);
  display.print(" C");
  display.setCursor(0, 10);
  display.print("Fan Speed: ");
  display.print(fanSpeed);
  display.display();

  delay(1000);
}
This code is designed to be uploaded to an Arduino UNO microcontroller. It initializes the OLED display and sets up the temperature sensor and fan control pin. The loop function reads the temperature, calculates the corresponding fan speed, and updates the display with the current temperature and fan speed. The fan speed is controlled by PWM on pin D9.