
Circuit Documentation
Summary
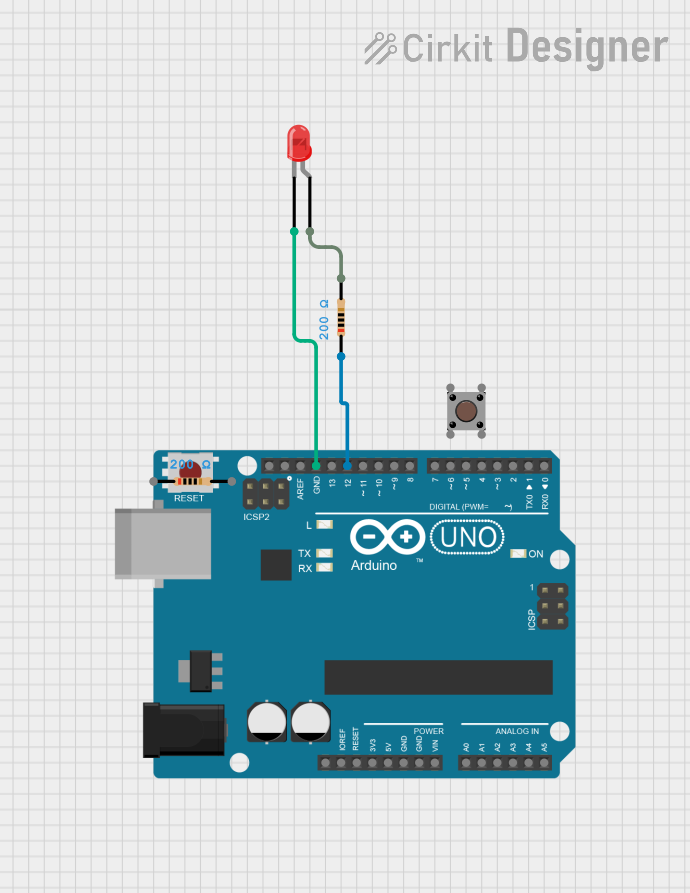
This circuit consists of an Arduino UNO microcontroller, a pushbutton, a red LED, and three resistors. The Arduino UNO controls the LED and a servo motor based on the state of the pushbutton. When the pushbutton is pressed, the servo motor moves to 90 degrees, and when released, it returns to 0 degrees. The LED is connected to the Arduino and is controlled via a digital pin.
Component List
Arduino UNO
- Description: A microcontroller board based on the ATmega328P.
- Pins: UNUSED, IOREF, Reset, 3.3V, 5V, GND, Vin, A0, A1, A2, A3, A4, A5, SCL, SDA, AREF, D13, D12, D11, D10, D9, D8, D7, D6, D5, D4, D3, D2, D1, D0
Resistor (200 Ohms)
- Description: A resistor with a resistance of 200 Ohms.
- Pins: pin1, pin2
Resistor (200 Ohms)
- Description: A resistor with a resistance of 200 Ohms.
- Pins: pin1, pin2
Resistor (200 Ohms)
- Description: A resistor with a resistance of 200 Ohms.
- Pins: pin1, pin2
LED: Two Pin (red)
- Description: A red LED with two pins.
- Pins: cathode, anode
Pushbutton
- Description: A pushbutton with four pins.
- Pins: Pin 3 (out), Pin 4 (out), Pin 1 (in), Pin 2 (in)
Wiring Details
Arduino UNO
- GND is connected to the cathode of the LED: Two Pin (red).
- D12 is connected to pin1 of a Resistor (200 Ohms).
- D2 is connected to Pin 3 (out) of the Pushbutton.
- D9 is connected to the servo motor (not listed in the parts but mentioned in the code).
Resistor (200 Ohms)
- pin1 is connected to D12 of the Arduino UNO.
- pin2 is connected to the anode of the LED: Two Pin (red).
LED: Two Pin (red)
- cathode is connected to GND of the Arduino UNO.
- anode is connected to pin2 of a Resistor (200 Ohms).
Pushbutton
- Pin 3 (out) is connected to D2 of the Arduino UNO.
- Pin 4 (out), Pin 1 (in), and Pin 2 (in) are not connected in the provided net list.
Code Documentation
Code Summary
The provided code controls a servo motor and reads the state of a pushbutton. When the pushbutton is pressed, the servo motor moves to 90 degrees. When the pushbutton is released, the servo motor returns to 0 degrees.
Code
#include <Servo.h>

Servo myServo;  // Create a servo object
const int buttonPin = 2;  // Push button pin
const int servoPin = 9;   // Servo control pin
int buttonState = 0;      // Variable to store the button state

void setup() {
  pinMode(buttonPin, INPUT);  // Initialize the push button pin as an input
  myServo.attach(servoPin);   // Attach the servo to the control pin
  myServo.write(0);           // Initialize the servo position to 0 degrees
}

void loop() {
  buttonState = digitalRead(buttonPin);  // Read the state of the push button

  if (buttonState == HIGH) {
    myServo.write(90);  // Move the servo to 90 degrees when the button is pressed
  } else {
    myServo.write(0);   // Move the servo back to 0 degrees when the button is released
  }
}
Code File
- File Name: sketch.ino
- File Extension: .ino