
Arduino Mega 2560-Based Health Monitoring System with I2C LCD Display
View and Edit Project In Cirkit Designer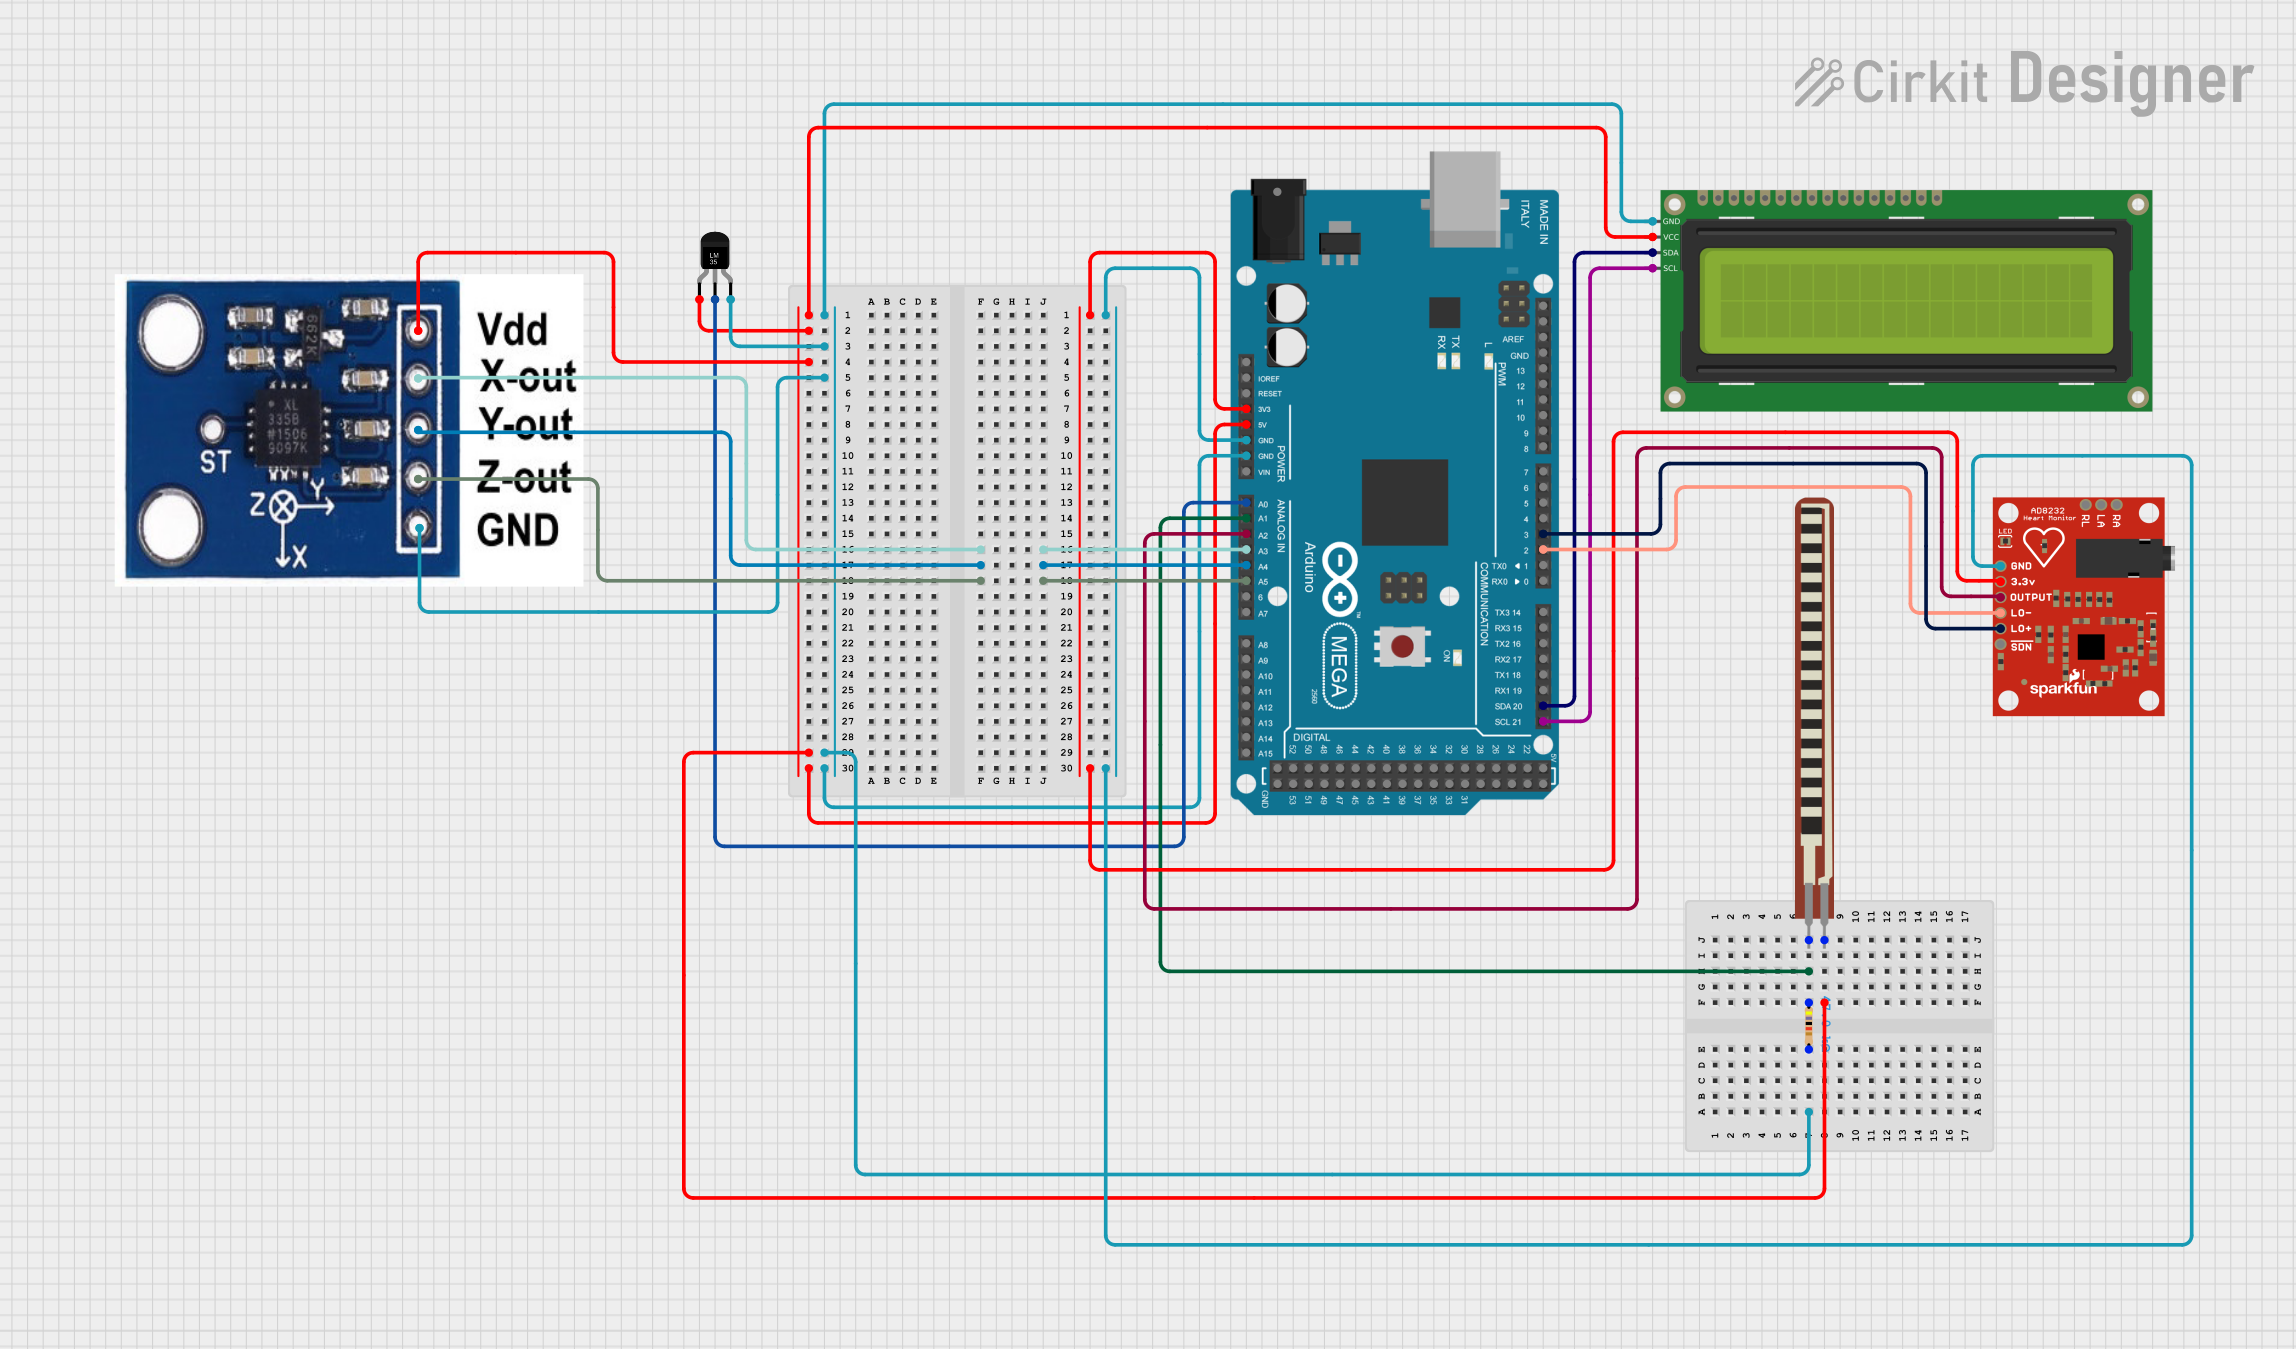
Circuit Documentation
Summary
This document provides a detailed overview of a circuit that includes an Arduino Mega 2560 microcontroller, a 16x2 I2C LCD, a Temperature Sensor (LM35), a 2.2 inch Basic Flex Resistor, a 47k Ohm Resistor, an AD8232 HeartRate Monitor, and an ADXXL335 accelerometer. The circuit is designed to interface these components with the Arduino Mega 2560 for various sensor readings and display outputs.
Component List
Arduino Mega 2560
- Description: A microcontroller board based on the ATmega2560.
- Pins: IOREF, RESET, 3V3, 5V, GND, VIN, A0-A15, D0-D53, AREF, SDA, SCL
16x2 I2C LCD
- Description: A 16x2 character LCD display with I2C interface.
- Pins: GND, VCC, SDA, SCL
Temperature Sensor (LM35)
- Description: A precision centigrade temperature sensor.
- Pins: +Vs, Vout, GND
2.2 inch Basic Flex Resistor
- Description: A flexible resistor that changes resistance when bent.
- Pins: Pin 1, Pin 2
Resistor
- Description: A 47k Ohm resistor.
- Pins: pin1, pin2
- Properties: Resistance: 47000 Ohms
AD8232 HeartRate Monitor
- Description: A heart rate monitor front end.
- Pins: GND, 3.3v, OUTPUT, LO-, LO+, SDN, RA, LA, RL
ADXXL335
- Description: A 3-axis accelerometer.
- Pins: VCC, X-OUT, Y-OUT, Z-OUT, GND
Wiring Details
Arduino Mega 2560
- A0: Connected to Vout of Temperature Sensor (LM35)
- A1: Connected to pin1 of Resistor and Pin 2 of 2.2 inch Basic Flex Resistor
- A2: Connected to OUTPUT of AD8232 HeartRate Monitor
- A3: Connected to X-OUT of ADXXL335
- A4: Connected to Y-OUT of ADXXL335
- A5: Connected to Z-OUT of ADXXL335
- 5V: Connected to VCC of 16x2 I2C LCD, +Vs of Temperature Sensor (LM35), VCC of ADXXL335, and pin 1 of 2.2 inch Basic Flex Resistor
- 3V3: Connected to 3.3v of AD8232 HeartRate Monitor
- GND: Connected to GND of 16x2 I2C LCD, GND of Temperature Sensor (LM35), GND of ADXXL335, GND of AD8232 HeartRate Monitor, and pin2 of Resistor
- D21/SCL: Connected to SCL of 16x2 I2C LCD
- D20/SDA: Connected to SDA of 16x2 I2C LCD
- D2 PWM: Connected to LO- of AD8232 HeartRate Monitor
- D3 PWM: Connected to LO+ of AD8232 HeartRate Monitor
16x2 I2C LCD
- GND: Connected to GND of Arduino Mega 2560, GND of Temperature Sensor (LM35), GND of ADXXL335, and pin2 of Resistor
- VCC: Connected to 5V of Arduino Mega 2560, +Vs of Temperature Sensor (LM35), VCC of ADXXL335, and pin 1 of 2.2 inch Basic Flex Resistor
- SDA: Connected to D20/SDA of Arduino Mega 2560
- SCL: Connected to D21/SCL of Arduino Mega 2560
Temperature Sensor (LM35)
- +Vs: Connected to 5V of Arduino Mega 2560, VCC of 16x2 I2C LCD, VCC of ADXXL335, and pin 1 of 2.2 inch Basic Flex Resistor
- Vout: Connected to A0 of Arduino Mega 2560
- GND: Connected to GND of Arduino Mega 2560, GND of 16x2 I2C LCD, GND of ADXXL335, and pin2 of Resistor
2.2 inch Basic Flex Resistor
- Pin 1: Connected to 5V of Arduino Mega 2560, VCC of 16x2 I2C LCD, +Vs of Temperature Sensor (LM35), and VCC of ADXXL335
- Pin 2: Connected to pin1 of Resistor and A1 of Arduino Mega 2560
Resistor
- pin1: Connected to Pin 2 of 2.2 inch Basic Flex Resistor and A1 of Arduino Mega 2560
- pin2: Connected to GND of Arduino Mega 2560, GND of 16x2 I2C LCD, GND of Temperature Sensor (LM35), and GND of ADXXL335
AD8232 HeartRate Monitor
- GND: Connected to GND of Arduino Mega 2560
- 3.3v: Connected to 3V3 of Arduino Mega 2560
- OUTPUT: Connected to A2 of Arduino Mega 2560
- LO-: Connected to D2 PWM of Arduino Mega 2560
- LO+: Connected to D3 PWM of Arduino Mega 2560
ADXXL335
- VCC: Connected to 5V of Arduino Mega 2560, VCC of 16x2 I2C LCD, +Vs of Temperature Sensor (LM35), and pin 1 of 2.2 inch Basic Flex Resistor
- X-OUT: Connected to A3 of Arduino Mega 2560
- Y-OUT: Connected to A4 of Arduino Mega 2560
- Z-OUT: Connected to A5 of Arduino Mega 2560
- GND: Connected to GND of Arduino Mega 2560, GND of 16x2 I2C LCD, GND of Temperature Sensor (LM35), and pin2 of Resistor
Documented Code
Arduino Mega 2560 Code
void setup() {
  // put your setup code here, to run once:

}

void loop() {
  // put your main code here, to run repeatedly:

}
This code is a basic template for the Arduino Mega 2560. The setup function is used to initialize any settings or configurations, and the loop function contains the main code that runs repeatedly.